Virtual Health Record (VHR) allows a user who does not have access to the entire search server to access patient medical records. The amount and type of health information that can be viewed is determined by the permission role assigned by the administrator. All users can access the Patient Lookup page and the Links page (images throughout this guide show it as State Connections). Below is a list of possible user roles and the additional pages they are allowed to view:
- vhr_admin: access to all pages
- vhr: access to all pages, but must enter lookup information in the required fields
- vhr_adt: access to Admits/Discharges/Registrations and Patient Info pages
- vhr_demographics: access to Patient Info page
- vhr_lab: access only to Lab page
- vhr_medications: access to both the administered and the prescribed medication pages
- vhr_radiology: access only to Radiology page
- vhr_transcripts: access to the Transcribed Reports page
Keep in mind that in addition to any of these roles, a user must also be assigned to the searchappliance_search_by_id user group. This is more limited access, and the user cannot access Clinical Reports.
Administrators have the rights to assign and update the VHR user's access through the Users.
Because VHR is configurable, this document shows possibilities. The screens on individual appliances may appear differently from those in the screenshots.
 Click to zoom
Patient Lookup
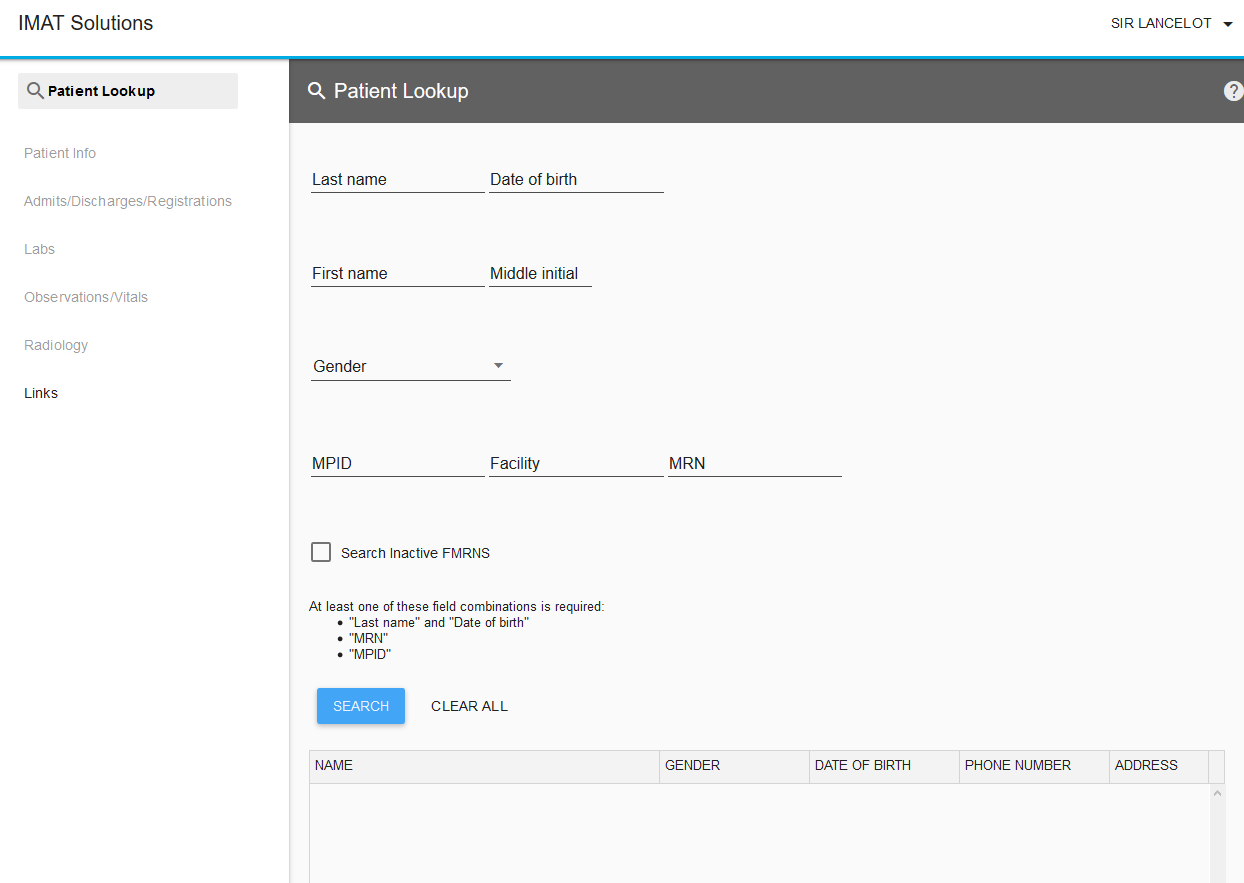
The initial page of VHR is Patient Lookup. A patient search must be completed before any other pages can be viewed, with the exception of the Links page.
Search for a Patient
- Fill in the required fields; they should be marked with either an asterisk or be listed below the search form. All other fields are optional and are used for narrowing the search results.
- A metaphone search is allowed on the last name field.
- The first name field can be entered as a wild card search with three or more characters: JON produces Joni, Jonas, and Jonathan as results.
- The format for the date of birth should be mm/dd/yyyy.
- Click .
- Click on the correct patient in the search results.
If the user has been added to a group that is granted PHI Access, he or she can proceed from this point to approved pages according to the user's VHR roles. Depending on the configuration, the user may be asked to choose a reason for access or to agree to certain terms. If only one patient results from the search, that patient is automatically selected, and the user is redirected to the landing page.
System Timeout
If on any page the screen is inactive for a preset time period, the system times out and returns the user to the login page. A warning appears one minute before the system logs the user out.
Toolbar
Each page that contains patient records comes equipped with a toolbar. The toolbar is used to filter, view, and print records.
If, at any point, any of the toolbar options are unavailable, the icons appear in gray. The filter icon also turns into an outline instead of being solid.

Refresh
Pressing refresh runs the report again to refresh the data. It clears any filters applied to the page.

Filter
Click this button to display and apply filters to the patient records. Filter options vary depending on the page but generally include Search, Facility, Provider, From date, and To date. Clear the filter by either pressing Clear Filter or by pressing the Refresh button on the toolbar.
Because it is a toggle button, hide the filter options by clicking the button again.
If filtering is not available, the icon appears as a gray outline.

View Records
When in this view, it is possible to click on a record in the result list to view the record.

Select to Print
When this view is selected, it allows the user to select multiple records at a time and add them to a print queue. You cannot view records from the SELECT TO PRINT view.
 Click to zoom
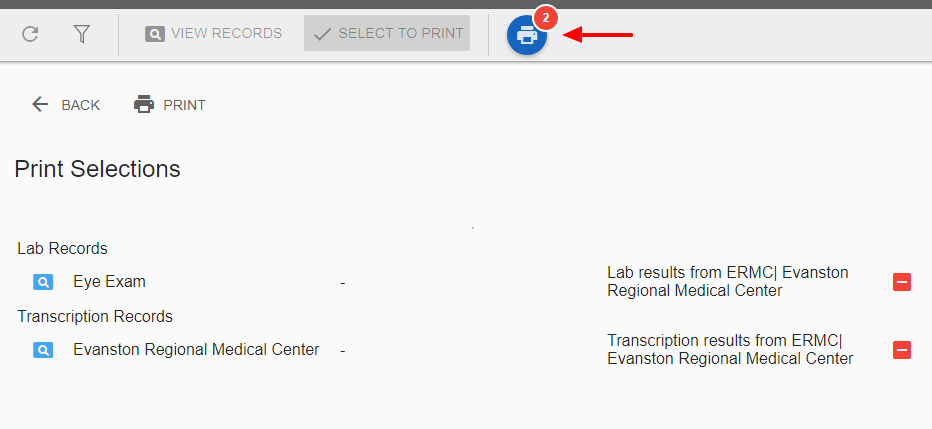
The print view displays the number of records in the queue. Items remain in the list while other views or pages are chosen. Press the button to see the list of records. While viewing the list, it is possible either to click on the magnifying glass, , to view the record or to press the minus, , to remove the record from the queue.
Press PRINT while viewing the list of queued reports to print all records at once.
If any of the records you are printing have behavioral health information on it, all documents in that printed batch will have a watermark on it that reads, "Confidential 42 CFR Part 2."
 Click to zoom
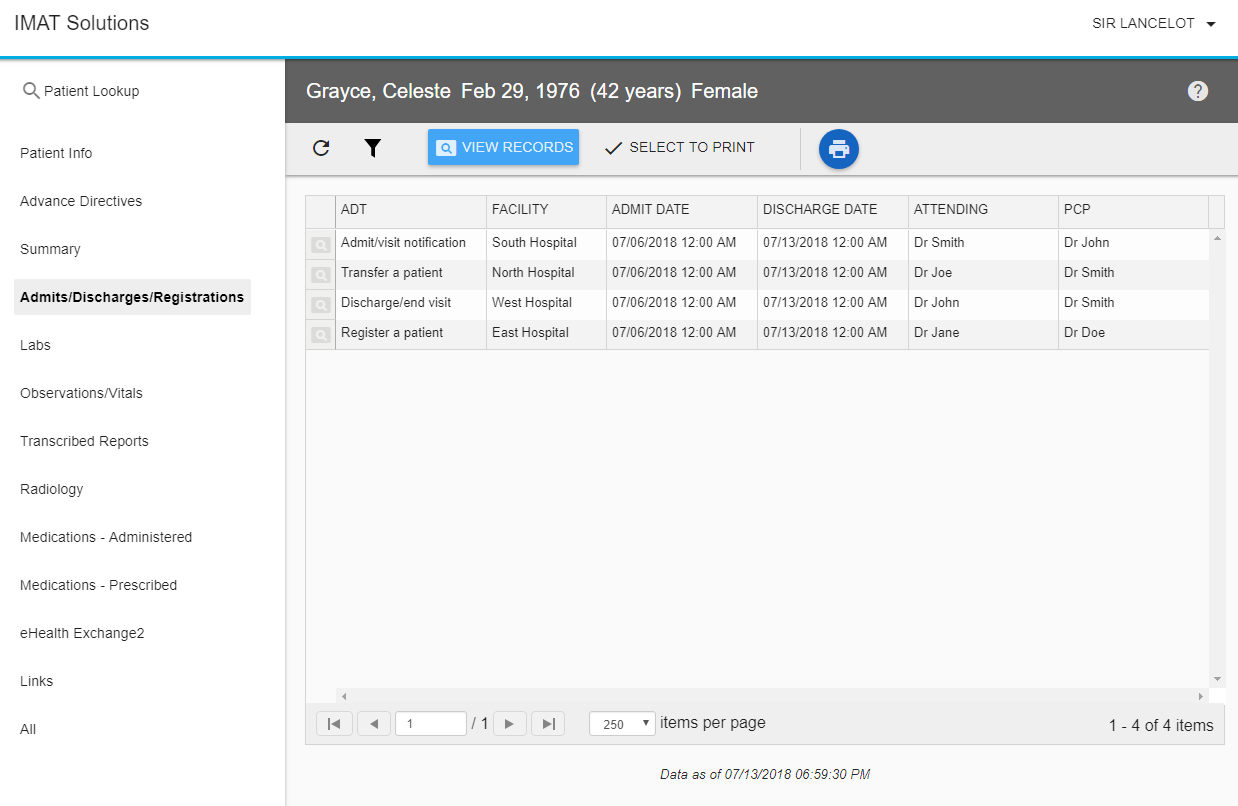
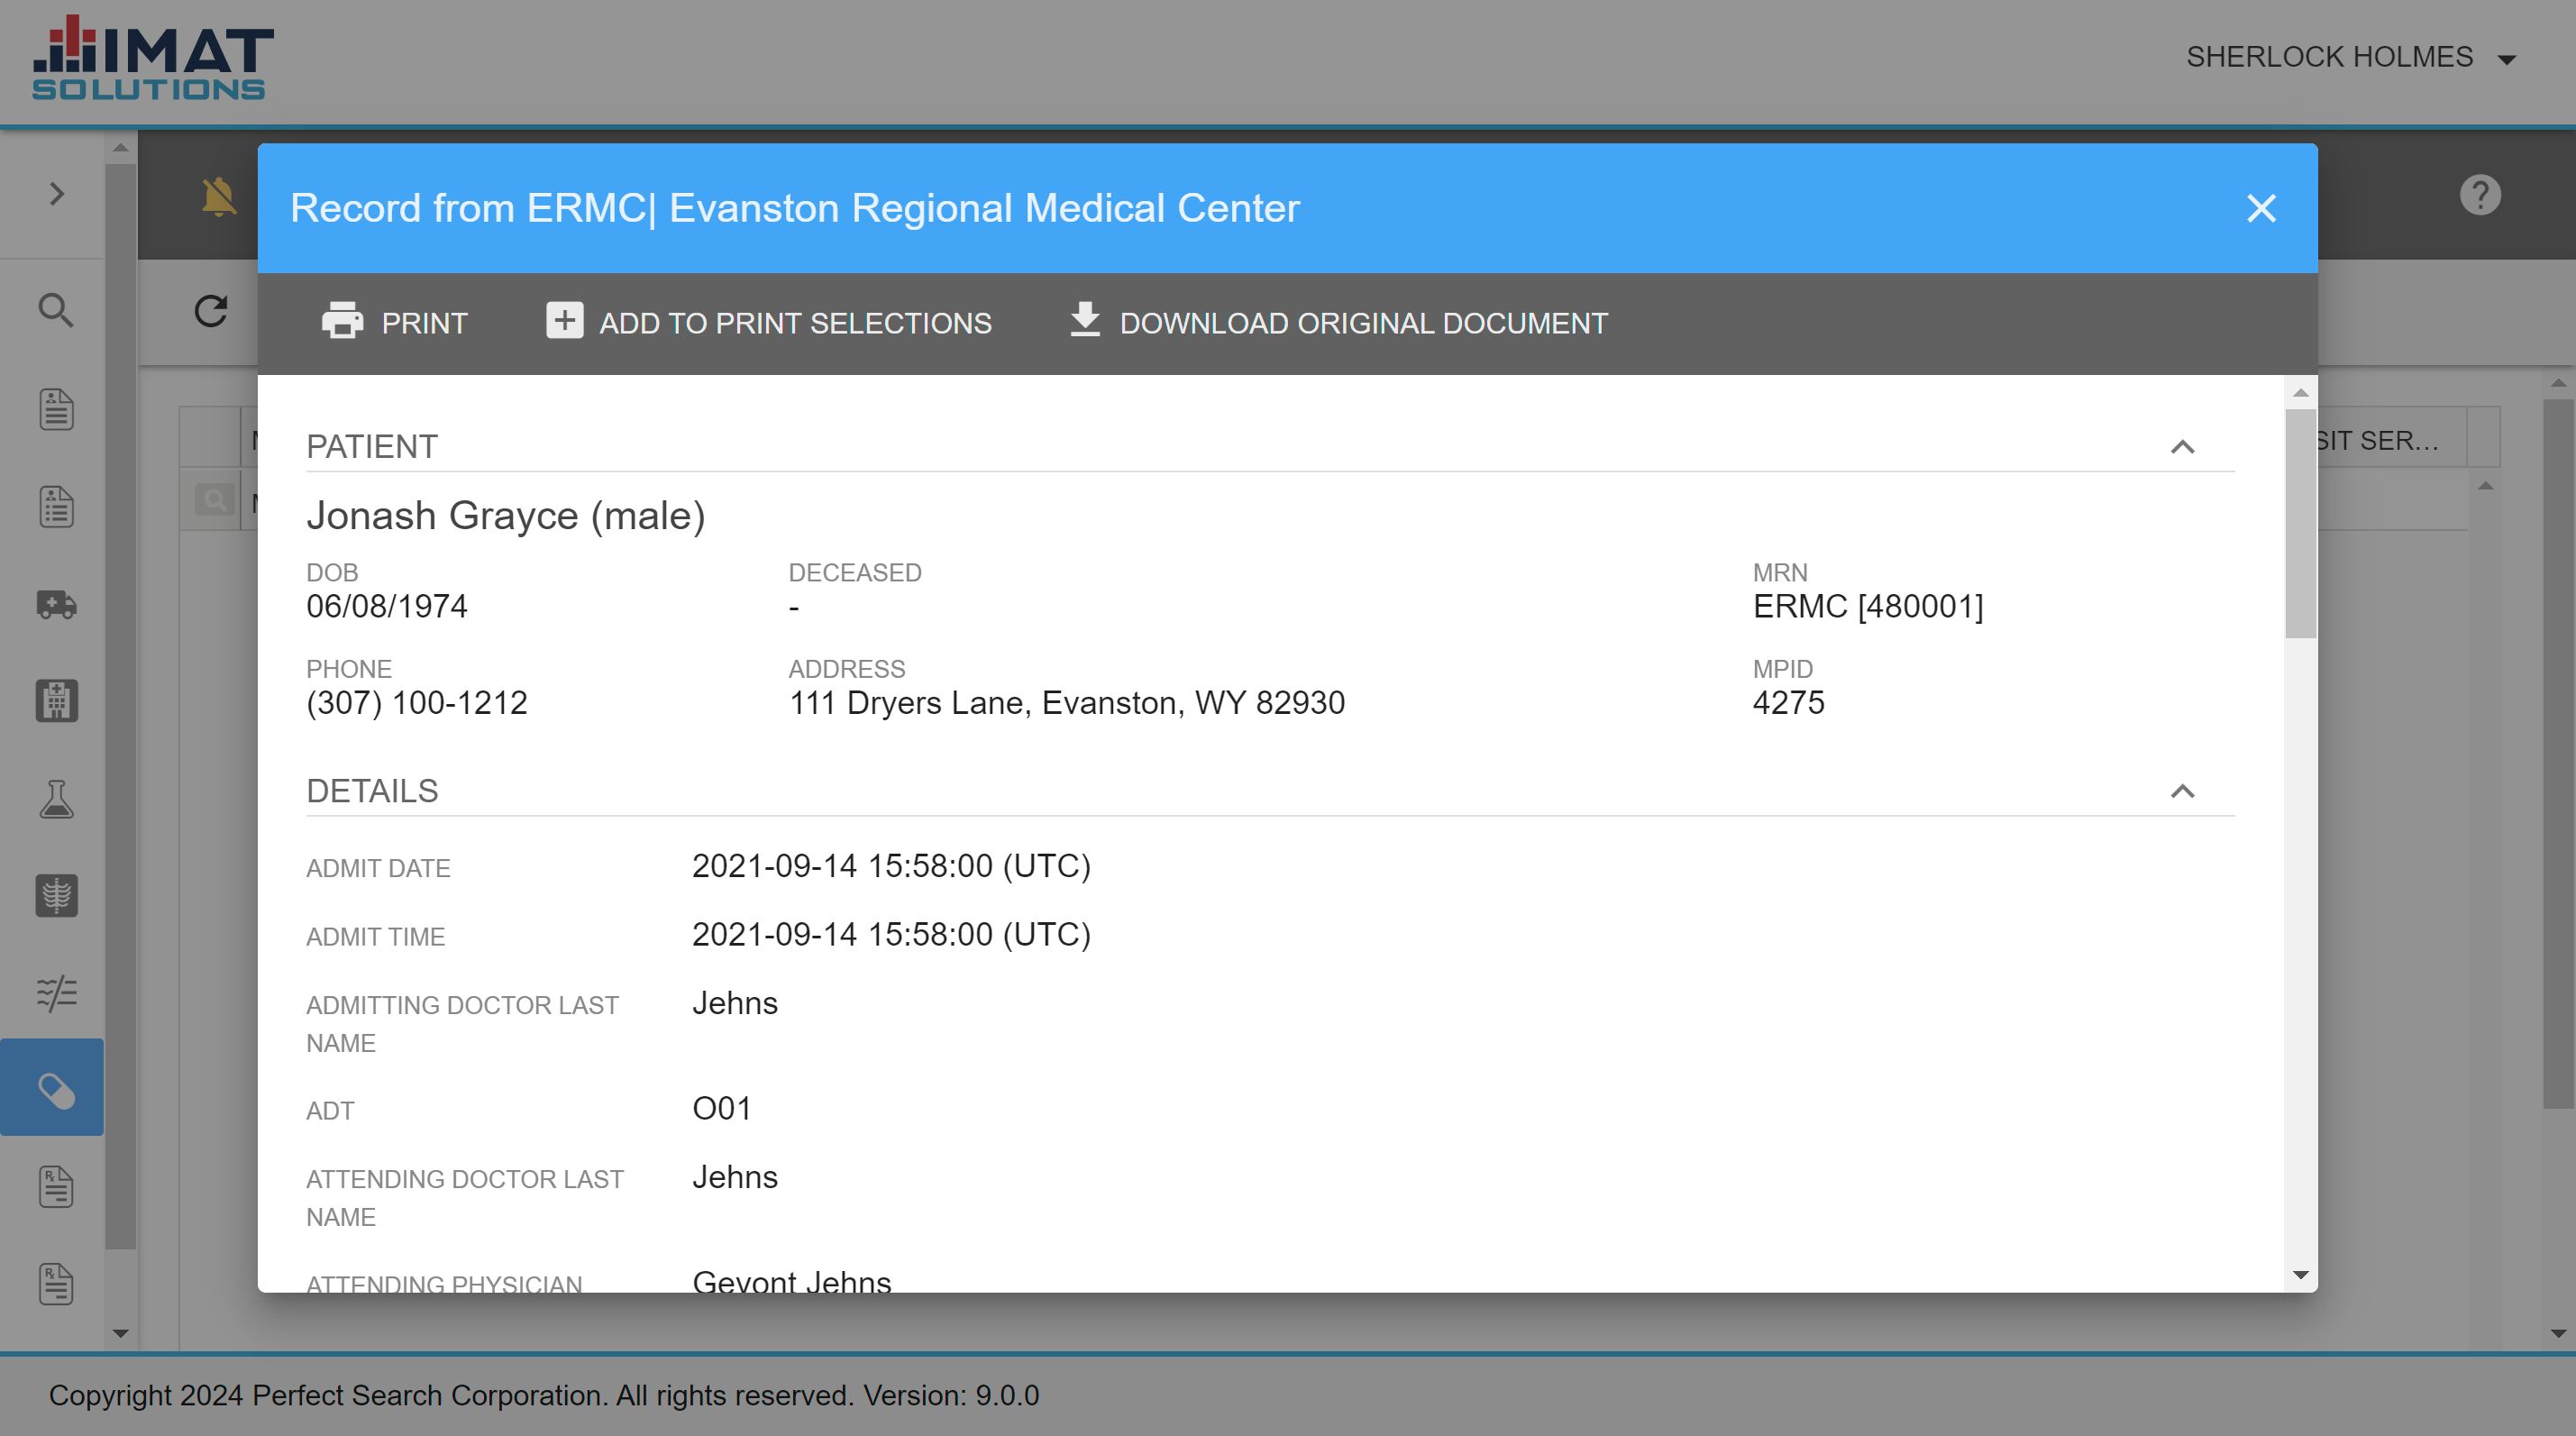
Admits / Discharges / Registrations
The ADT page shows all the admissions, discharges, transfers, and registrations of the patient.
To view the record, click anywhere on the record line. While still in the record viewing screen, print the record by pressing PRINT or add it to the print list by pressing ADD TO PRINT SELECTIONS. Click DOWNLOAD ORIGINAL DOCUMENT to download the document.
 Click to zoom
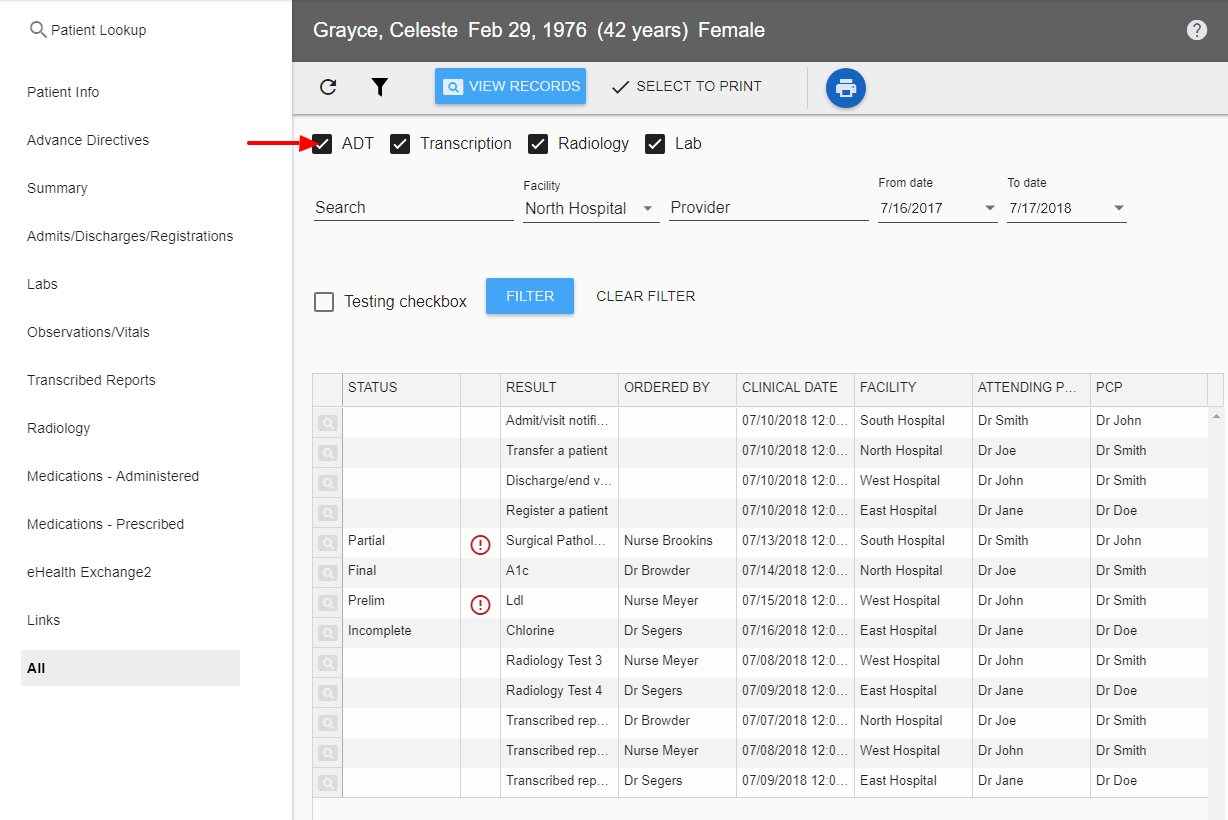
All
The All page is available to those that are set to VHR Admin and VHR User levels. Here all the ADT, Transcription, Radiology, or Lab records for the patient can be seen.
Filter Information
- Click the filter icon to display the options.
- Deselect one or more of the checked boxes at the top of the screen under the patient information: ADT, Transcription, Radiology, or Lab. The four options are turned on by default.
- Apply other filters as desired: keyword search, facility, provider, and date range.
- Press .
To view the record, click anywhere on the record line. While still in the record viewing screen, print the record by pressing PRINT or add it to the print list by pressing ADD TO PRINT SELECTIONS. Click DOWNLOAD ORIGINAL DOCUMENT to download the document.
An alert, , appears to indicate an abnormality in any of the lab results.
CCDs
Continuity of Care Documents are accessible for viewing, provided they've been configured. Open each document by clicking on it while you are in the VIEW RECORD mode. Print records by selecting them while in the SELECT TO PRINT mode.
.png) Click to zoom
Click to zoom Click to zoom
Lab
View lab results of the patient by visiting the Lab page.
Add a filter to restrict the number of returned results by filling in one or more of the provided fields. Press Filter to apply the changes. To view the record, click anywhere on the record line.
The patient's demographic information is displayed at the top along with additional information on the lab itself. If attachments are available, the first appears just below the lab information. Check the box to view the attachment. Note that there could be more than one attachment. Scroll through the record to view any other attachments that may be available.
There may be a link provided in the Line Notes column. Click on the link to jump to the corresponding note further down the page.
As with most other records that can be clicked on in VHR, the original document is available for viewing at the bottom of the record screen. Scroll to the bottom and check the box to make it visible.
While still in the record viewing screen, print the record by pressing PRINT or add it to the print list by pressing ADD TO PRINT SELECTIONS. Click DOWNLOAD ORIGINAL DOCUMENT to download the document.
An alert, , appears to indicate an abnormality in any of the lab results.
 Click to zoom
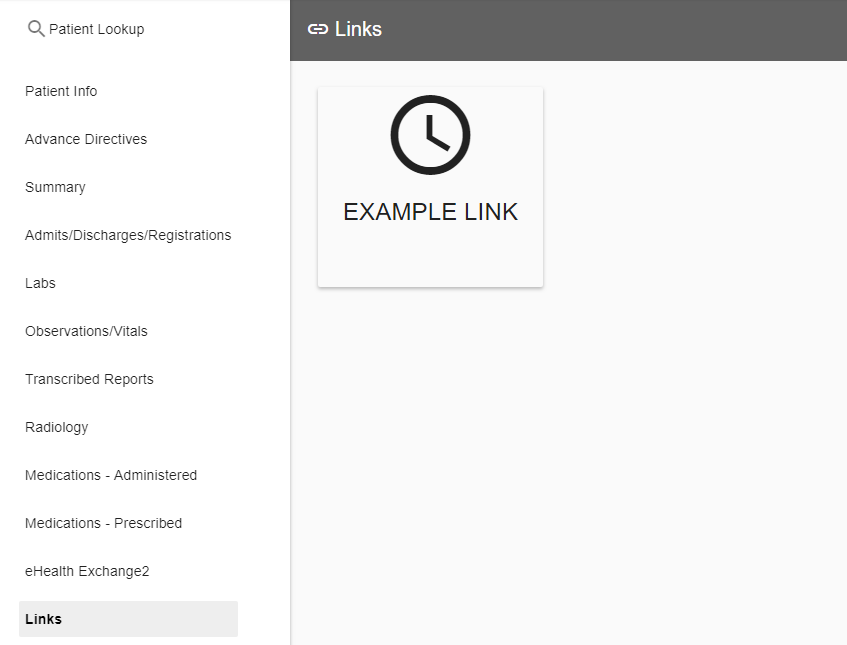
Links
This page can be customized according to the organization's needs. It provides links to any outside source that may be useful to the user: state forms, reference sources, organizations' home pages, etc. Click on the tile created to open the web page.
The administrator is able to customize the file in the VHR Configuration section of Admin.
 Click to zoom
Medications - Administered
This page shows the administered medications to the patient. The dosage is displayed as well as the medication. Clicking on the medication opens the record.
To view the record, click anywhere on the record line. While still in the record viewing screen, print the record by pressing PRINT or add it to the print list by pressing ADD TO PRINT SELECTIONS. Click DOWNLOAD ORIGINAL DOCUMENT to download the document.
 Click to zoom
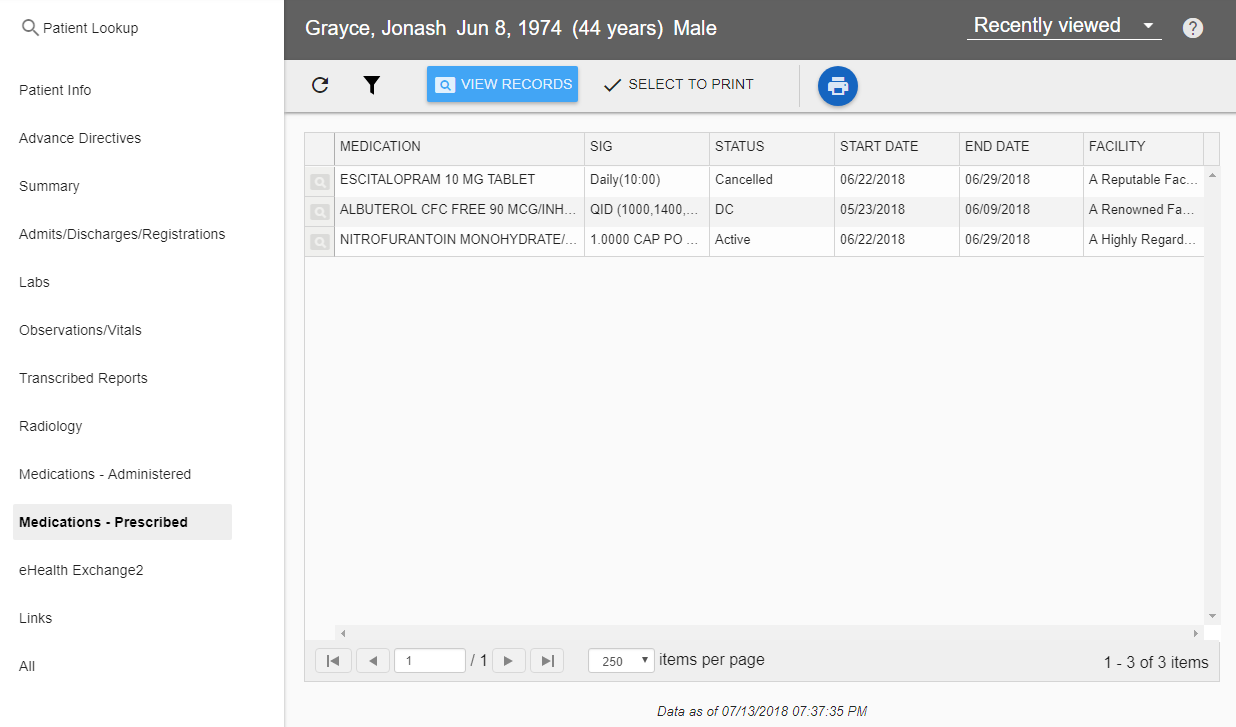
Medications - Prescribed
This page lists all the medications prescribed to the patient. It differs from the administered medication page in that it has dosage instructions included.
To view the record, click anywhere on the record line. While still in the record viewing screen, print the record by pressing PRINT or add it to the print list by pressing ADD TO PRINT SELECTIONS. Click DOWNLOAD ORIGINAL DOCUMENT to download the document.
 Click to zoom
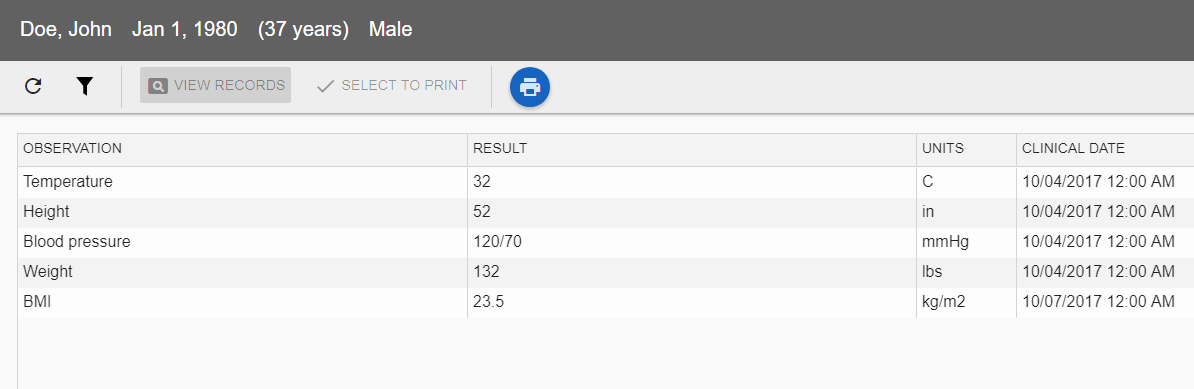
Observations/Vitals
The Observations/Vitals page displays the vital measurements of the patient, such as temperature, BMI, and weight. When on this page, both VIEW RECORDS and SELECT TO PRINT are disabled on the toolbar.
 Click to zoom
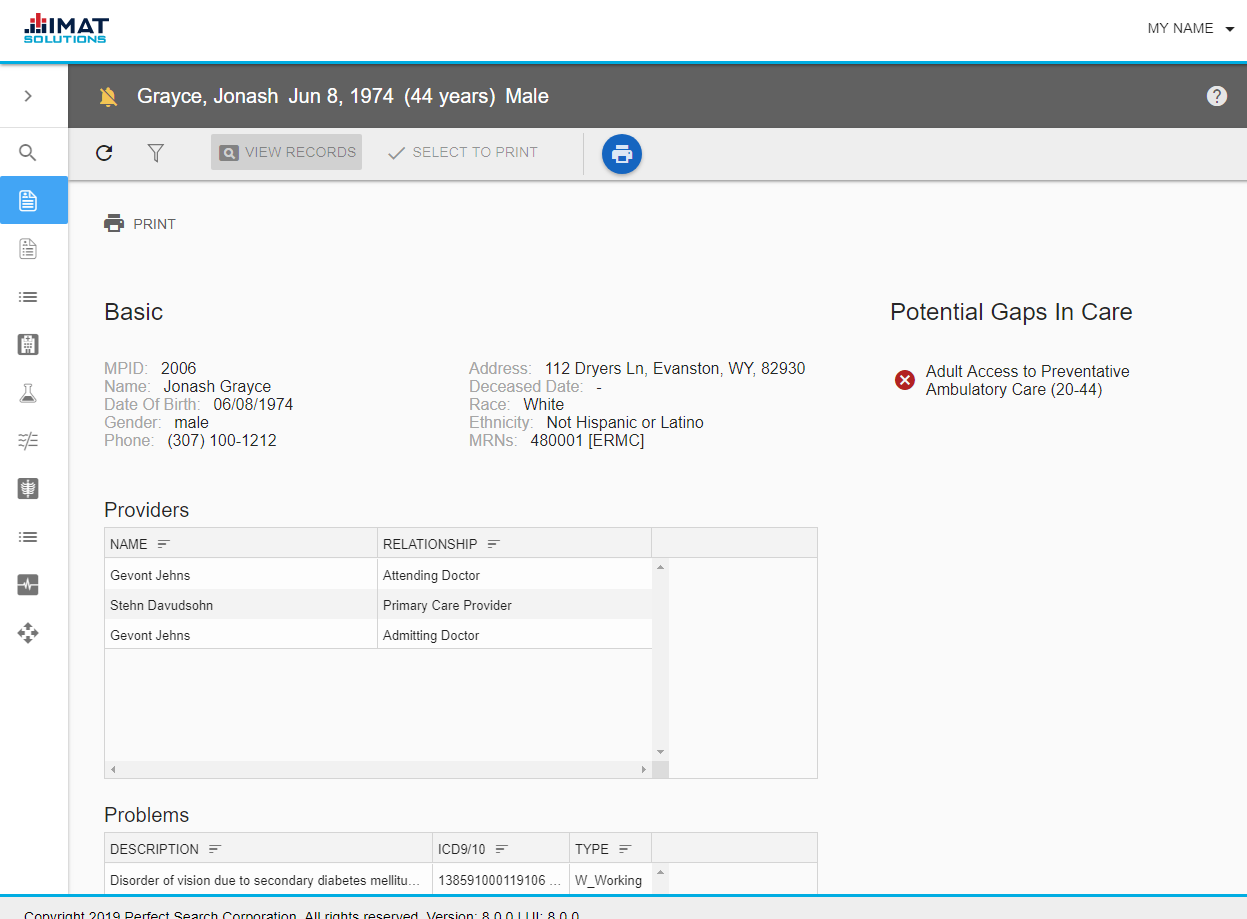
Patient Info
The Patient Info page is designed to display important background information on a patient:
- Basic: demographic information
- Allergies: recorded allergies
- Medications: recorded medications
- Problems: recorded diagnosis
- Medical Insurance: the patient's insurance company
- Providers: the providers on record for the patient
- Gaps in Care: areas where medical care is possibly lacking given the patient's current medical records
 Click to zoom
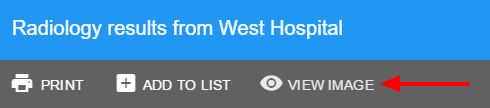 Click to zoom
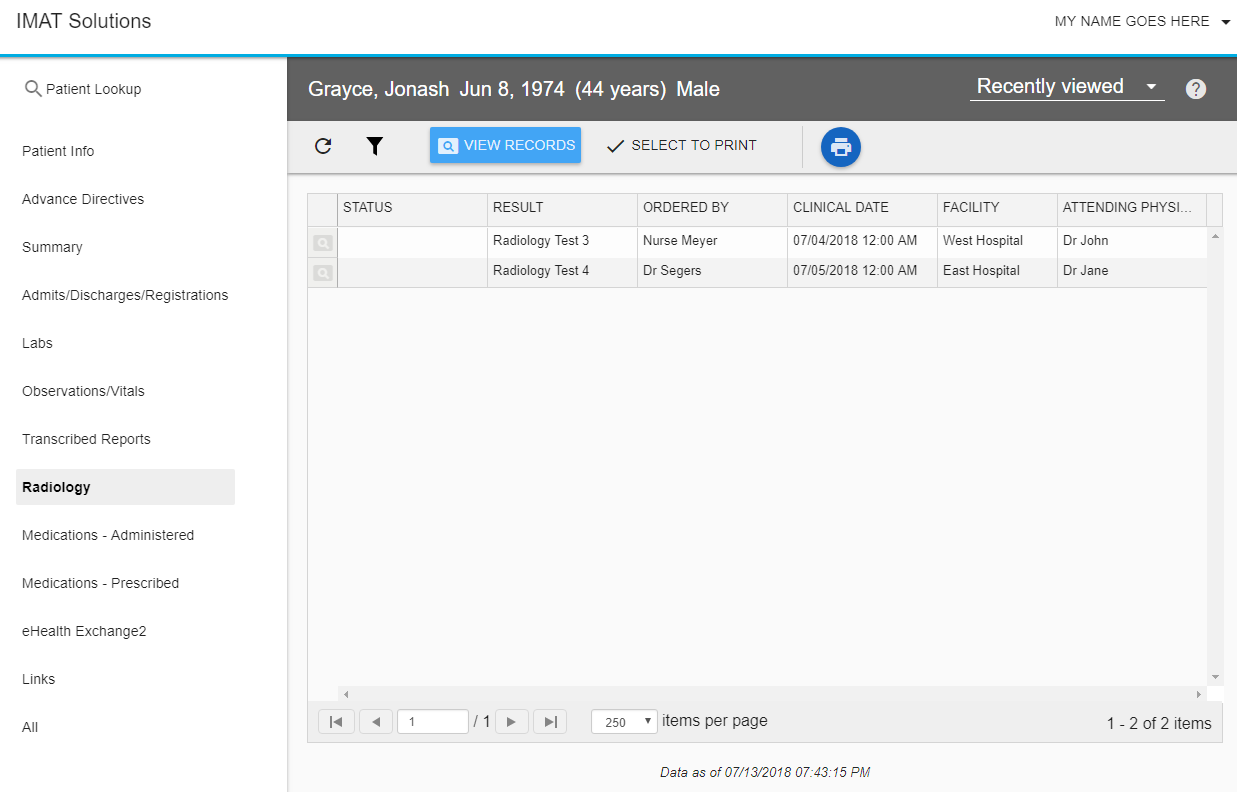
Radiology
Access radiology records and images with the Radiology page.
Add a filter to restrict the number of returned results by filling in one or more of the provided fields. Press Filter to apply the changes.
To view the record, click anywhere on the record line. If a pdf image is available, it is displayed when the record is selected. While still in the record viewing screen, print the record by pressing PRINT or add it to the print list by pressing ADD TO PRINT SELECTIONS. Click DOWNLOAD ORIGINAL DOCUMENT to download the document.
Some images are available through a third party. To view the image, click on the viewing icon (found in the gray bar at the top) to open the image link.
.png) Click to zoom
Click to zoomSummary
The summary shows the five most recent records from the Admits/Discharges/Registrations, Labs, Radiology, and Transcribed Reports.
- Enter any restrictions at the top to create a filter.
- Click on any heading to go to that page. If filters already exist for the Summary page, clicking on a header opens that page with the filters already in place.
- Click on any record to view a specific record. While still in the record viewing screen, print the record by pressing PRINT or add it to the print list by pressing ADD TO PRINT SELECTIONS.
OR
If in SELECT TO PRINT mode, click the check mark to add to the print list. - Click DOWNLOAD ORIGINAL DOCUMENT to download the document.
Transcribed Reports
All the transcribed reports for the patient are found on this page. These include records that are not found on the ADTs, Labs, or Radiology pages. Add a filter to restrict the number of returned results by filling in one or more of the provided fields. Press to apply the changes. Click on the magnifying glass (while in VIEW RECORDS mode) on the left to view the record.
While still in the viewing record screen, print the record by pressing PRINT or add it to the print list by pressing ADD TO PRINT SELECTIONS. Click DOWNLOAD ORIGINAL DOCUMENT to download the document.
 Click to zoom
View Recent Records
After one record has been viewed, Recently viewed records appears. Click on it to view the ten most recently viewed records. This applies only to the current patient. As soon as a new patient is selected, the list of recently viewed items is cleared and a new list is created.
Administrators may configure these pages through the VHR Configuration pages.