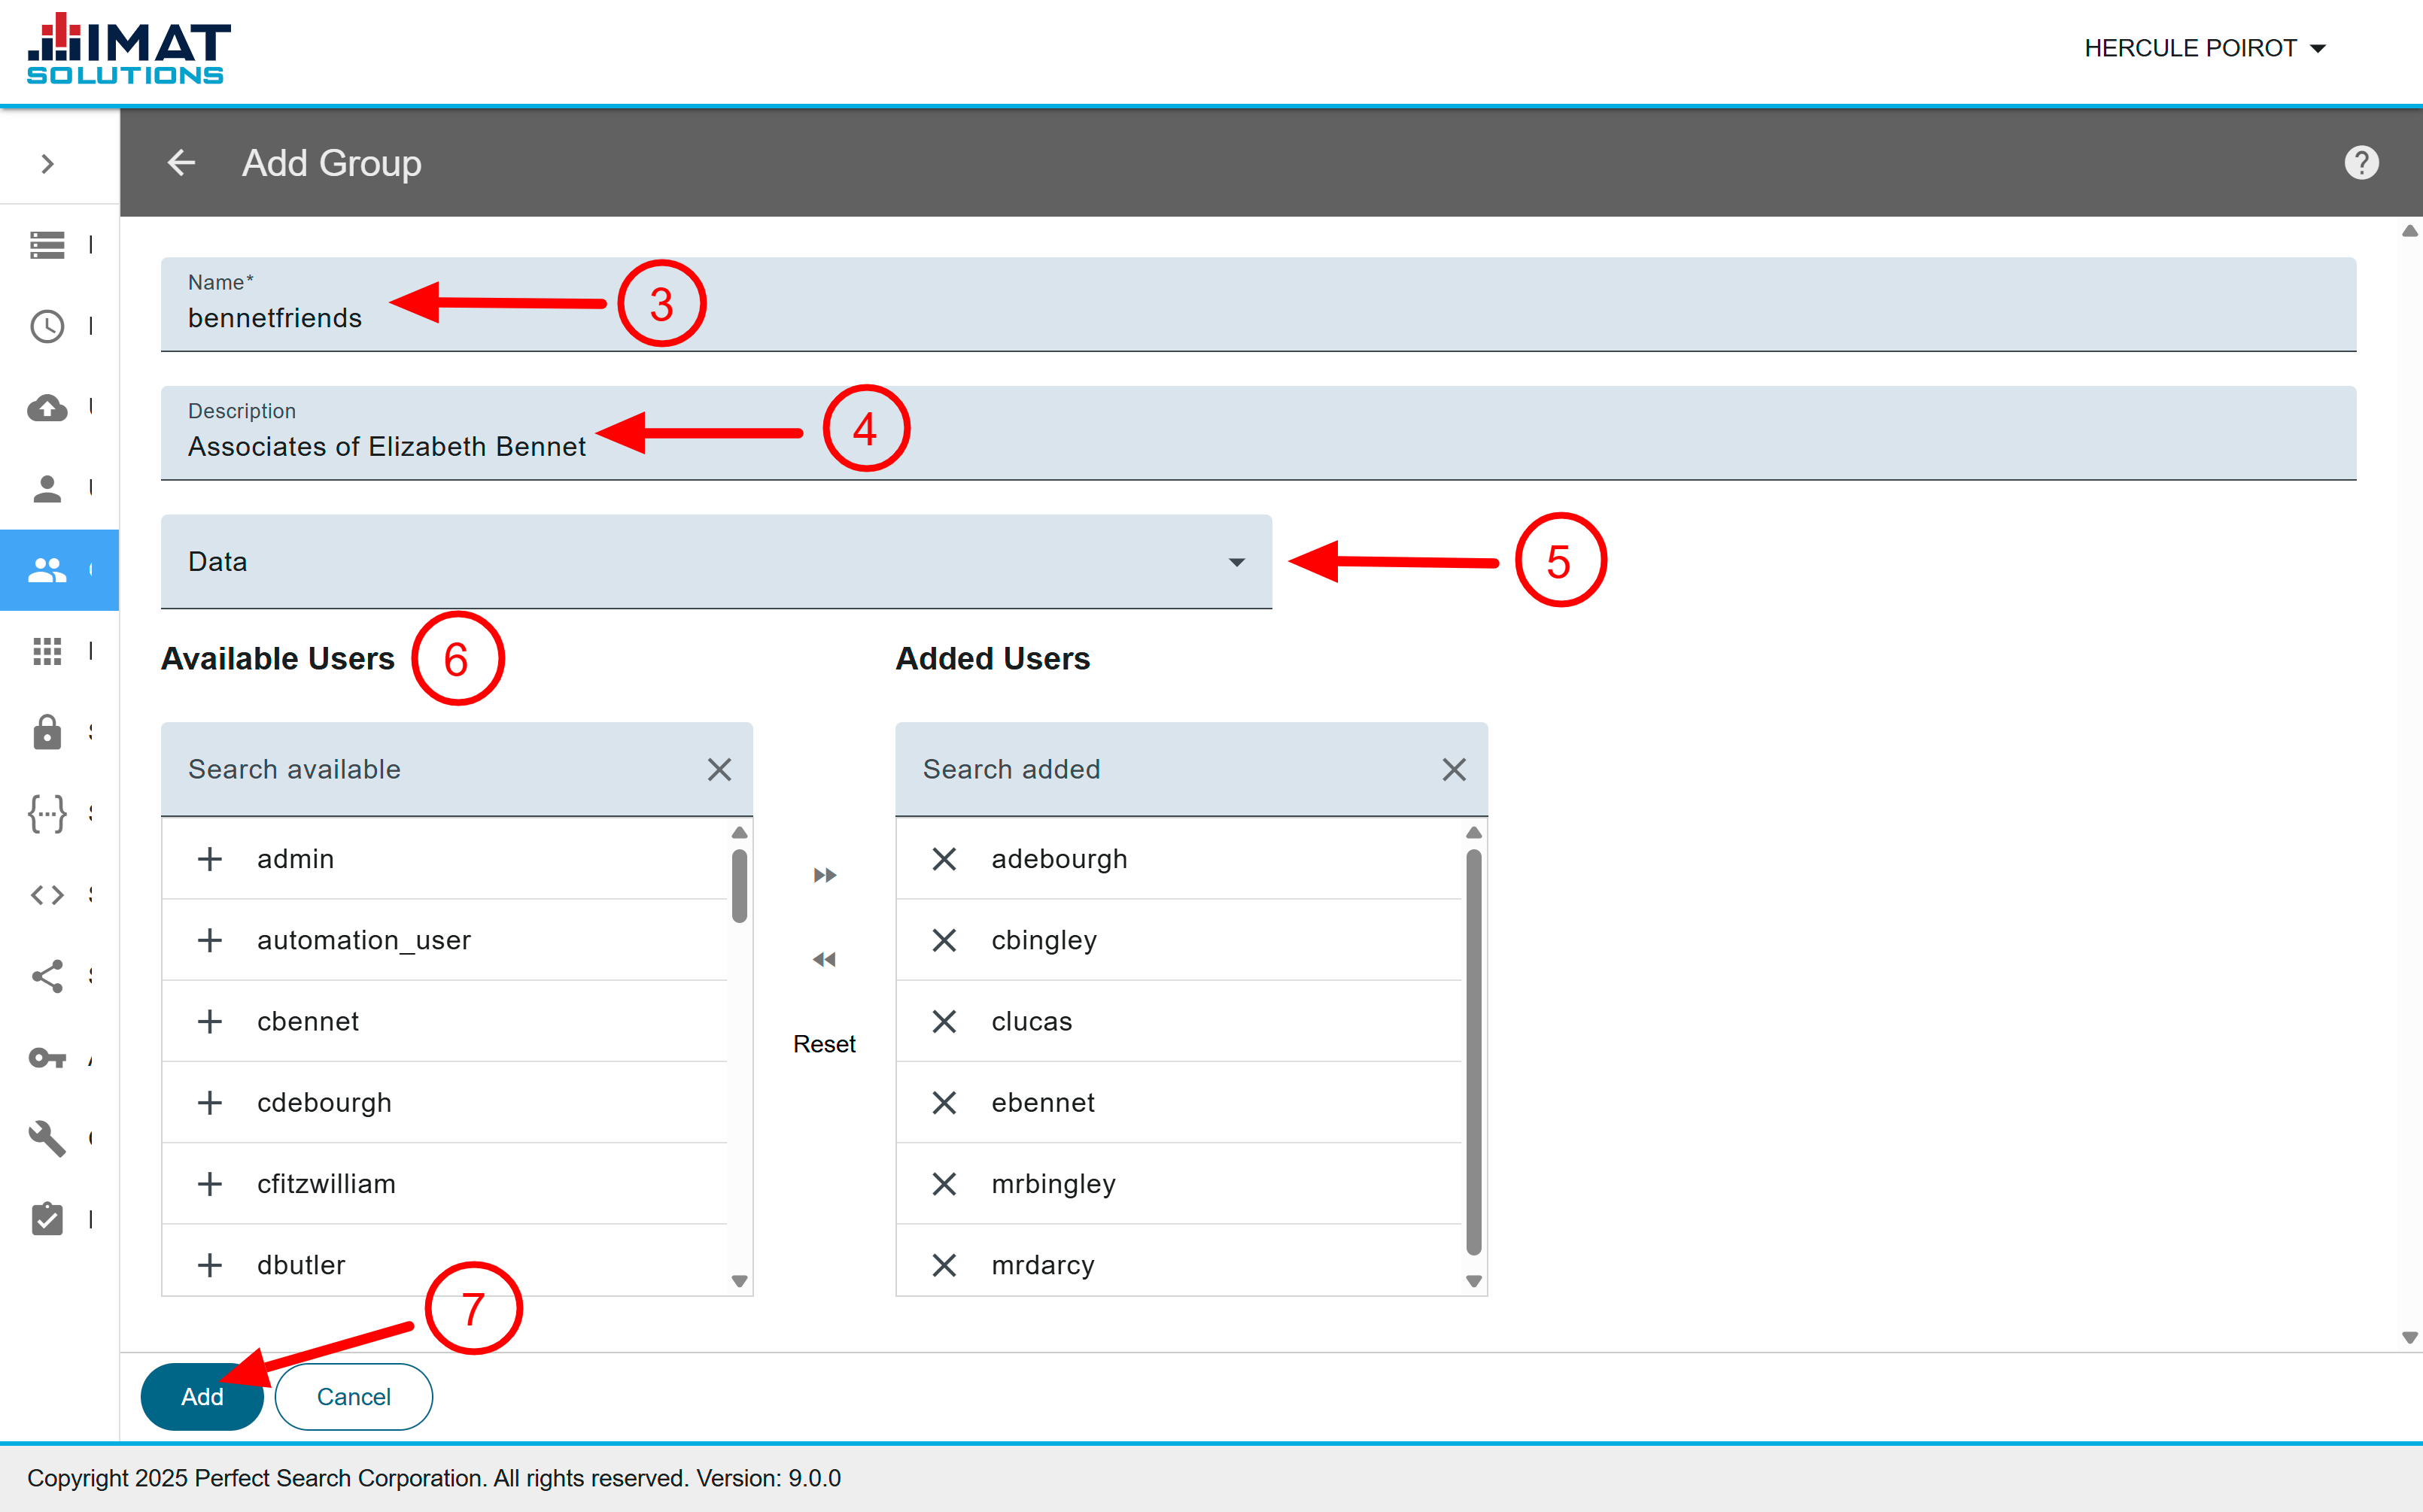
Create groups of users to allow multiple users access to the same information. Groups are useful for security reasons and creating collections.
 Click on image to zoom
Create Groups
- In the Navigation menu, click Groups.
- Click found in the top right corner.
- In the Name field, enter a name for the group. This field is required and cannot be edited once a group is saved. Group names are not allowed spaces. You may use camel case or underscores to help distinguish words: GreatDetectives or great_detectives. Only alphanumeric and underscore characters are allowed.
- In the Description field, enter the description for the group.
- Select the Group type. This field is required and cannot be edited once a group is saved. For now, this helps identify the purpose for the group.
- In the Available Users area, click next to the user to add him or her to the group. The user appears in the Added Users section below the description. Clicking moves all users to Added Users. Users can be added and removed at any point after a group is saved.
- Click .
Perform a search for users by typing the username in the Search Available Users field provided.
Clicking returns you to the list of groups without saving the changes.
Search Appliance Roles
The Search Appliance uses default roles to allow access to different subsystems on the appliance. For example, these roles allow a common user to access the search interface without having permission to use the administration pages.
| Role Name | Role Descriptions |
|---|---|
| Administration and Specialty Roles | |
| searchappliance_ccd_on_demand | This grants the user permission to run the ccd-on-demand plugin report. |
| searchappliance_cds_tools | The role gives the user access to the CDS tool. |
| searchappliance_fhir | This grants access to the FHIR system. The set of FHIR endpoints requires the FHIR role to use them. |
| searchappliance_indexer | Indexer users can configure settings associated with parsing and indexing data. This includes SearchServer, parse table, search table, and stop words settings. It allows access to Admin: Data Management only. |
| searchappliance_mpimanage | The user can add, change, activate, or deactivate MPI records.* |
| searchappliance_nifi | This role grants access to the NiFi system. |
| searchappliance_qrda | This grants permission to the user to run the QRDA plugin report. |
| searchappliance_roi_admin | This allows users to access and use the ROI tool. |
| searchappliance_system | Users can configure settings associated with the Search Appliance, such as the Web server, application interface, and administration portal settings. |
| Search Roles | |
| clinical_reports | This group allows users access to the measures sets. These sets allow users to view measures reports. |
| searchappliance_search | Users can access the Search Appliance search interface. The search group by itself does not allow the user to see results. The user must also be part of a group or security collection that allows access to data. Users do not have access to any of the Admin pages unless given those rights also. |
| searchappliance_search_by_id | Users can run simple and compound queries that are shared with them, but the role does not allow the user to specify new queries or to change reports shared with them. Users have limited access to Clinical Reports. Use this role to create locked-down workflows with compound query that allow a user to accomplish a specific task without being granted general access to the system. This role is used with those using IMAT's VHR or IMAT's ROI. |
| VHR Roles | |
| searchappliance_vhr | VHR users access all pages of VHR, but the search must be done with a minimum of a last name and date of birth.† |
| searchappliance_vhr_admin | Users have access to all the pages of VHR.† |
| searchappliance_vhr_adt | Users have access to the Admits/Discharges/Registrations page.† |
| searchappliance_vhr_demographics | Users have access to the VHR patient information page.† |
| searchappliance_vhr_lab | Users have access to the VHR lab page.† |
| searchappliance_vhr_medications | Users have access to both the VHR prescribed and administered pages.† |
| searchappliance_vhr_radiology | Users have access to the VHR radiology page.† |
| searchappliance_vhr_transcripts | Users have access to the VHR transcribed reports page.† |
| Removed Roles—these roles may appear in versions earlier than the 9.0 release | |
| searchappliance_breakglass | This allows the user temporary unrestricted access to search all of a patient's records in the system. |
| searchappliance_inboxes | Inboxes users can configure inboxes for use with the Push API. Users are given access to only the Uploader in the Admin pages. |
| searchappliance_sftpuser | It gives a user limited access to upload files that can be fed into the search server. Usually, this role is for the person who uploads the files and is created by IMAT's IT department.‡ |
| searchappliance_shell | Users in this role are permitted to SSH into a machine. |
| searchappliance_status | Users can monitor the status of the system. This includes monitoring logs and feed jobs. |
| searchappliance_uncontained_search | Highly-trusted users (normally only system administrators) have access to run a query without any security containment or restrictions on the network or data access. |
| searchappliance_wheel | Members of the wheel role are also put in the system wheel group, which is the administrative group on Red Hat systems, including CentOS. This means that the users of this role have sudo privileges and can access the system as root if needed. |
*All MPI users must also be assigned to searchappliance_search and a security collection.
†All vhr_ users must also be assigned to searchappliance_search_by_id.
‡Wheel and shell roles take precedence over the sftpuser role. If a user is assigned to the sftpuser and one of the other roles, sftpuser is removed from the list of assigned roles.
Role Mapping
Search Appliance role mapping assigns many roles to one group or one role to one group. The roles are structured in a simple hierarchy such that some roles have the same permission as itself and other roles inclusively. For example, the system role can access all systems requiring the system role but can also access all systems that require the indexer, retriever roles, etc. The following table lists the hierarchy in the preconfigured Search Server roles.
| Group Name | Role Permissions |
|---|---|
| searchappliance_ccd_on_demand | ccd_on_demand |
| searchappliance_cds_tools | cds_tools |
| searchappliance_fhir | fhir |
| searchappliance_indexer | indexer and search |
| searchappliance_nifi | nifi |
| searchappliance_mpimanage | mpi_manage* |
| searchappliance_qrda | qrda |
| searchappliance_roi_admin | roi_admin |
| searchappliance_search | search and search_by_id† |
| searchappliance_search_by_id | search_by_id† |
| searchappliance_system | all searchappliance_* roles |
| searchappliance_vhr_admin | vhr_admin, vhr, vhr_adt, vhr_demographics, vhr_lab, vhr_medications, vhr_radiology, and vhr_transcripts† |
| searchappliance_vhr | vhr, vhr_adt, vhr_demographics, vhr_lab, vhr_medications, vhr_radiology, and vhr_transcripts† |
| searchappliance_vhr_adt | vhr_adt† |
| searchappliance_vhr_demographics | vhr_demographics† |
| searchappliance_vhr_lab | vhr_lab† |
| searchappliance_vhr_medications | vhr_medications—administered and prescribed† |
| searchappliance_vhr_radiology | vhr_radiology† |
| searchappliance_vhr_transcripts | vhr_transcribed pages† |
| Removed Roles—these roles may appear in versions earlier than the 9.0 release | |
| searchappliance_breakglass | breakglass |
| searchappliance_inboxes | inboxes |
| searchappliance_sftpuser | SFTP user‡ |
| searchappliance_shell | shell |
| searchappliance_status | status |
| searchappliance_uncontained_search | uncontained_search |
| searchappliance_wheel | wheel and shell |
*All MPI users must also be assigned to searchappliance_search and a security collection.
†All VHR users must also be assigned to search_by_id.
‡Wheel and shell roles take precedence over the sftpuser role. If a user is assigned sftpuser and one of the other roles, sftpuser is removed from the list of assigned roles.
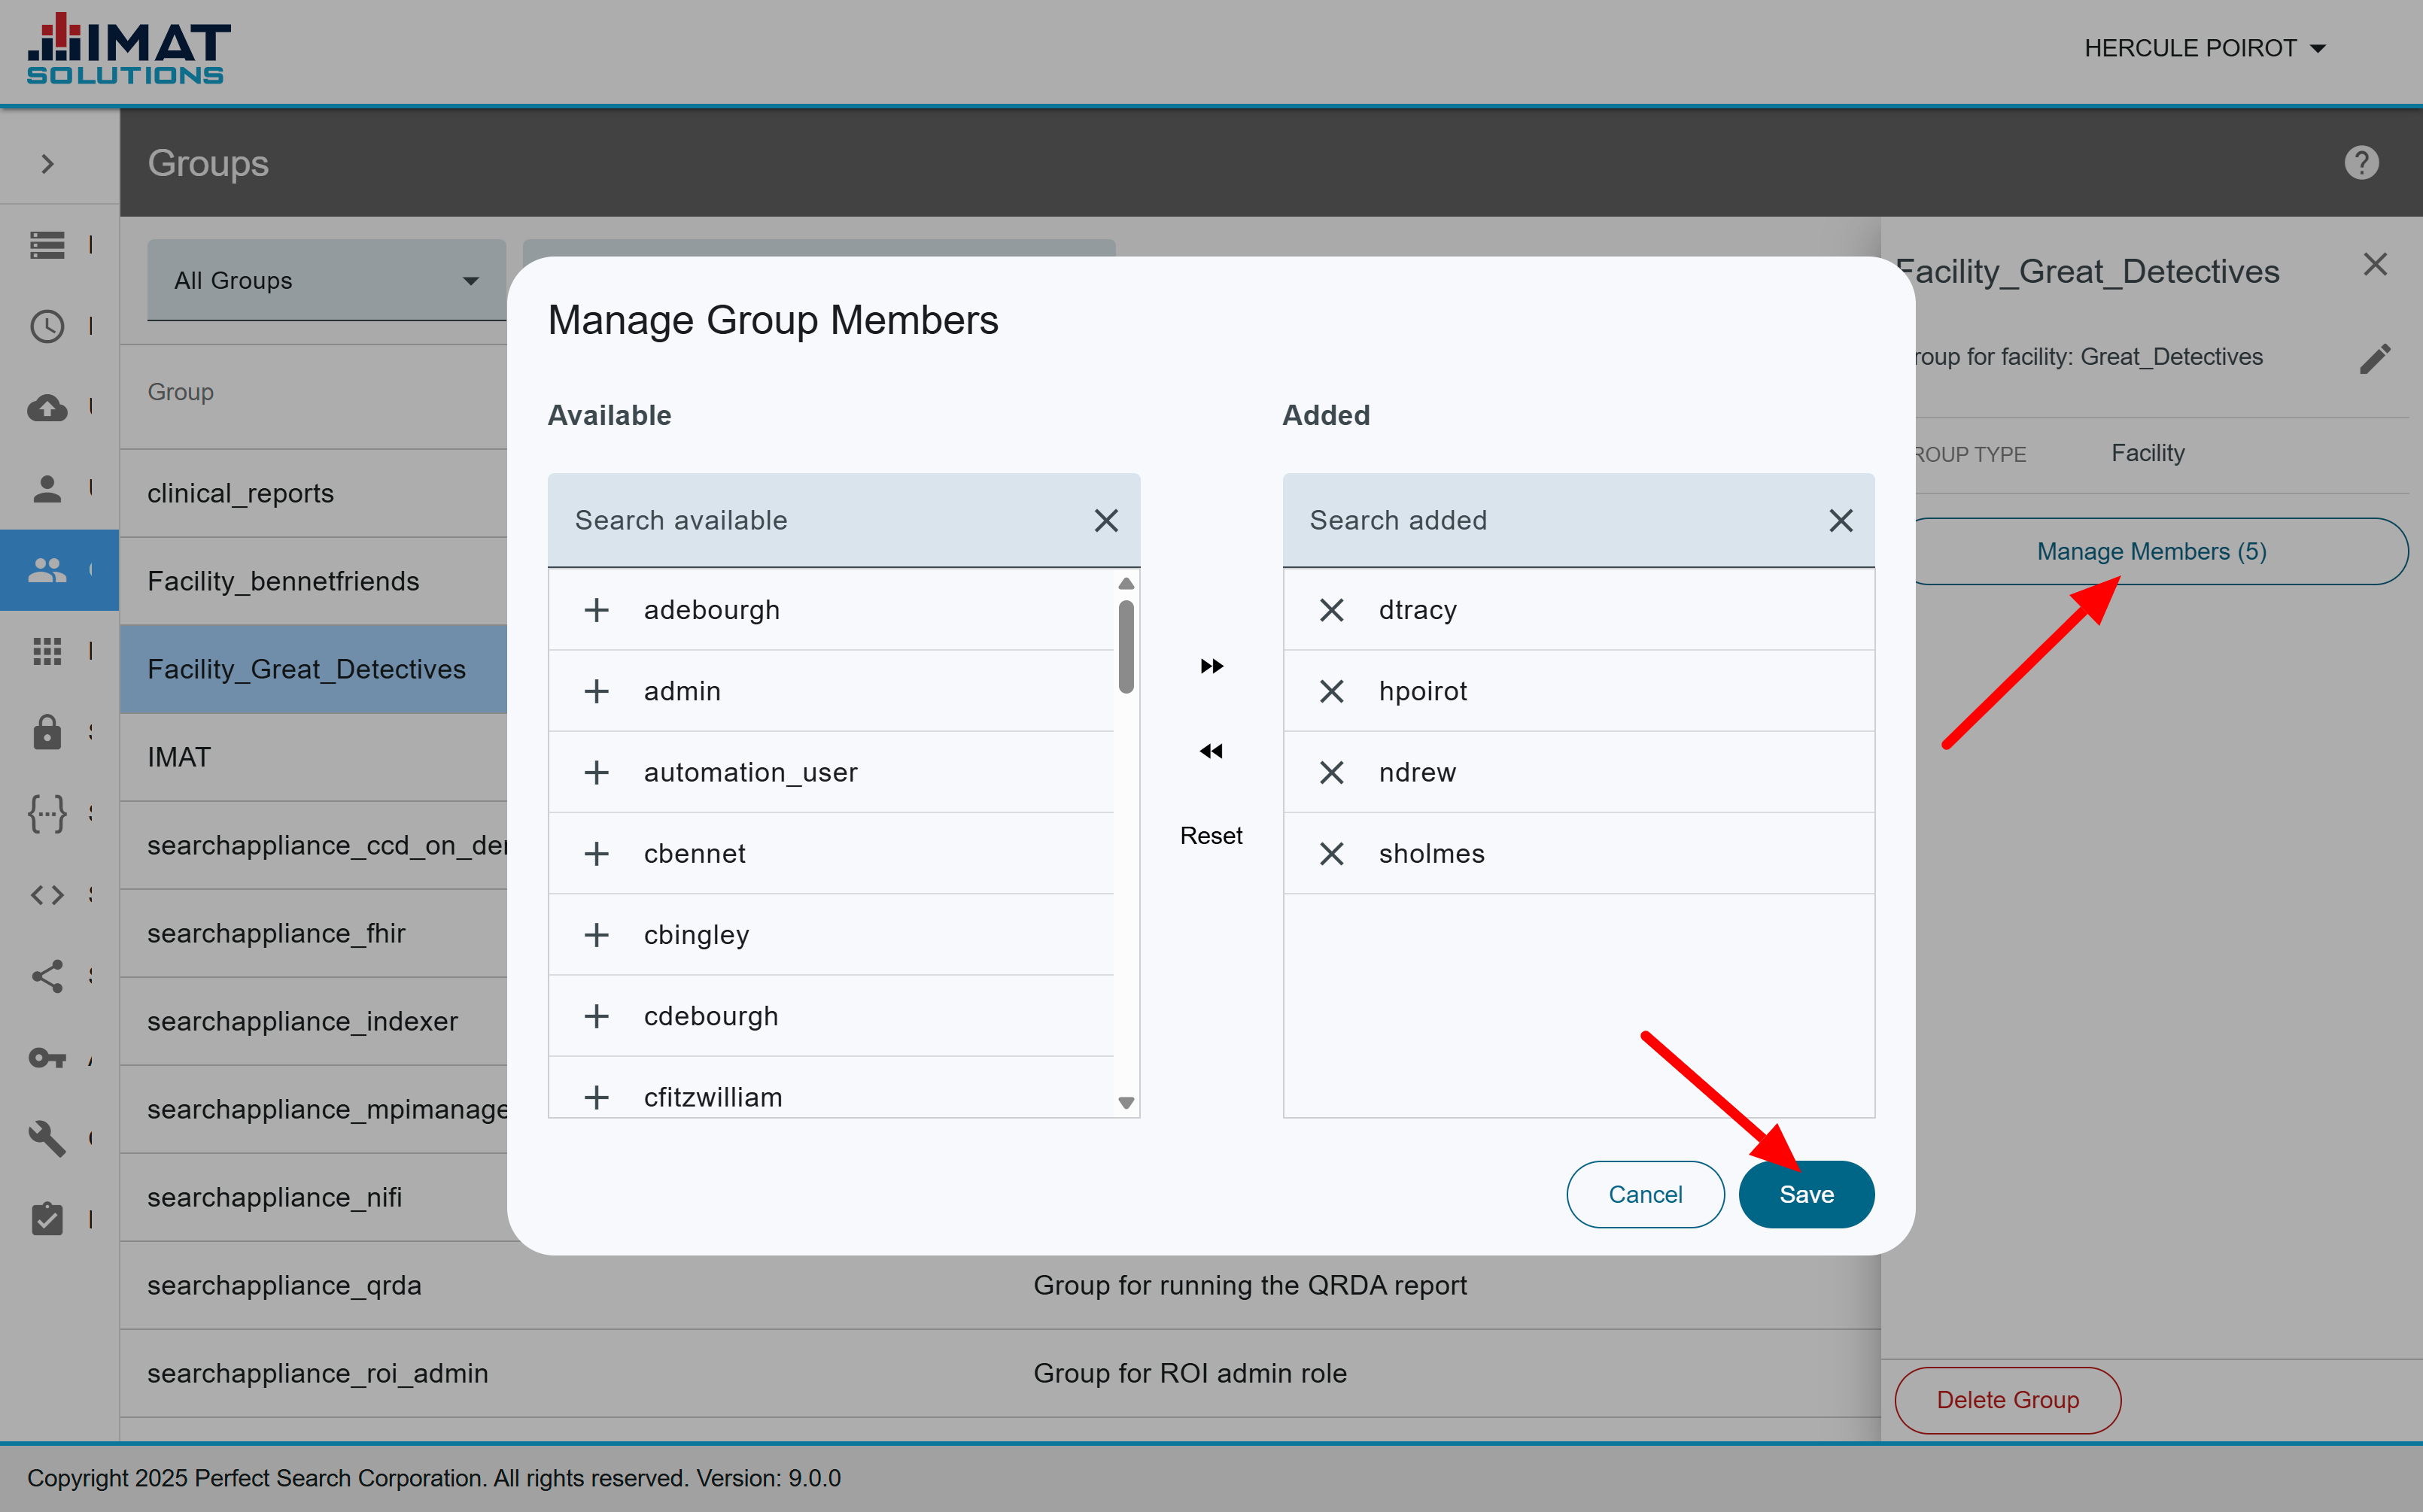
Edit a Group
Clicking on a group displays a pane on the right that shows the group name and description. You can also edit and delete groups from the pane.
 Click on image to zoom
Manage Members
- In the Navigation menu to the left, click Groups.
- Click the group you wish to edit. Search for groups by typing the group name in the search field.
- Click .
- Remove current members from the group by doing one of the following:
- Click by the user in the right column.
- Click to remove all from the right column to the left.
- Add members from the Available Members section of the screen by the following means:
- Click by the username to move one user to the group.
- Click to move all the users to the group.
- Click Reset to return all groups to their original position.
- Click .
 Click on image to zoom
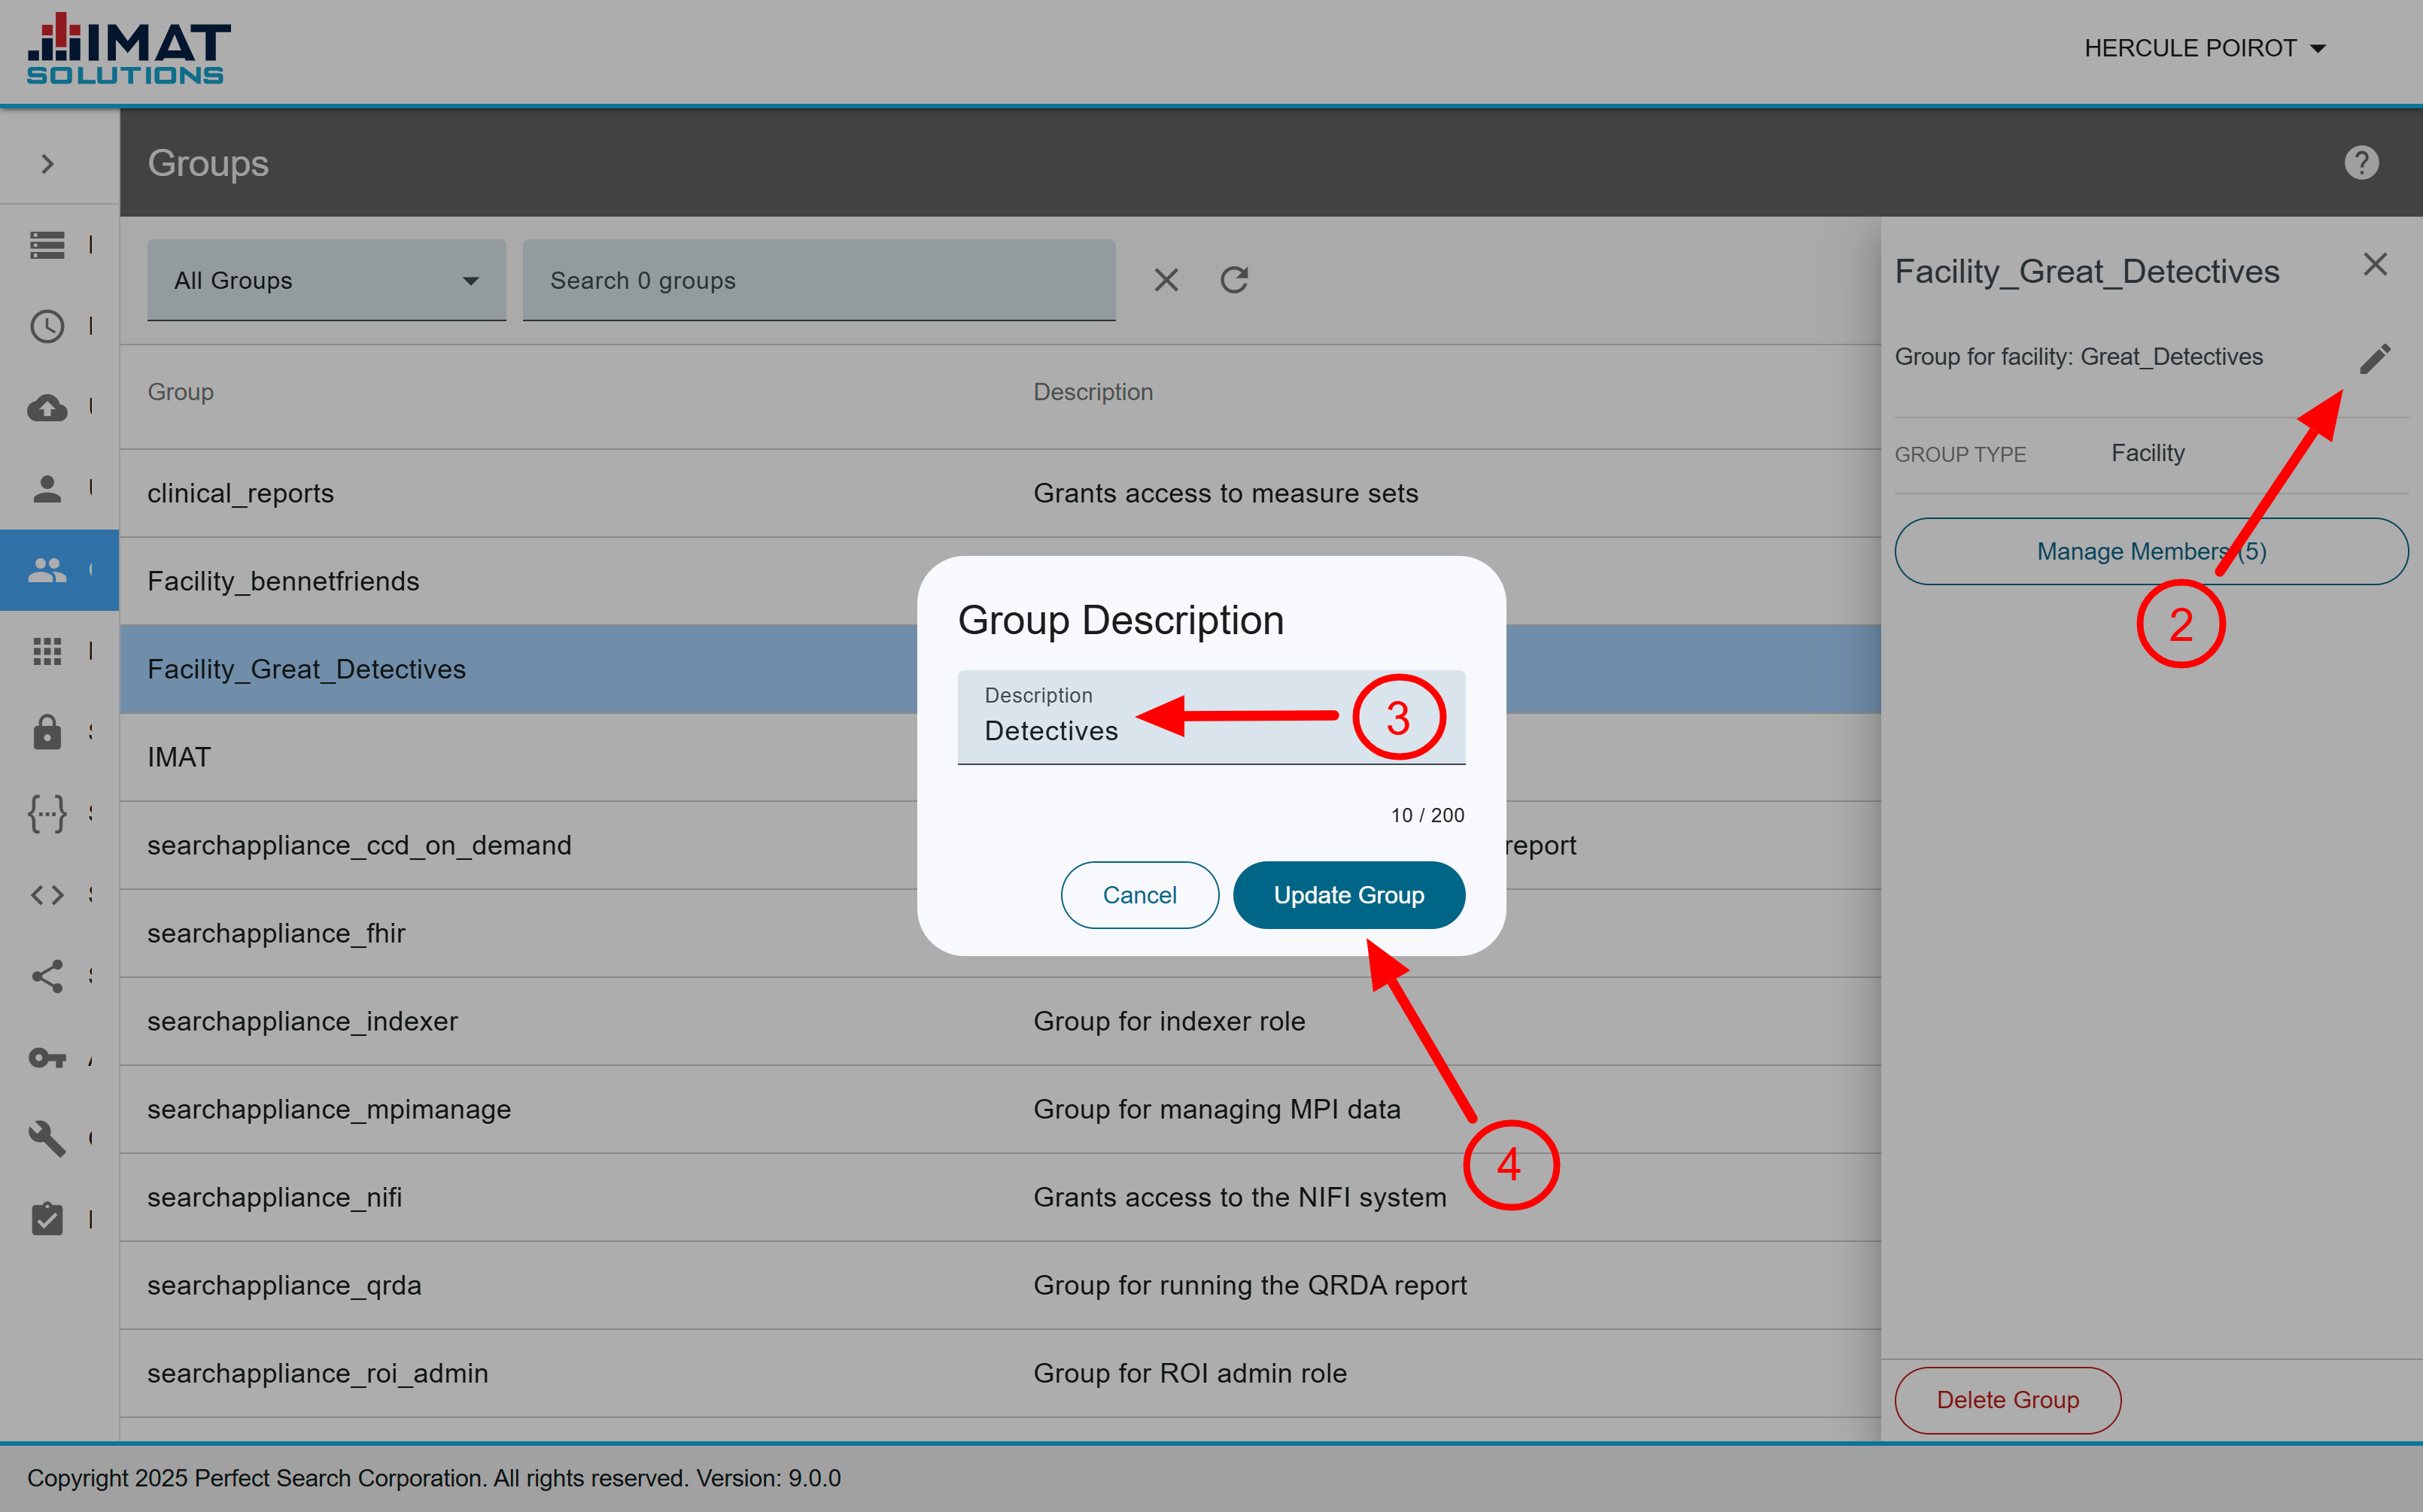
Edit the Group Description
To edit the group description:
- Click on the group you wish to edit.
- In the details pane, click .
- Enter the new description.
- Click .
 Click on image to zoom
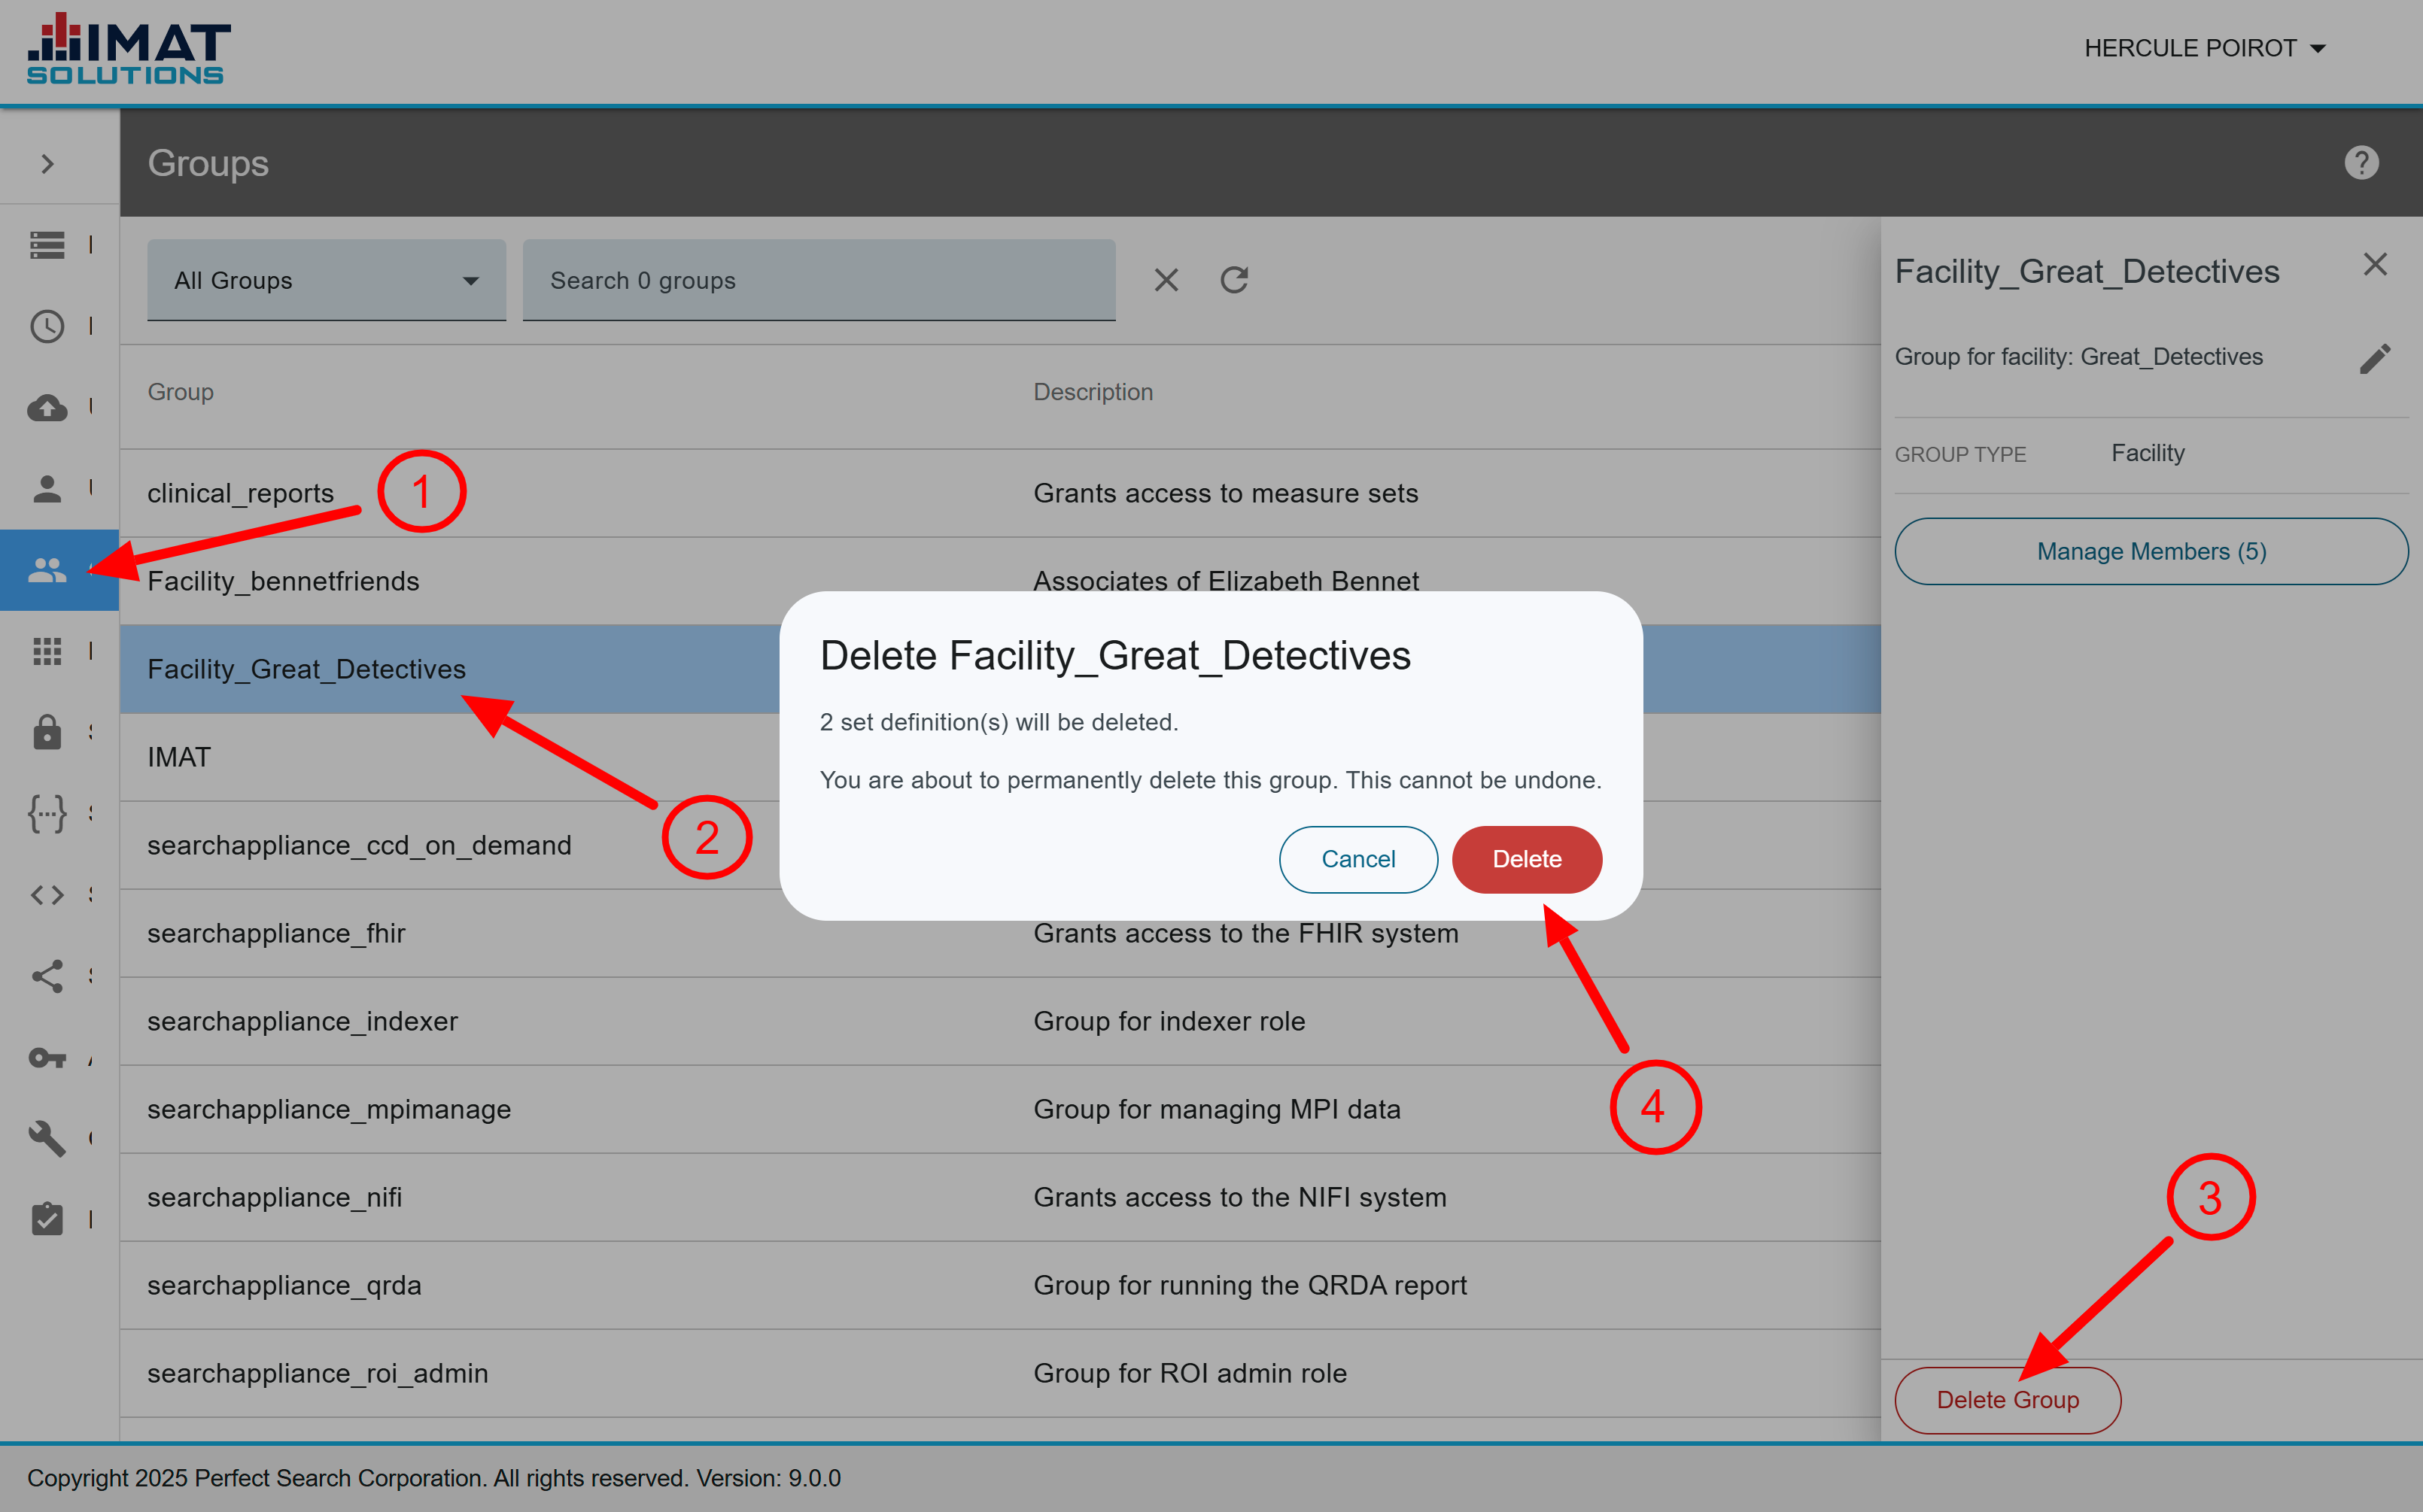
Delete a Group
If you find that you no longer need a group, it is possible to delete it. Be cautious when deleting a group, however, because it can cause unexpected problems. The confirm deletion box displays how many Set Definitions and Security Collections are associated with the group. Make sure that none of those items are required before you delete a group.
- In the Navigation menu, click Groups.
- Click on the group you wish to delete. Search for groups by typing the group name in the search field.
- Click .
- Confirm that you want to delete the group by clicking .
 Click on image to zoom
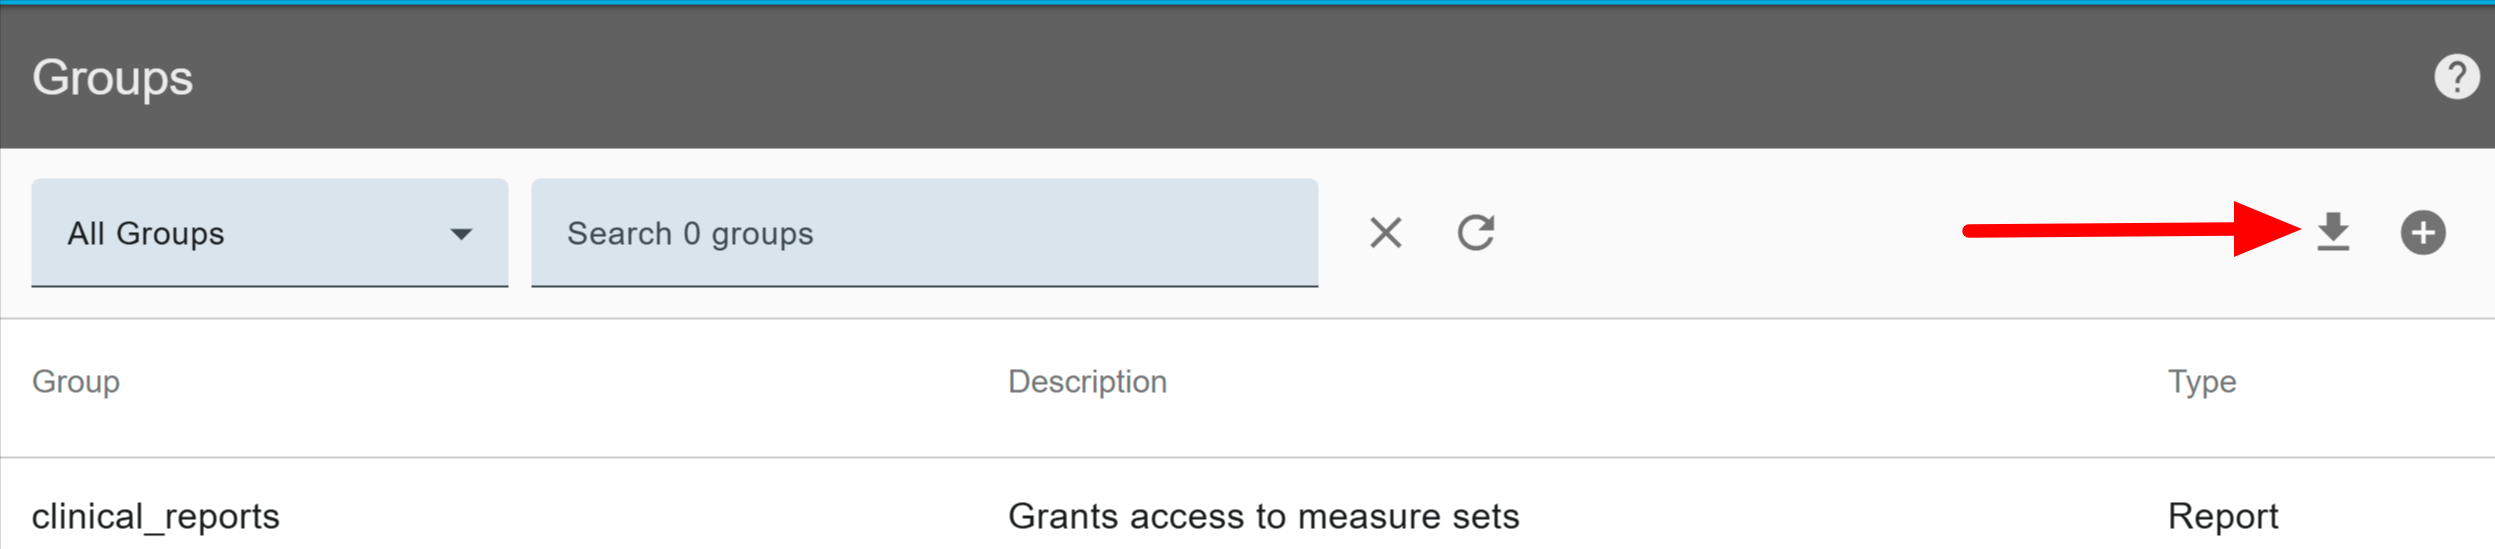
Download Group List
It is possible to download a CSV file of the groups:
- In the Navigation menu, click Groups.
- Click .