Launchpads are found on the home page for users when they sign in to the product. They contain customizable tiles used to navigate to the tools users have access to. The Admin Launchpads page allows administrators to create, edit, and delete users' and groups' launchpads and tiles. The administrator can also view others' launchpads and modify the users' editing permissions.
User Launchpads
The Users tab in Launchpads allows creating, editing, and deleting launchpads for individuals rather than groups. A user must first be created through the Admin tile before a launchpad can be created for him or her.
A search, located at the top left, enables easy lookup of a user.
Create User Launchpads
- Go to Admin by clicking on the tile from the launchpad. Either the Admin Launchpads tile or the Admin tile will work.
- Click Launchpads from the navigation on the left. You should land on the Users tab by default.
- Click found on the right.
- Select the New Owner. Possibilities for selection appear as you begin typing.
- Enter the Display Name; this is the name that appears on the user's launchpad.
- Click .
- When you return to the Launchpads screen, find and click on the new launchpad created.
- If desired, give the user permissions to edit their launchpad.
- Click .
- Add all desired tiles to the user's launchpad; see the Launchpad User Guide for help.
- Click Save. No changes are final until you click this button.
You will be returned to the Admin Launchpads screen.
As a system (admin) user, you will see all tiles available. Know, though, that users, if given editing permissions to their own launchpad, will only be able to see and select those tiles available to them. The user's assigned groups determine the available tiles.
 Click on image to zoom.
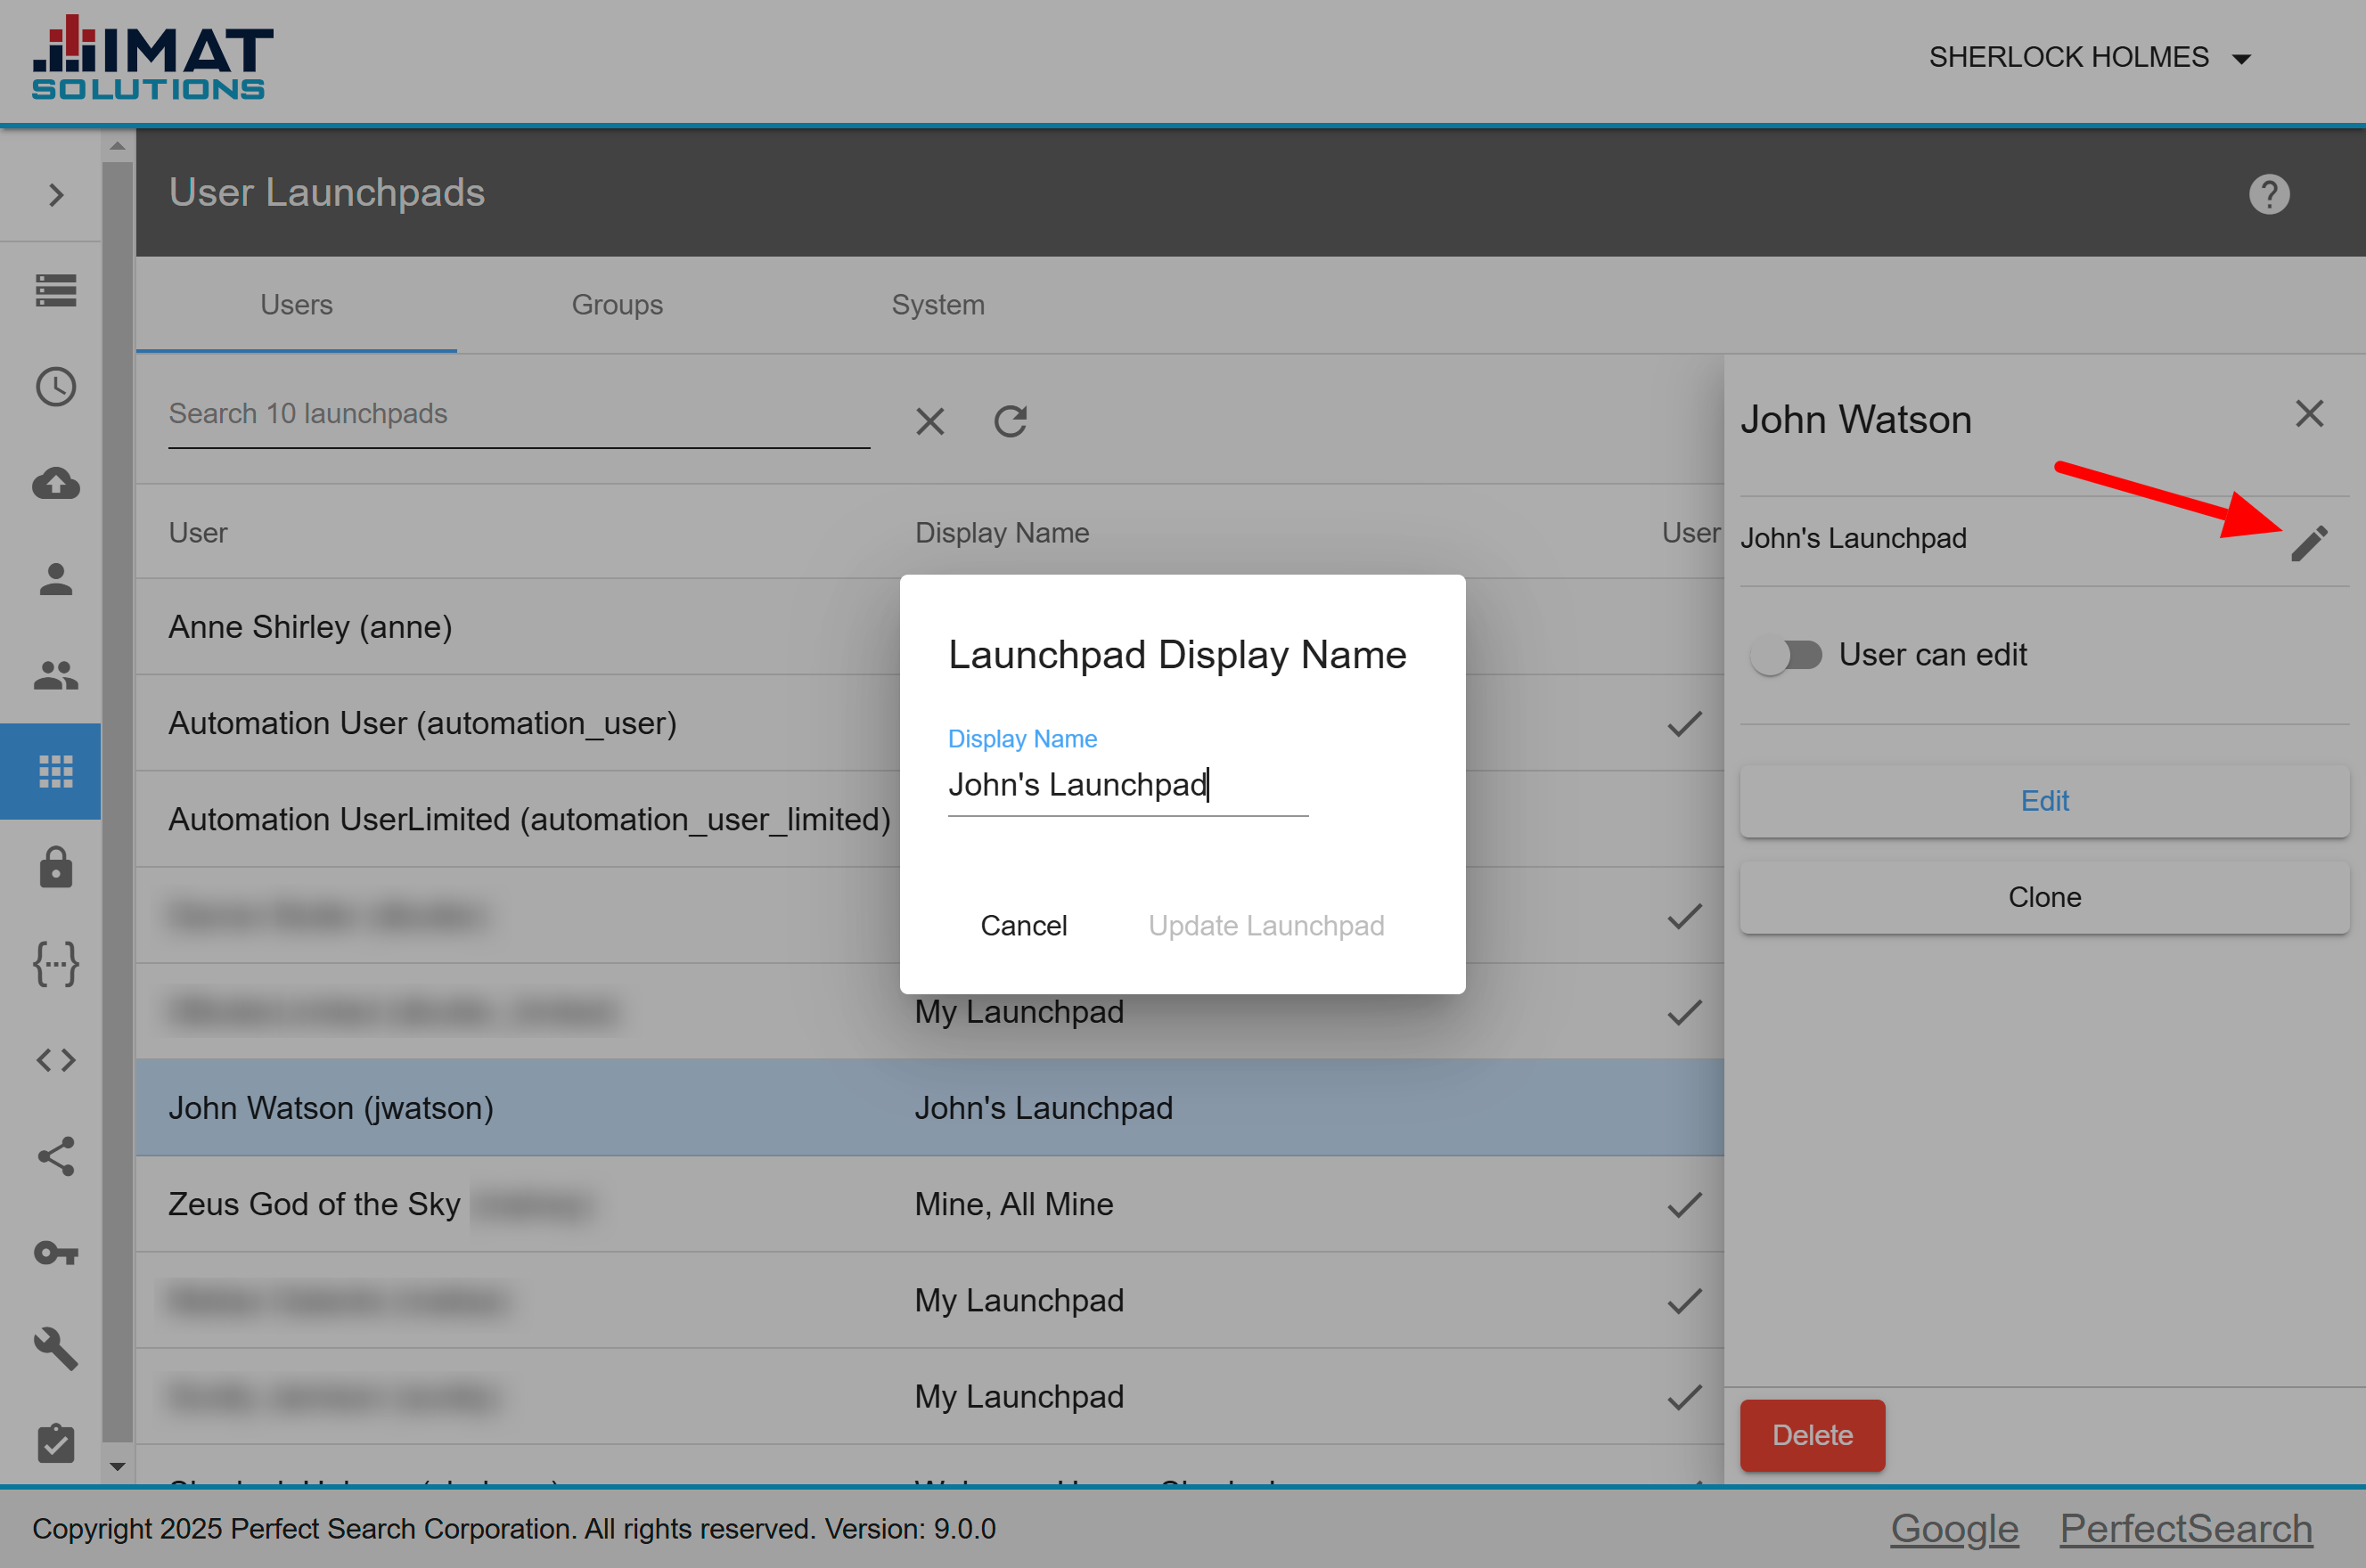
Rename User Launchpads
When necessary, the administrator can change any launchpad name. Do so by following these steps:
- Locate and click on the desired user name in Launchpads.
- Click next to the display name when the panel opens on the right.
- Replace the current text with the new text.
- Click .
 Click on image to zoom.
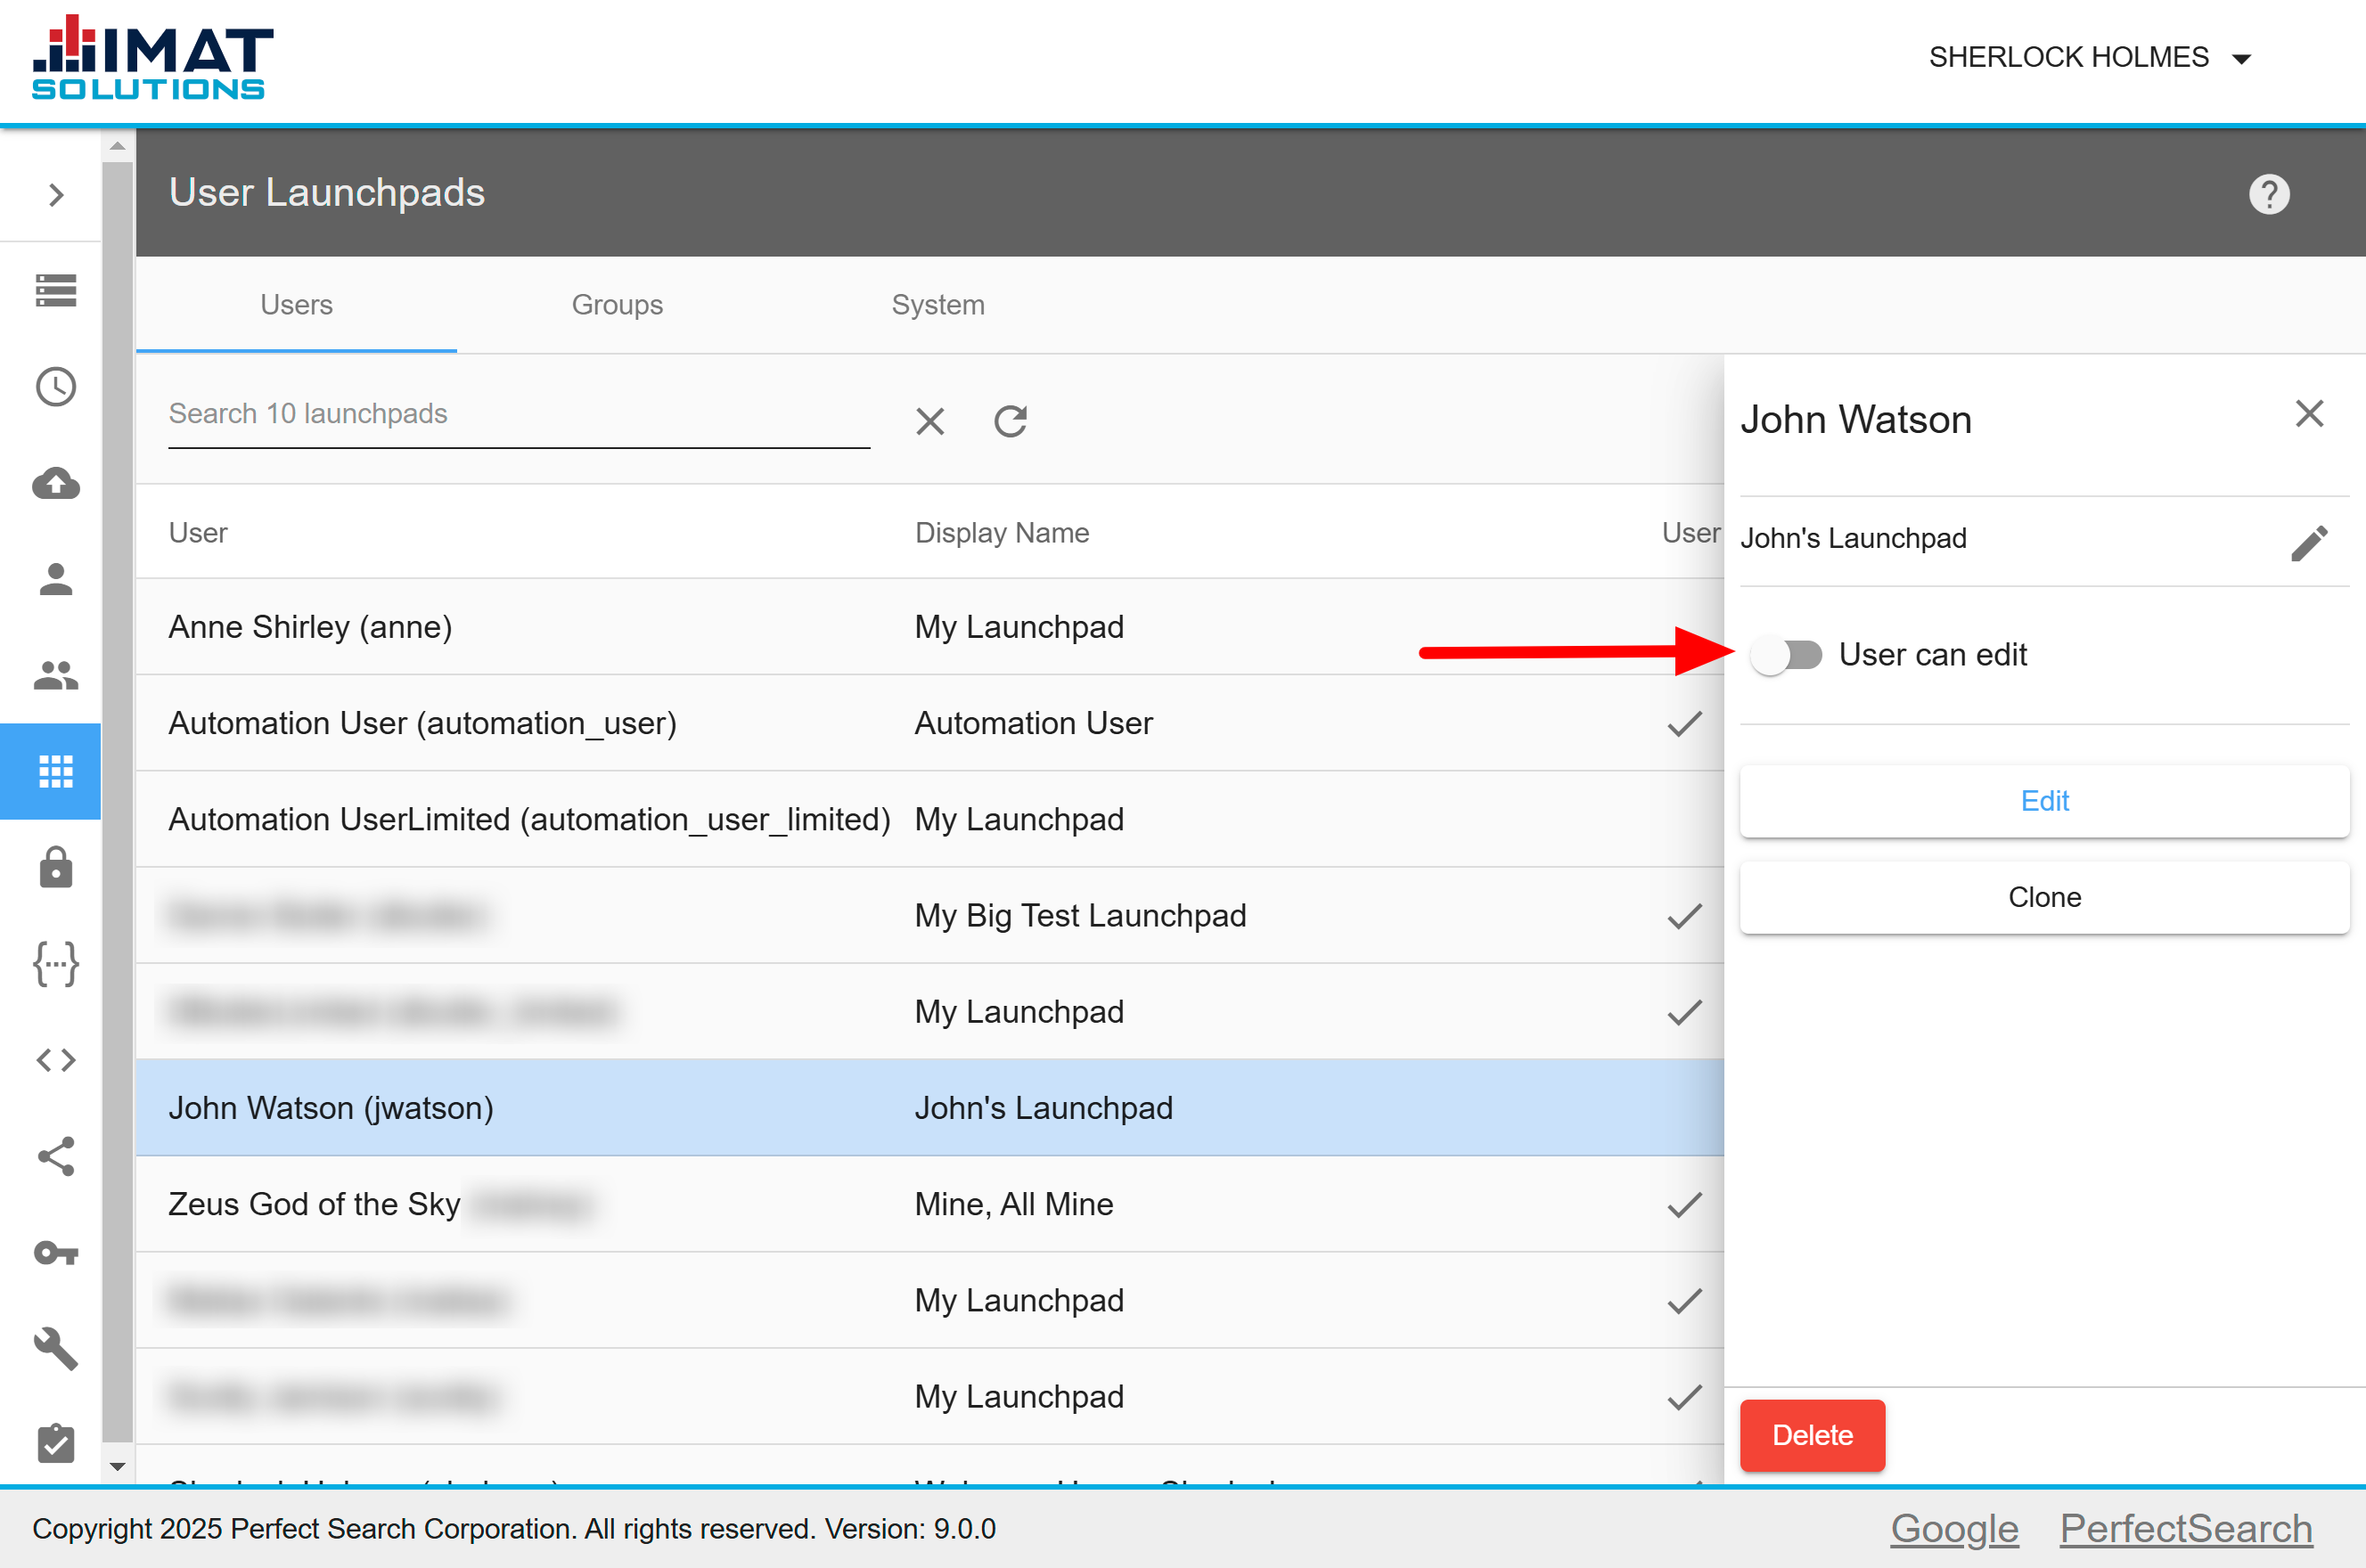
Edit User Permissions
An administrator can control whether a user can change his or her own launchpad.
By default, the ability to edit is disabled. Turn on editing permissions by clicking the Can Edit toggle. The toggle changes from faded to dark.
Toggle off to remove editing permissions from the user.
 Click on image to zoom.
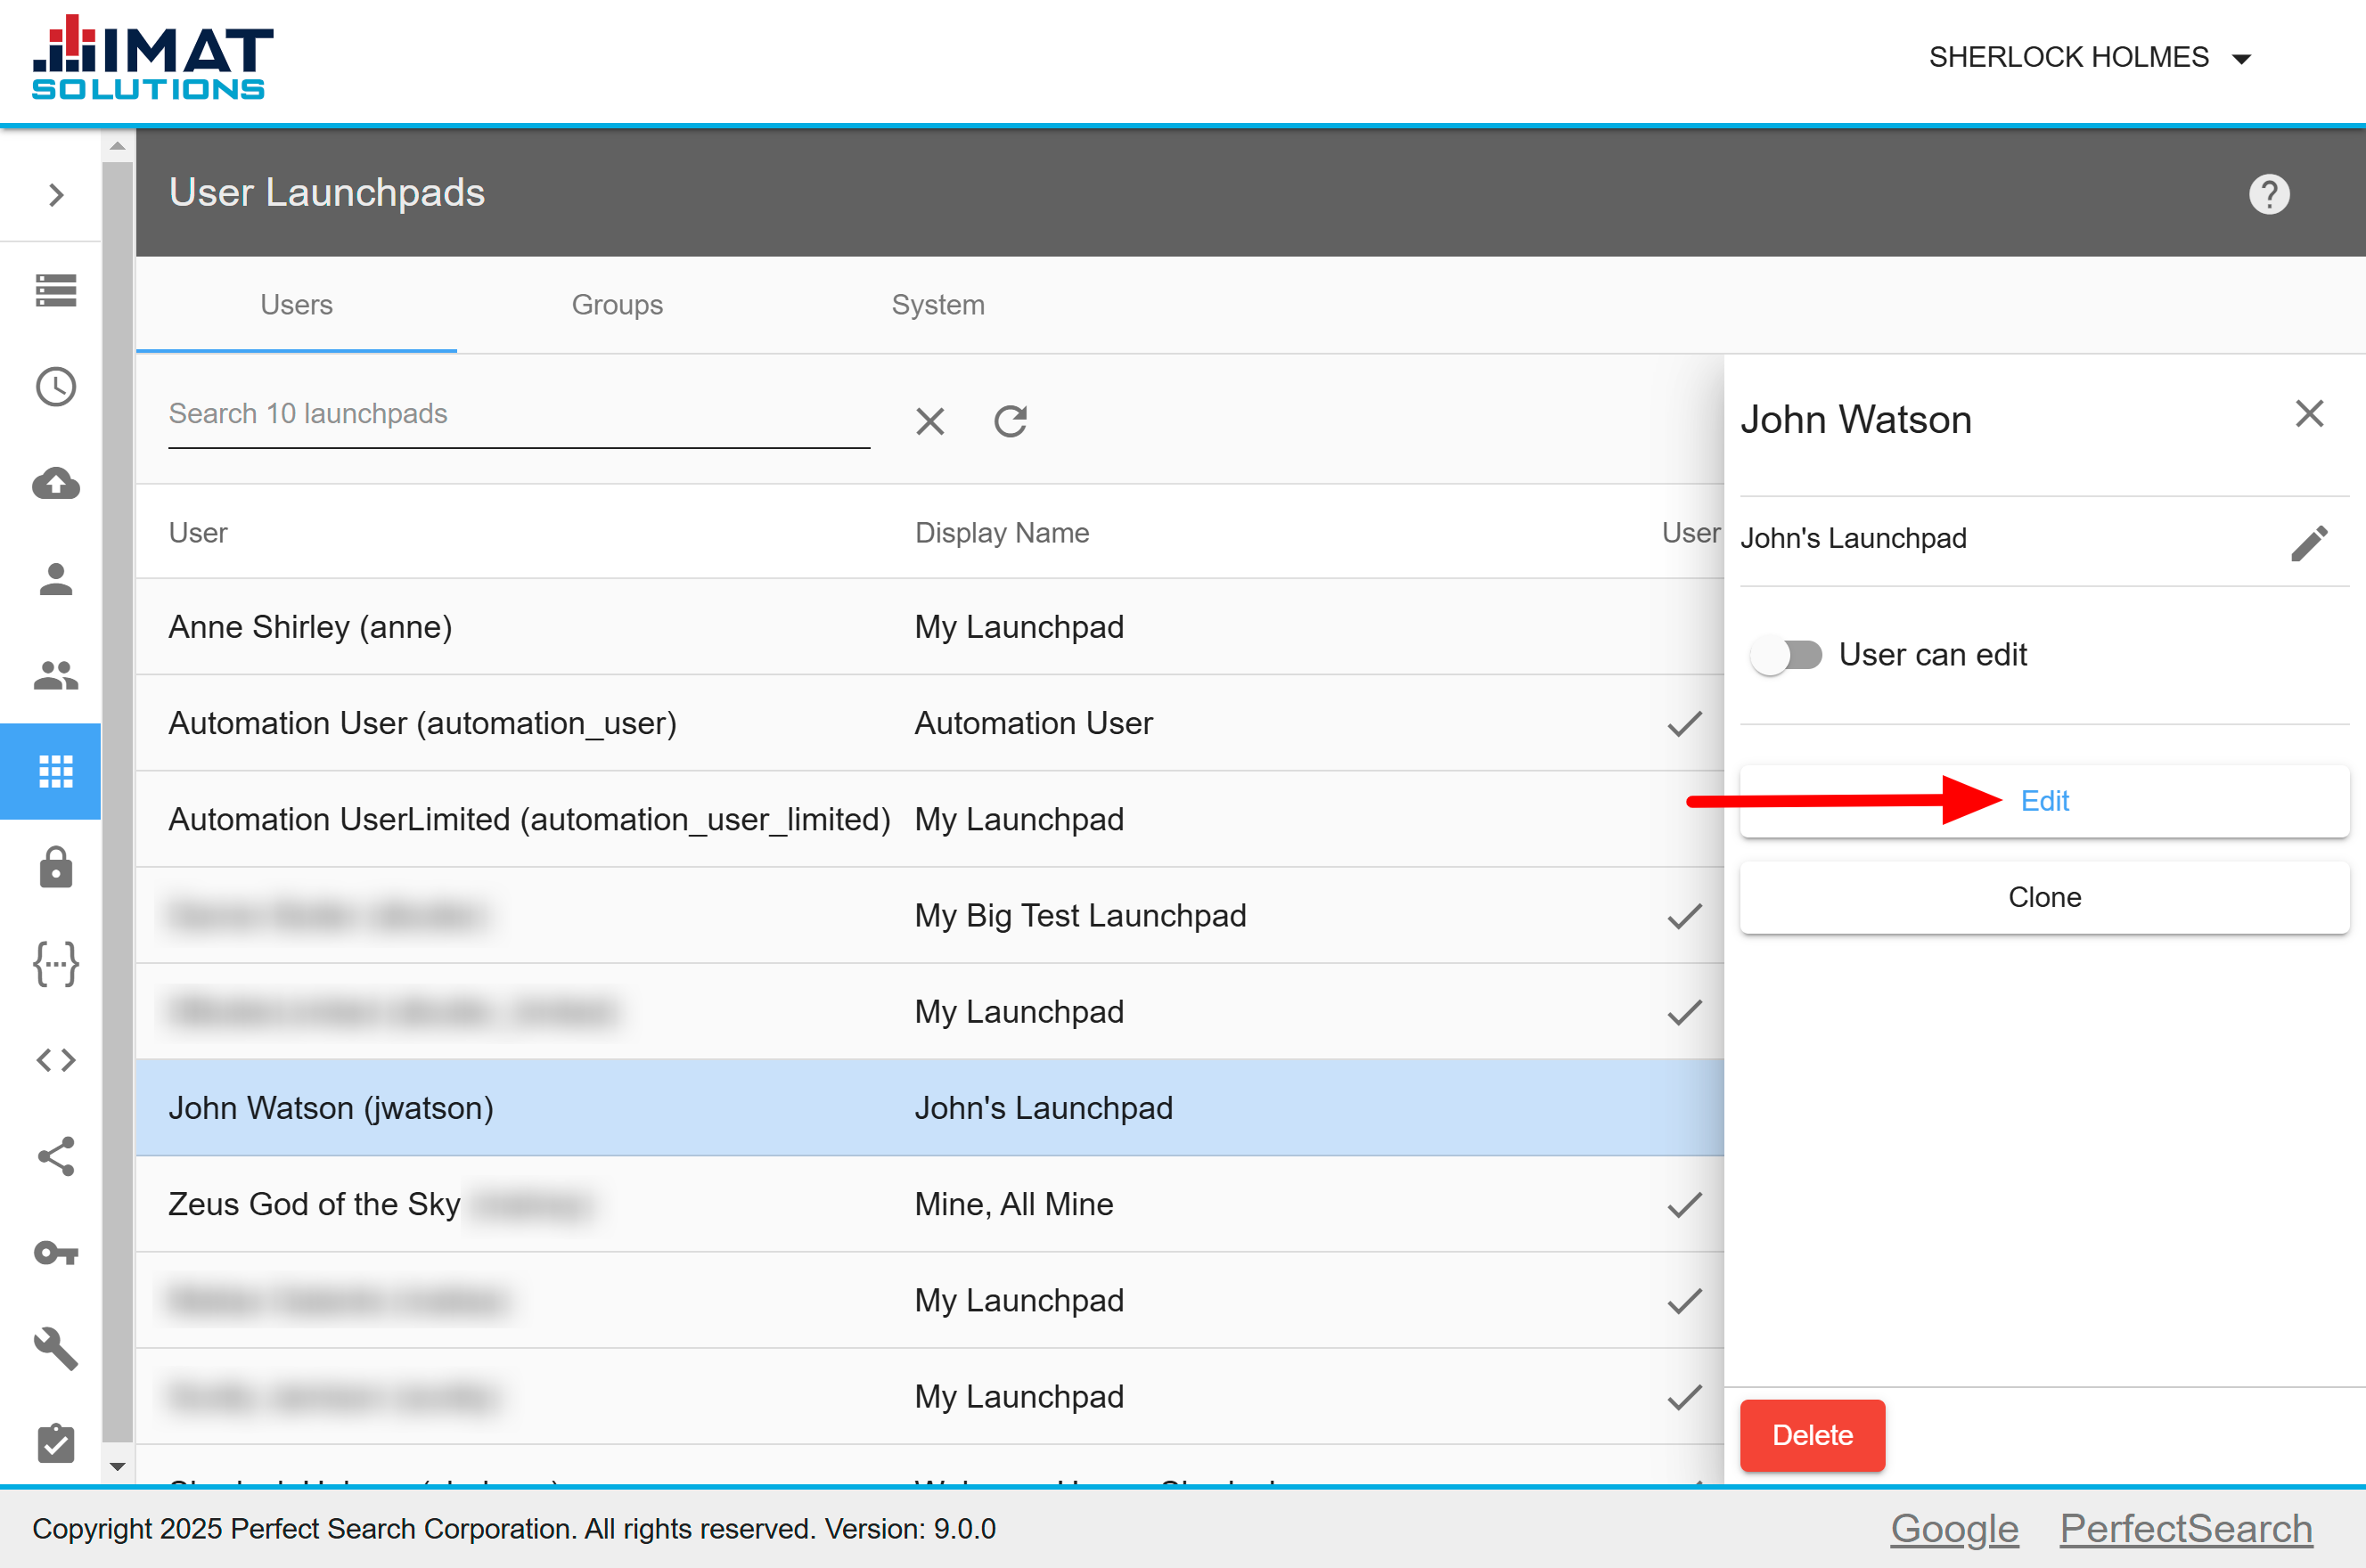
Edit User Launchpads Tiles
If the need for a user's launchpad tiles should change from the initial setup, the administrator can edit the launchpad:
- Locate and click the desired user name in Launchpads.
- Press .
- Add, edit, or delete tiles according to the user's needs. See the Launchpad User Guide for help.
- Click Save. No changes are final until you click this button.
 Click on image to zoom.
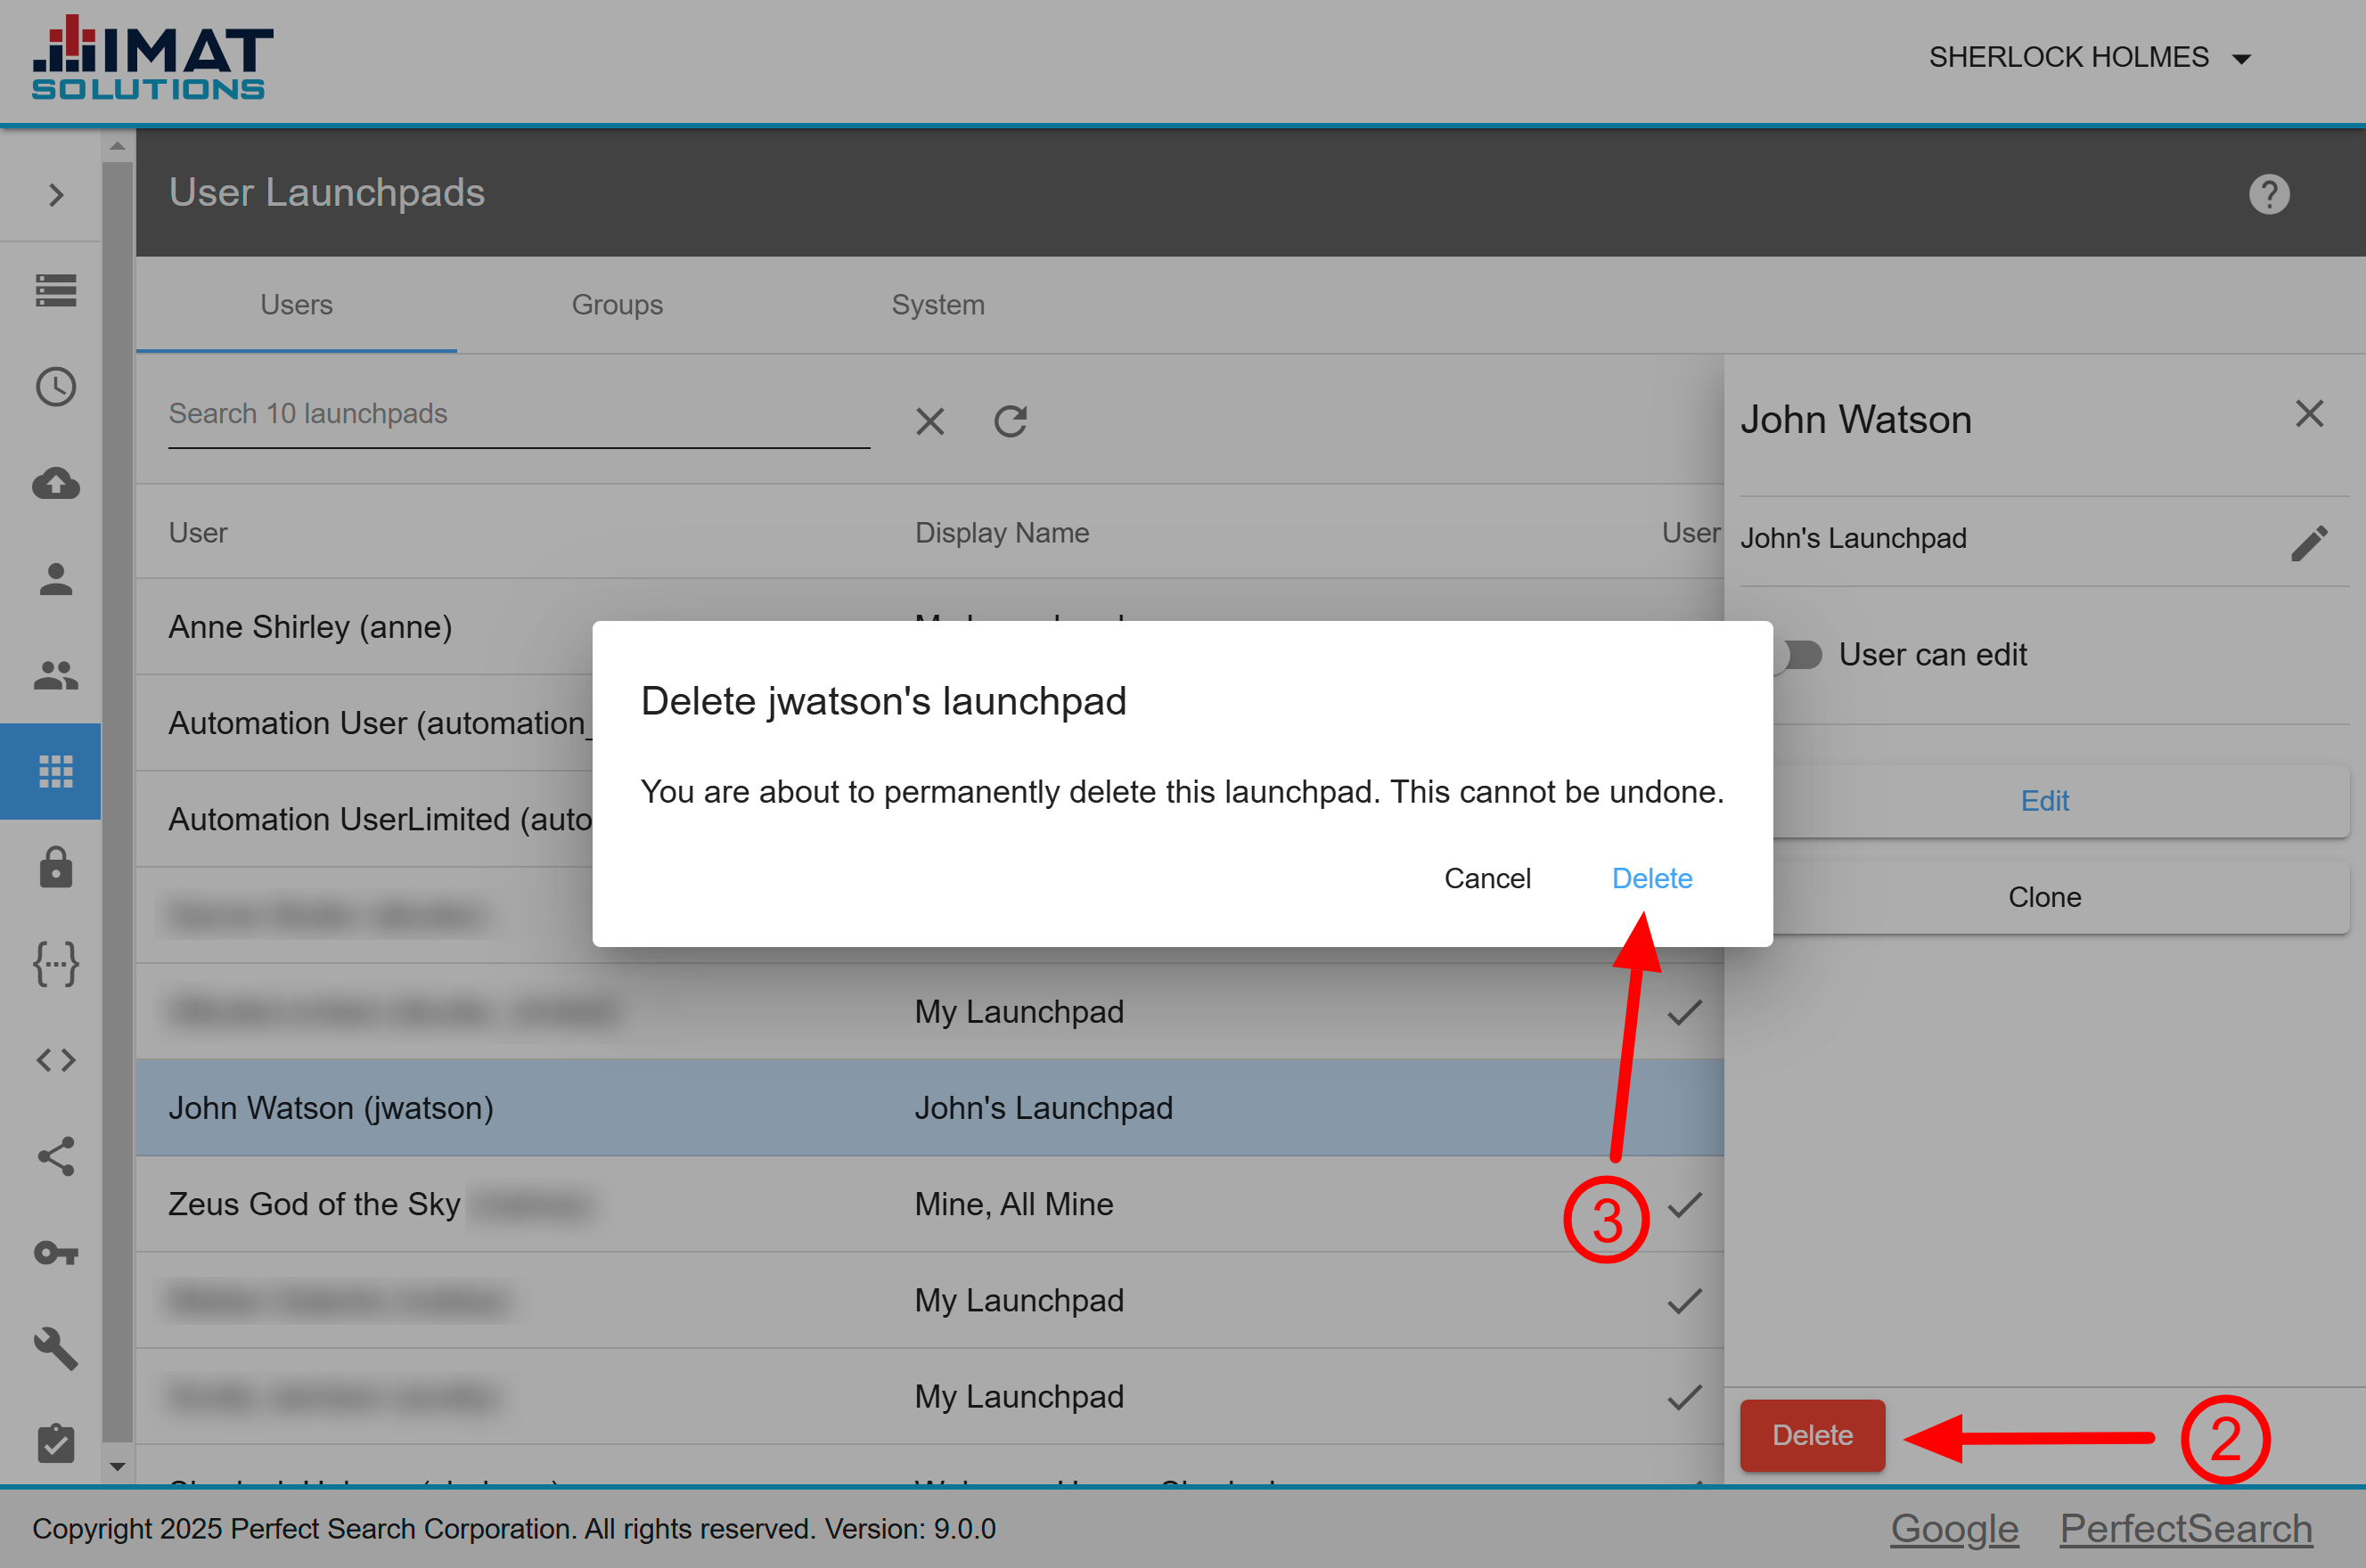
Delete User Launchpads
It is possible to delete a user's launchpad. To delete a user's launchpad, follow the steps below:
- Locate and click on the user name.
- Click .
- Click to confirm you want to delete the launchpad.
If a user is not assigned to a group launchpad, he or she may see a blank screen upon login after the user's launchpad is deleted.
 Click on image to zoom.
Group Launchpads
Launchpads can be created for groups where everybody in that group needs to see the same tiles. All launchpads assigned to a user appear in the left navigation pane after they've logged in.
Create Group Launchpads
- Select the Groups tab below the gray bar.
- Choose to create a group launchpad.
- Select the correct group in New Owner. Possibilities for selection appear as you begin typing.
- Enter the name of the launchpad in the Display Name field.
- Click Add Launchpad.
- When you return to the Launchpads screen, find the new launchpad, and click found on the panel on the right.
- Make the desired changes to the launchpad; see the Launchpad User Guide for help. Remember that if you are creating a report tile, you must share the report. Note that on a group dashboard, when a user clicks a MyResult tile, they will see an empty screen.
- Click Save. No changes are final until you click this button.
If tiles are not configured correctly and an error badge is displayed, the tiles do not appear for the users. Administrators can still configure the tiles through the Launchpads page of the Admin screens.
 Click on image to zoom.
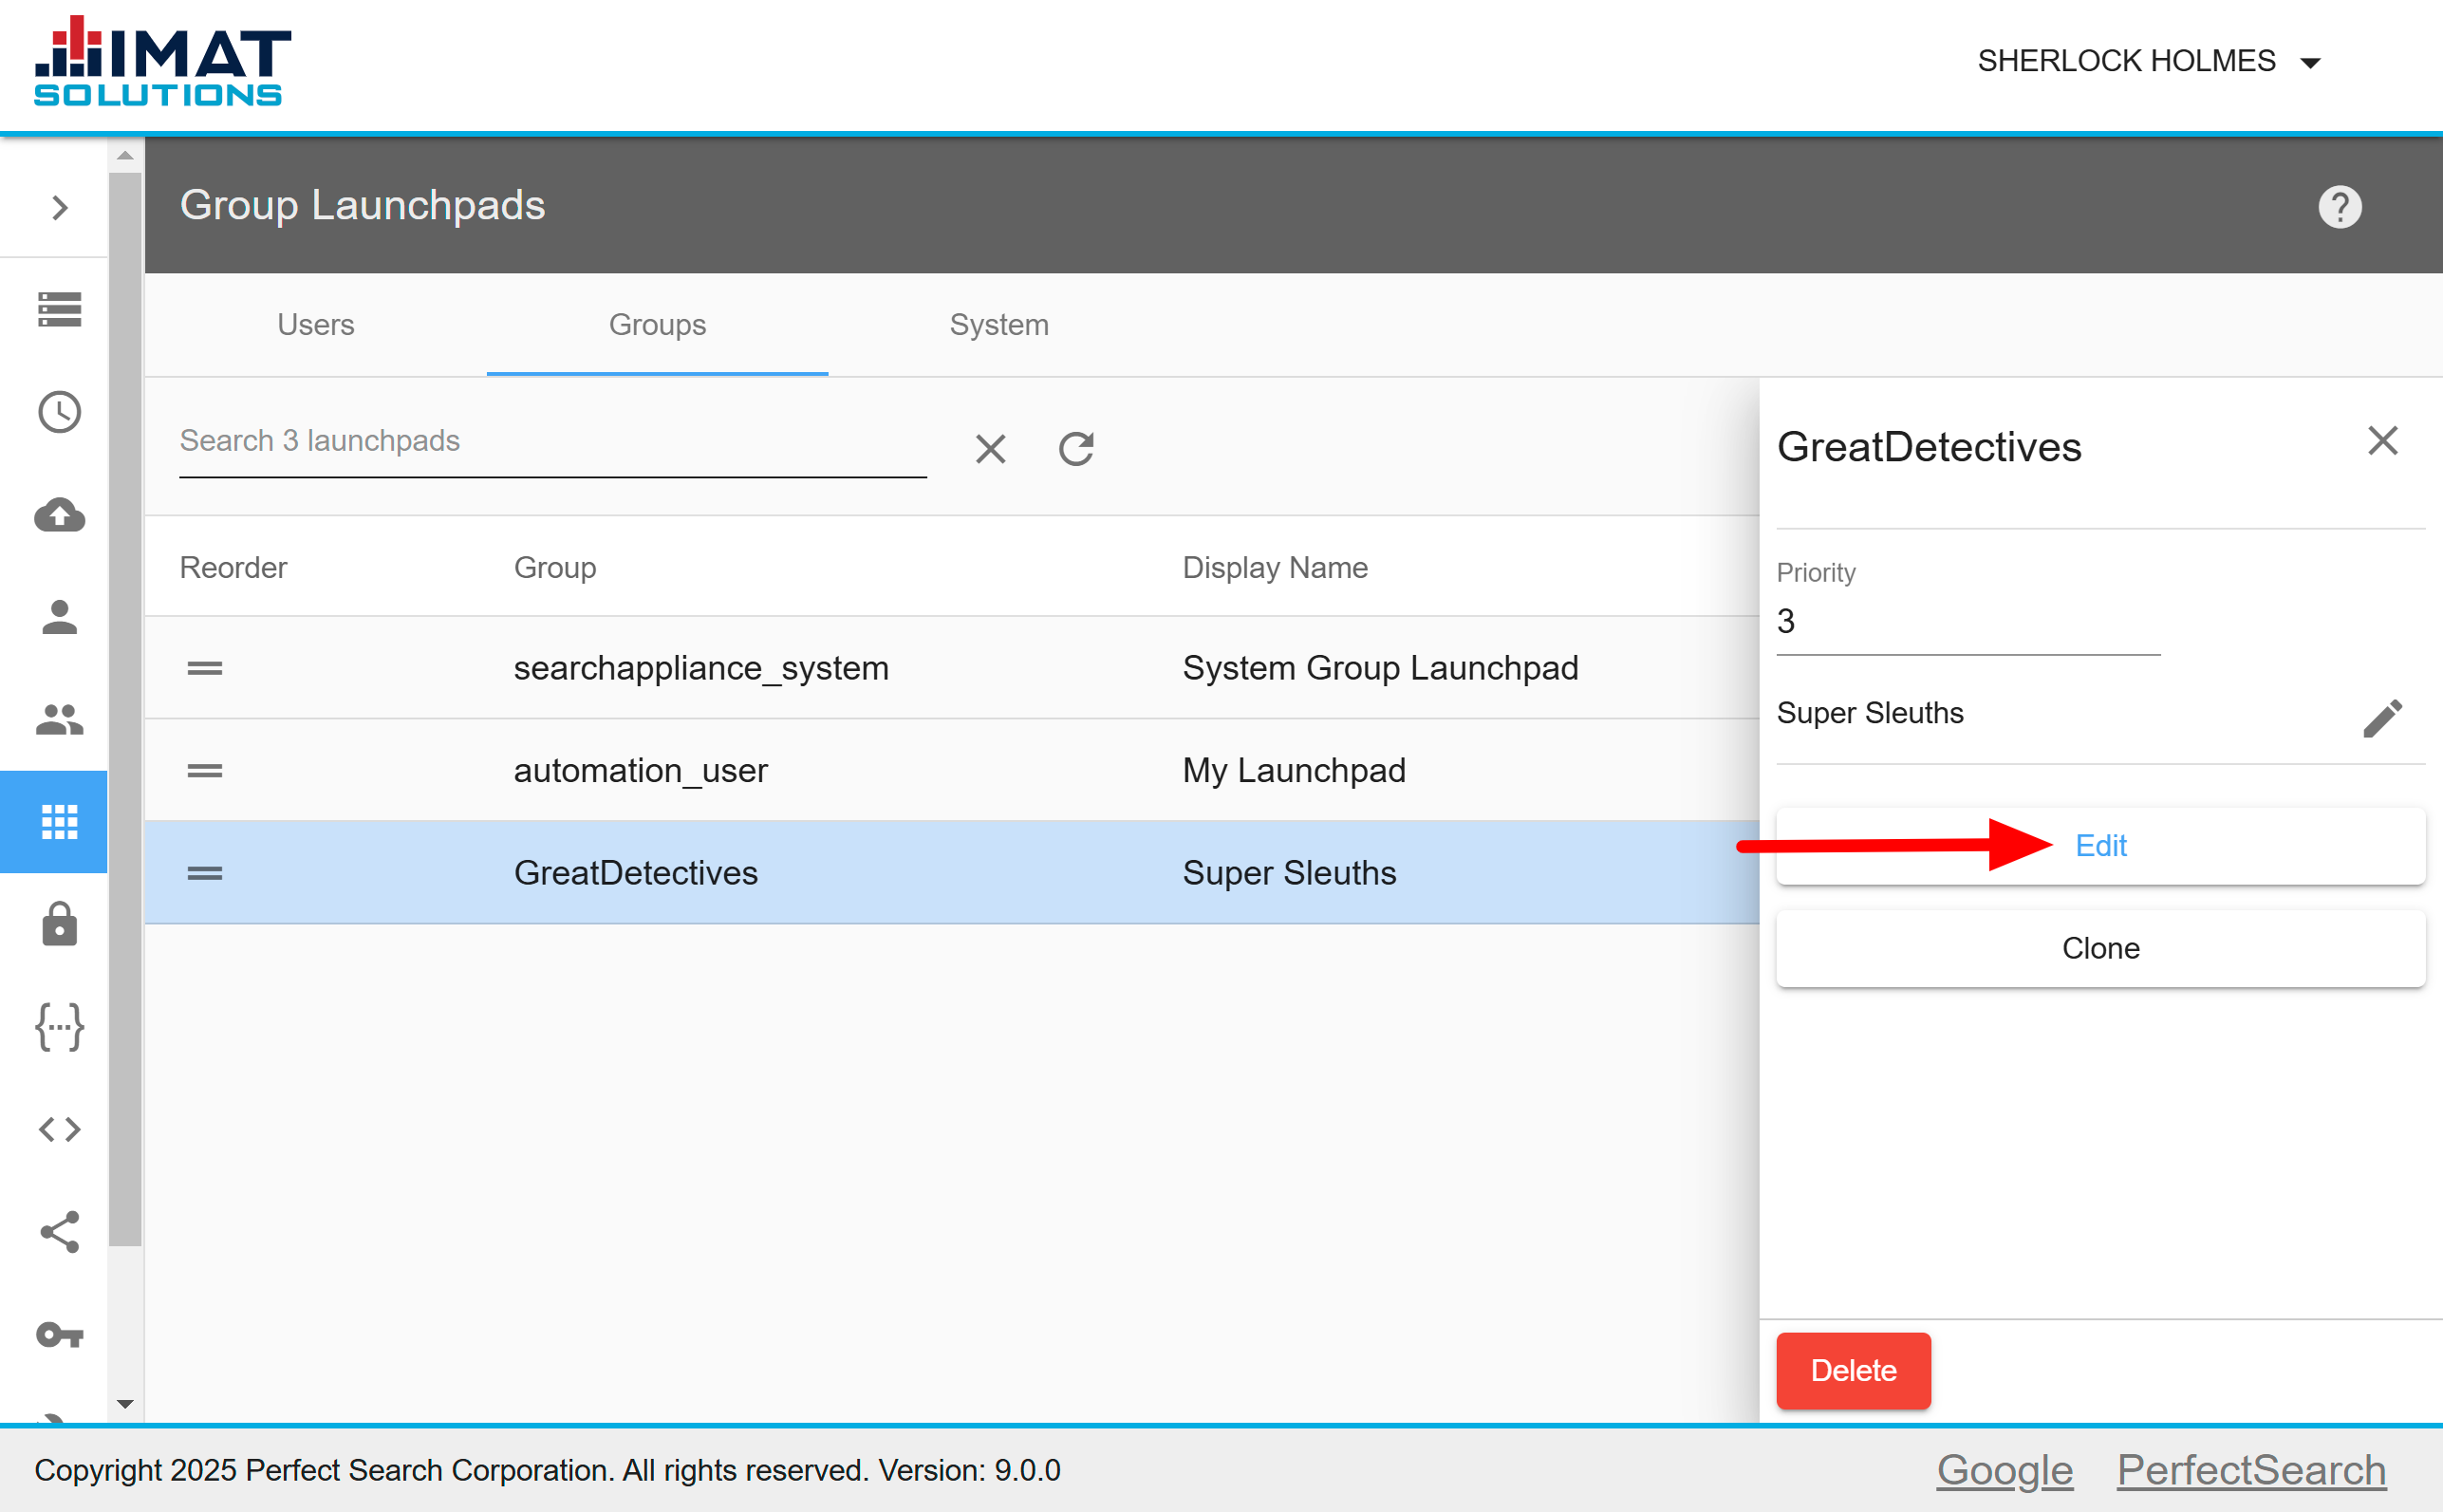
Edit Group Launchpads
If the need for a group's launchpad should change from the initial setup, the administrator can edit it:
- Locate and click the group launchpad you'd like to edit. A search, in the top left, enables easy lookup of a group.
- Click .
- Add, edit, or delete tiles according to the group's needs. See the Launchpad User Guide for help.
- Click Save. No changes are final until you click this button.
 Click on image to zoom.
Rename Group Launchpads
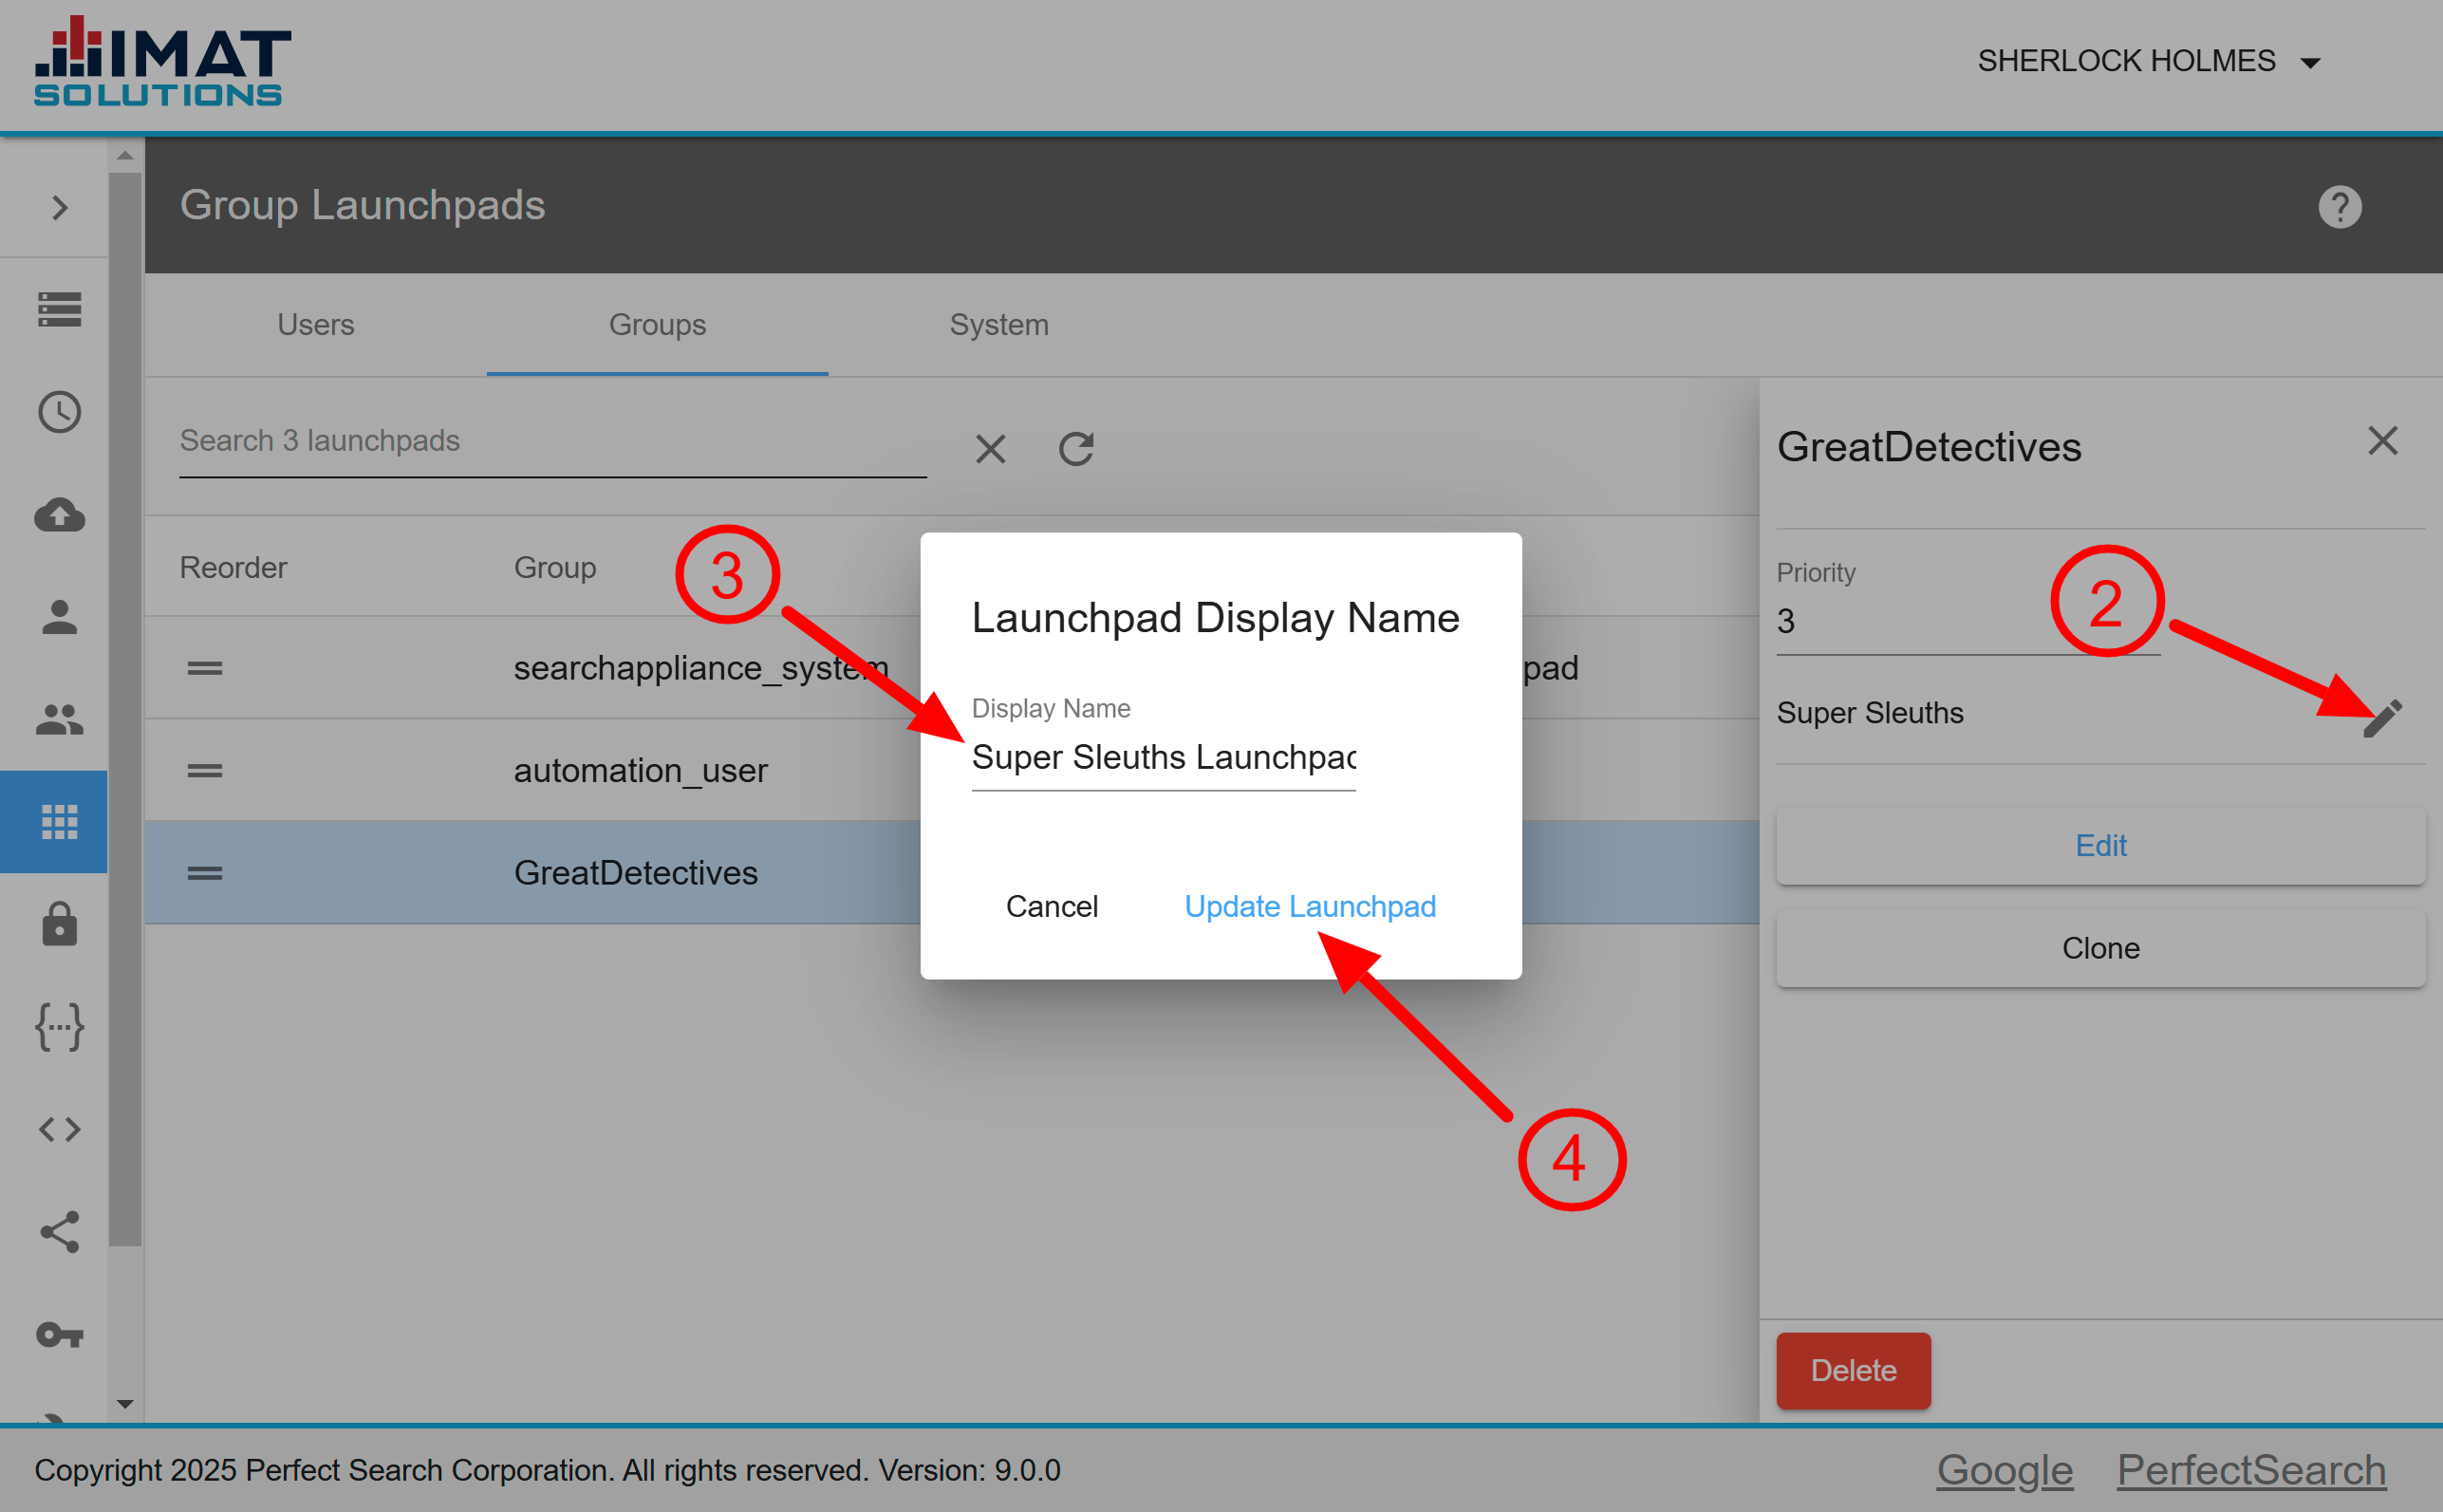
When necessary, the administrator can change any launchpad name. Do so by following these steps:
- Locate and click the group launchpad you'd like to rename. A search, located at the top left, enables easy lookup of a group.
- Click next to the group launchpad name when the panel opens on the right.
- Replace the current text with the new text when the dialog opens.
- Click .
 Click on image to zoom.
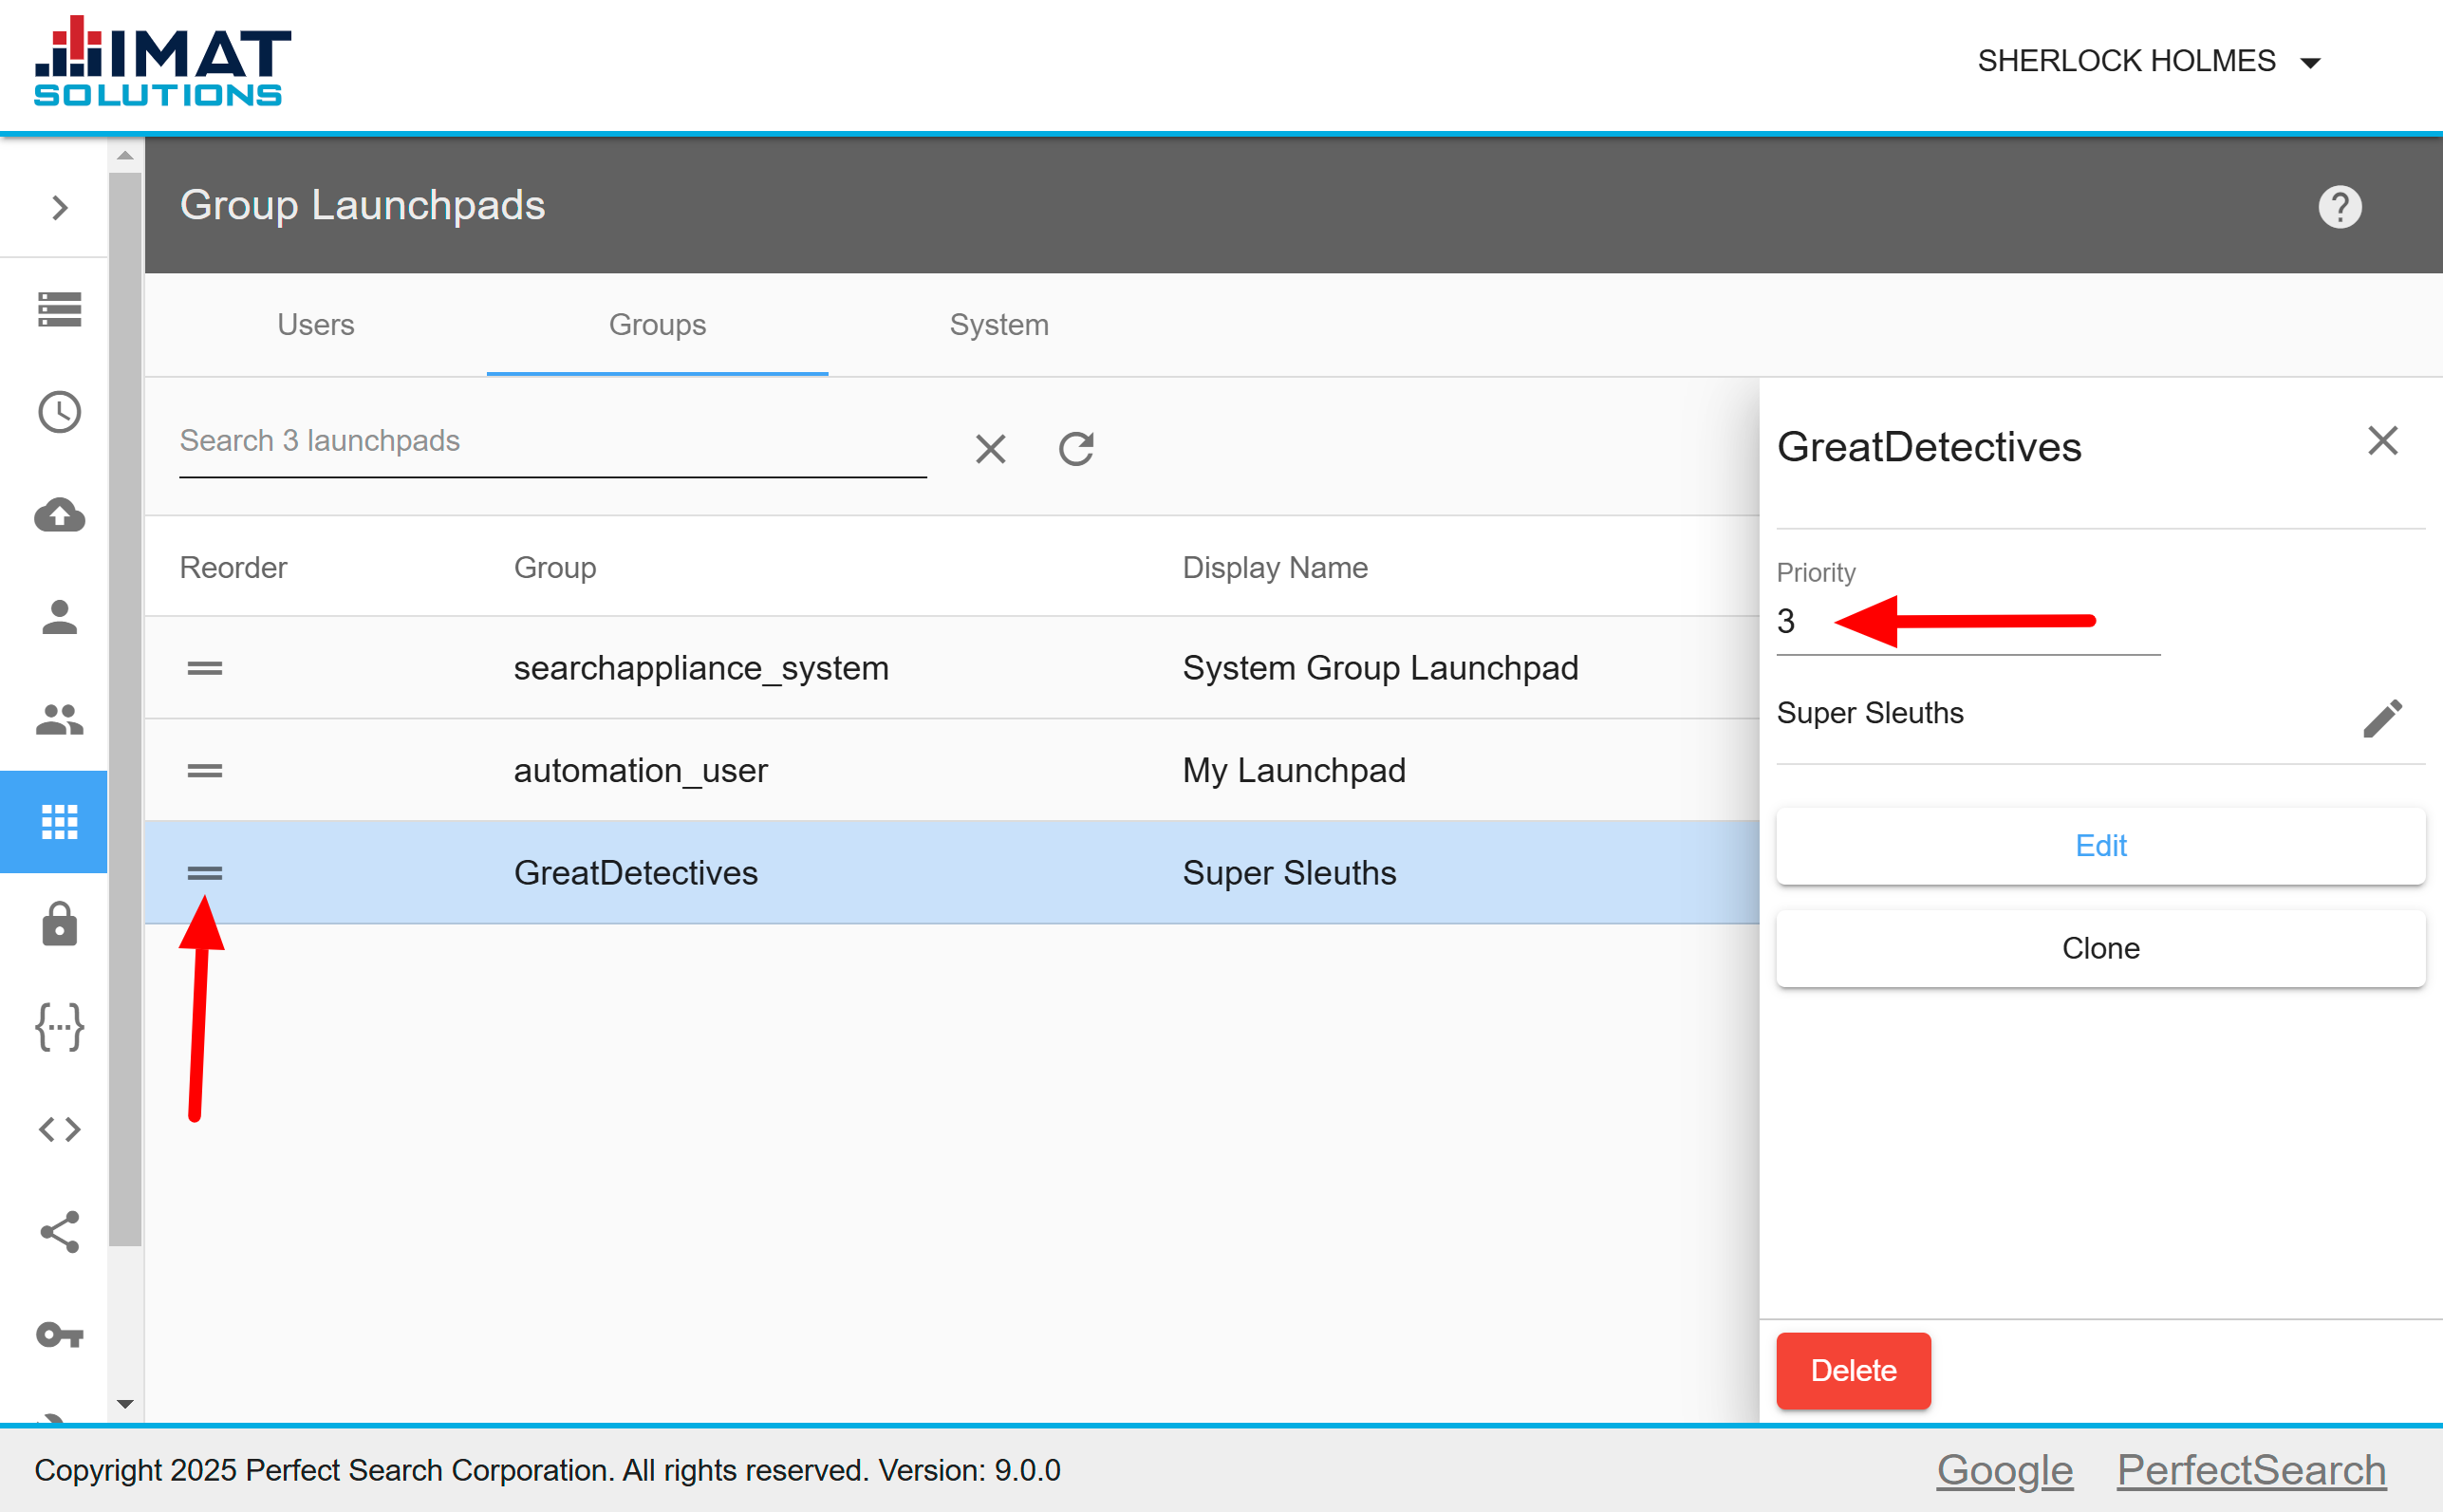
Prioritize Group Launchpads
You may select the order in which group launchpads appear in the user's launchpad list on the home page. Prioritize launchpads in either of the following two ways:
- Use to drag and drop the launchpad to the correct location.
- Change the order number under the Priority field in the details panel by typing the number or using the arrows provided when hovering over the field.
If a user has a personal launchpad, it will always appear at the top of the launchpad list on the home page.
 Click on image to zoom.
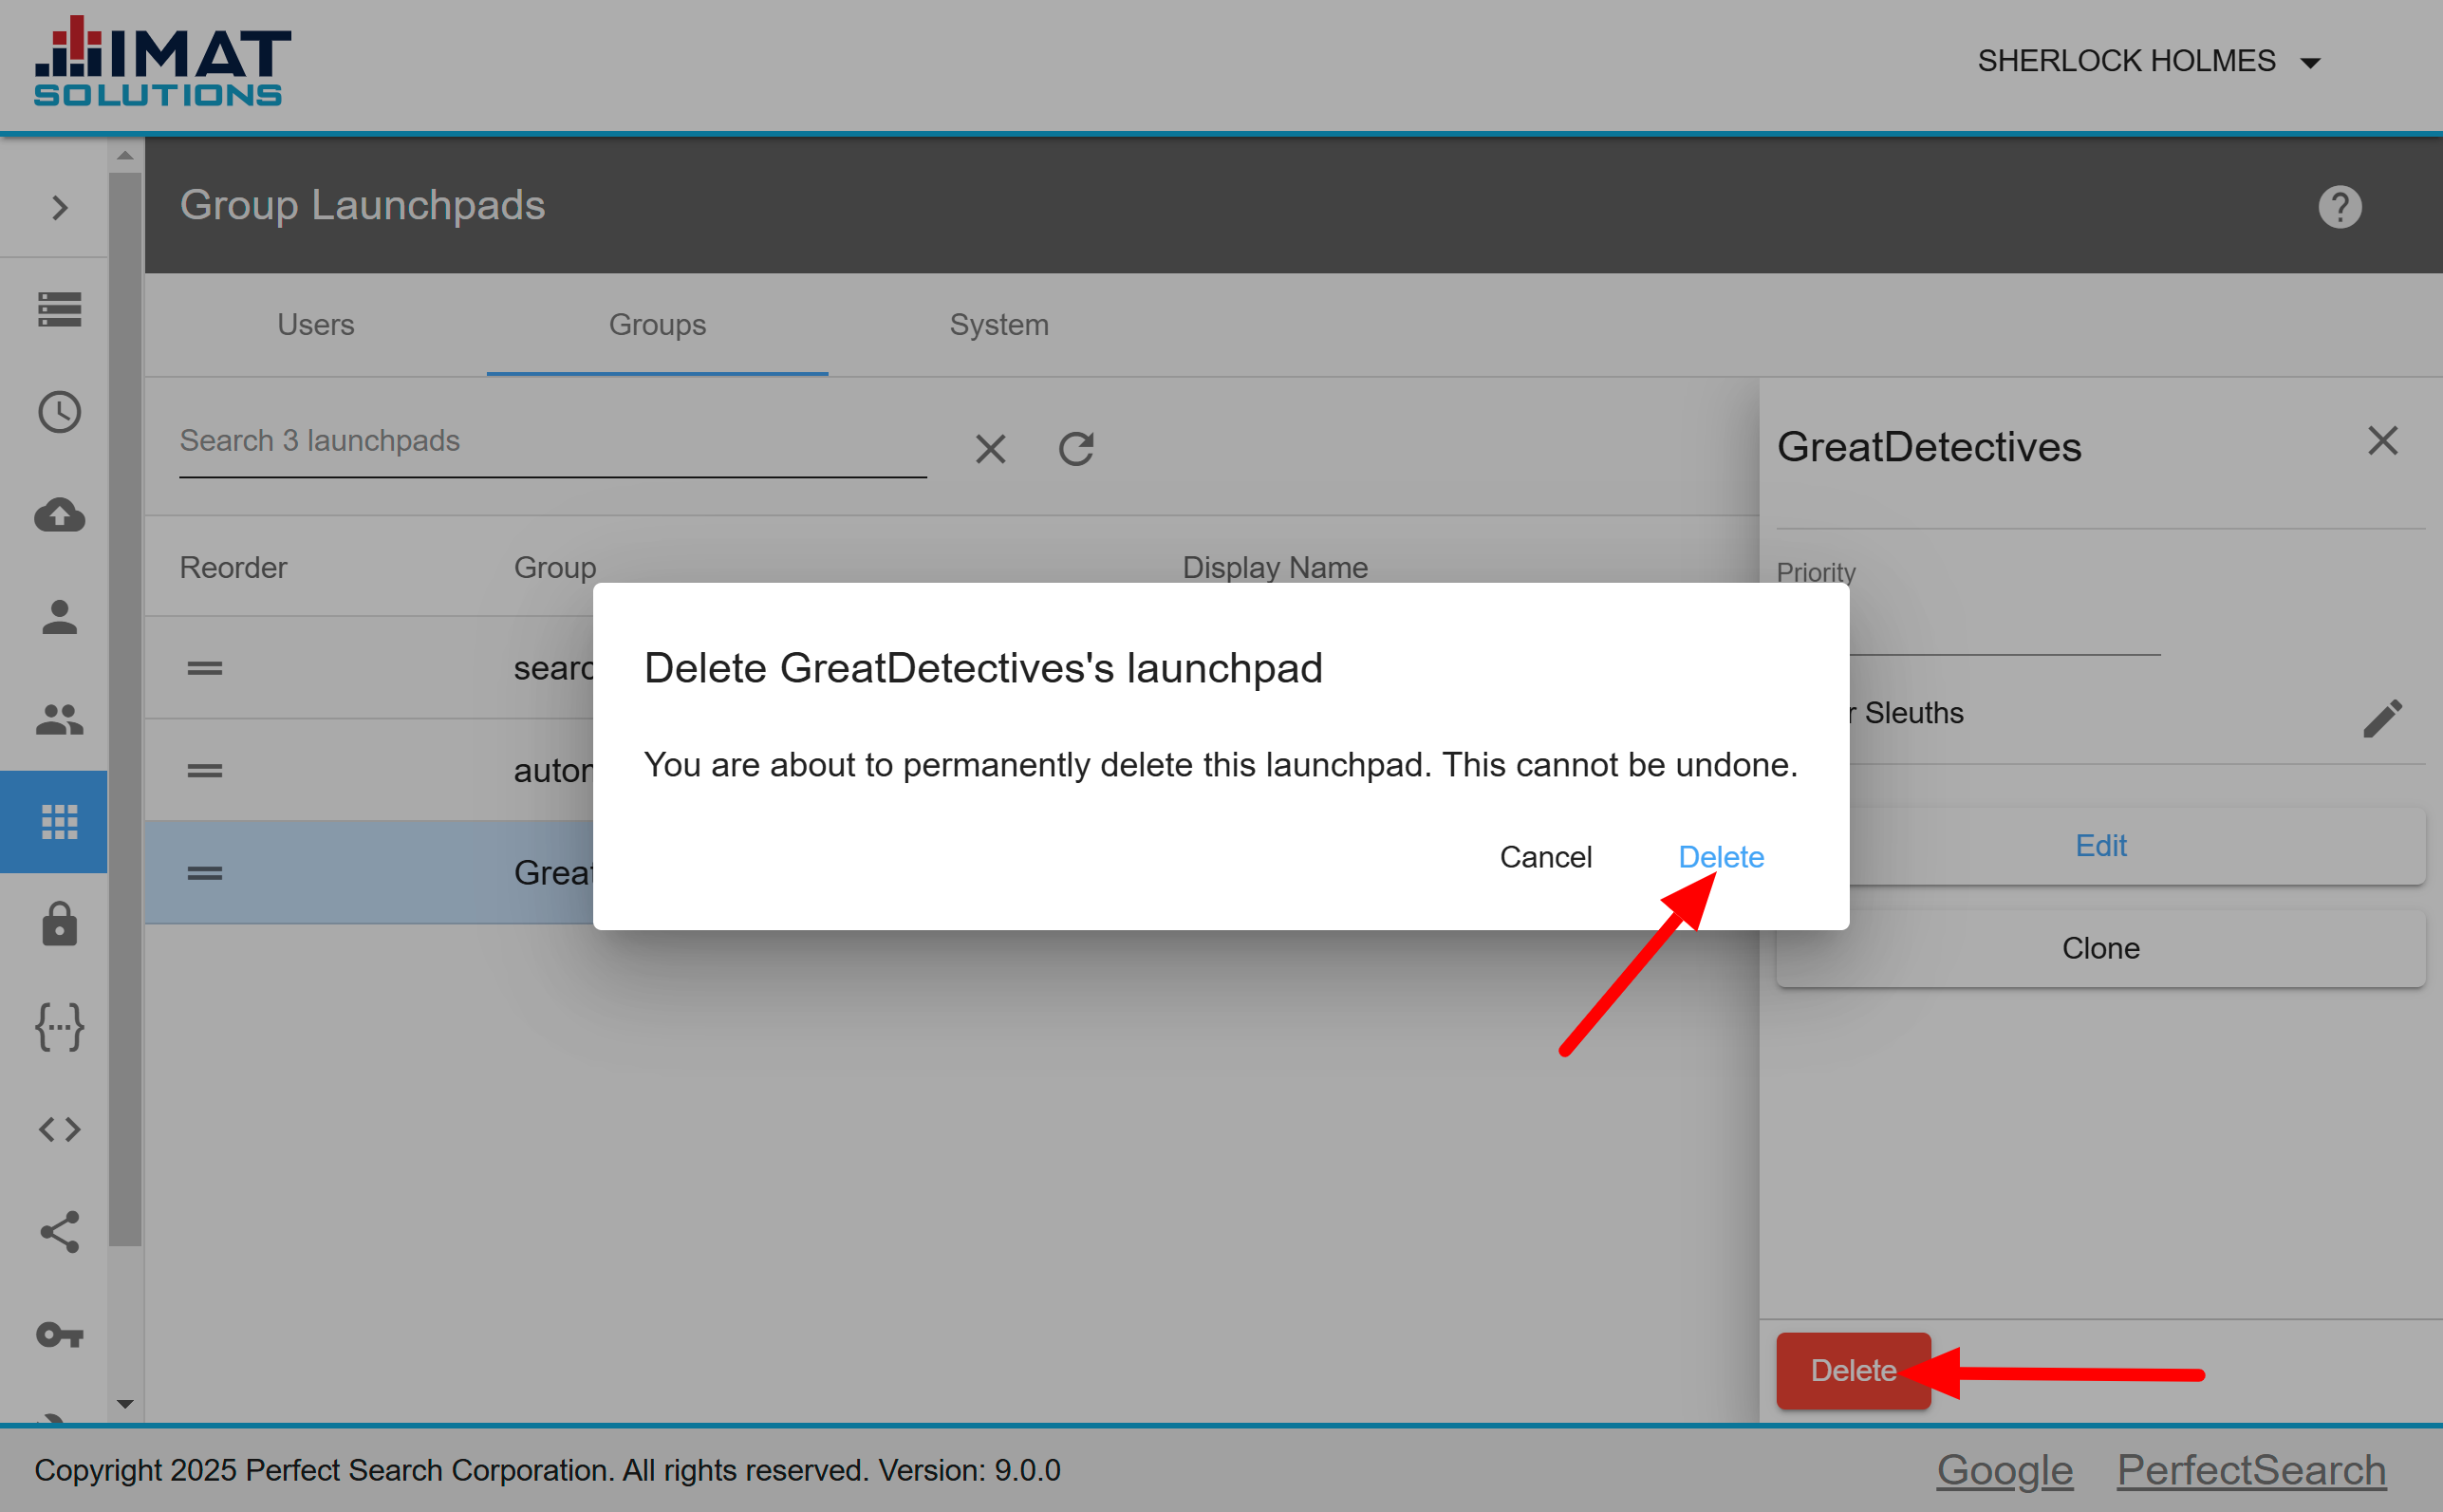
Delete Group Launchpads
When a launchpad is deleted, the user only sees the other launchpads that he or she is assigned to. If a user has no other launchpads, they may see a blank screen when they first log in. To delete a launchpad, follow the steps below:
- Locate and click on the group's launchpad you wish to delete.
- Click in the panel that opens to the right.
- Click to confirm you would like to delete the launchpad.
 Click on image to zoom.
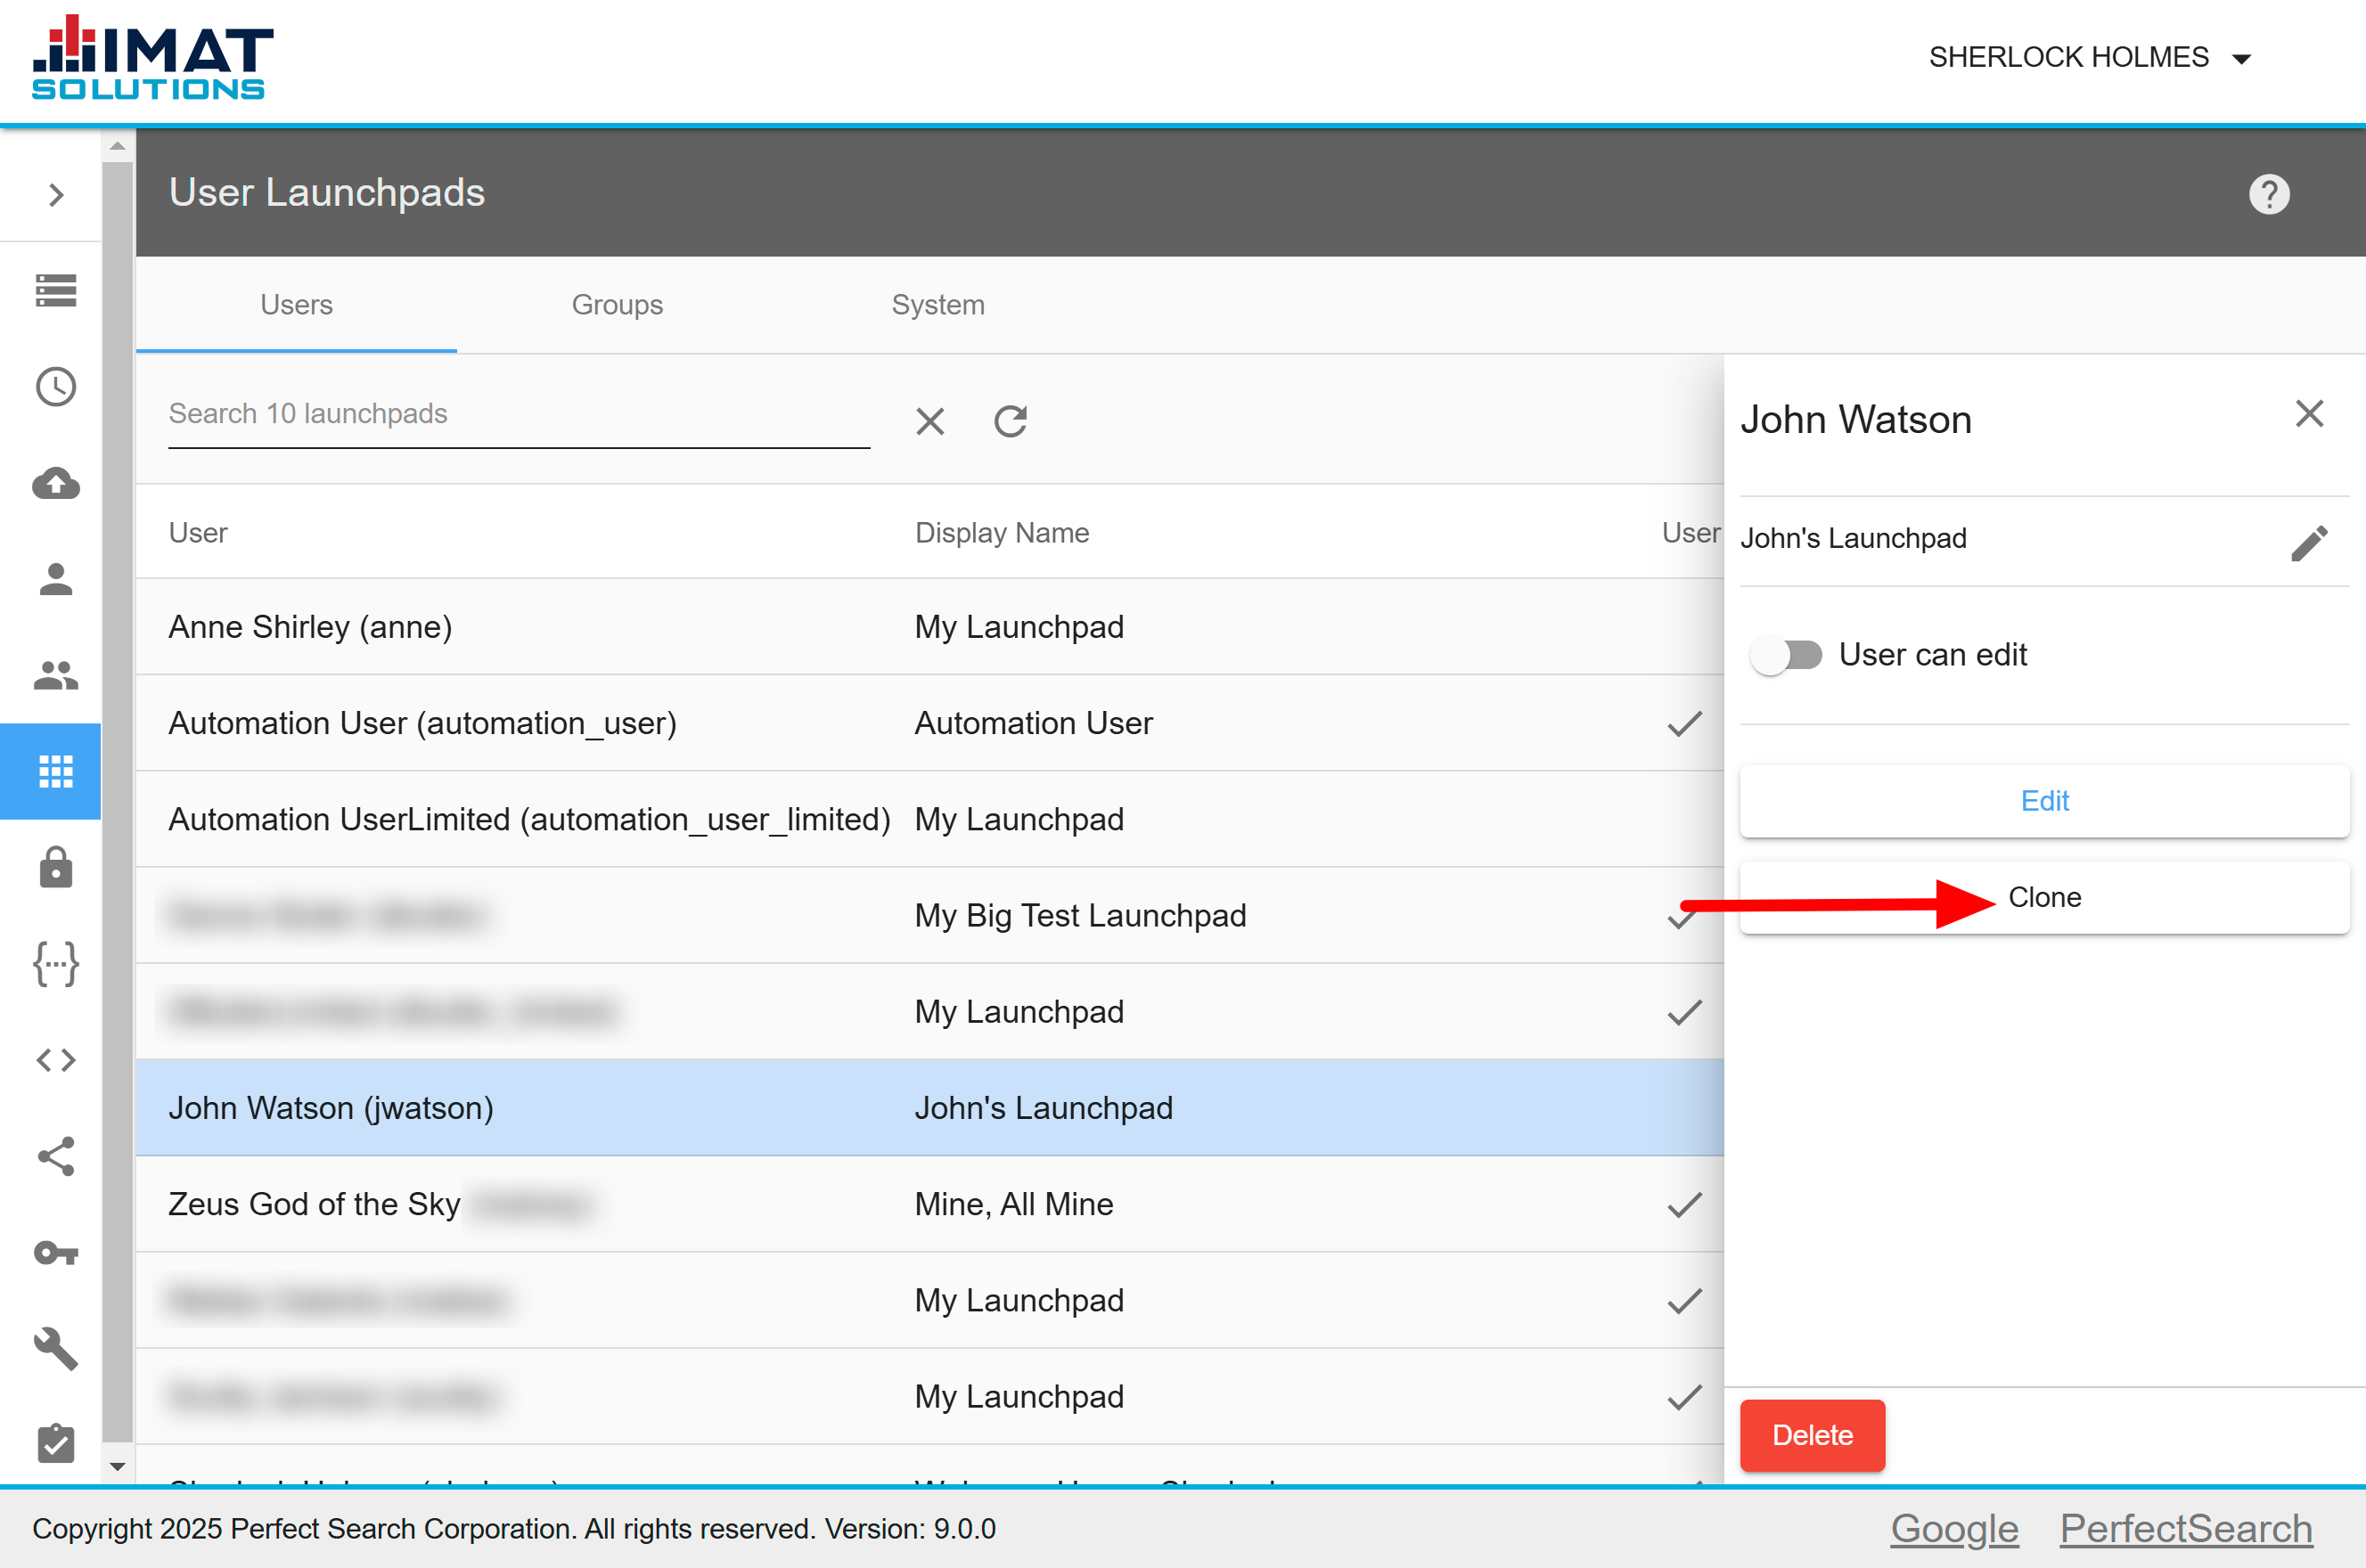
Clone Launchpads
If you have multiple users or groups that have the same tile needs as another group or user, you can clone a previously configured launchpad.
To create a replica of a launchpad, do the following:
- Locate and click the desired user or group launchpad you wish to clone.
- Click .
- Select the username or group name of the new launchpad owner.
- Enter the display name for the new launchpad.
- Click .
 Click on image to zoom.
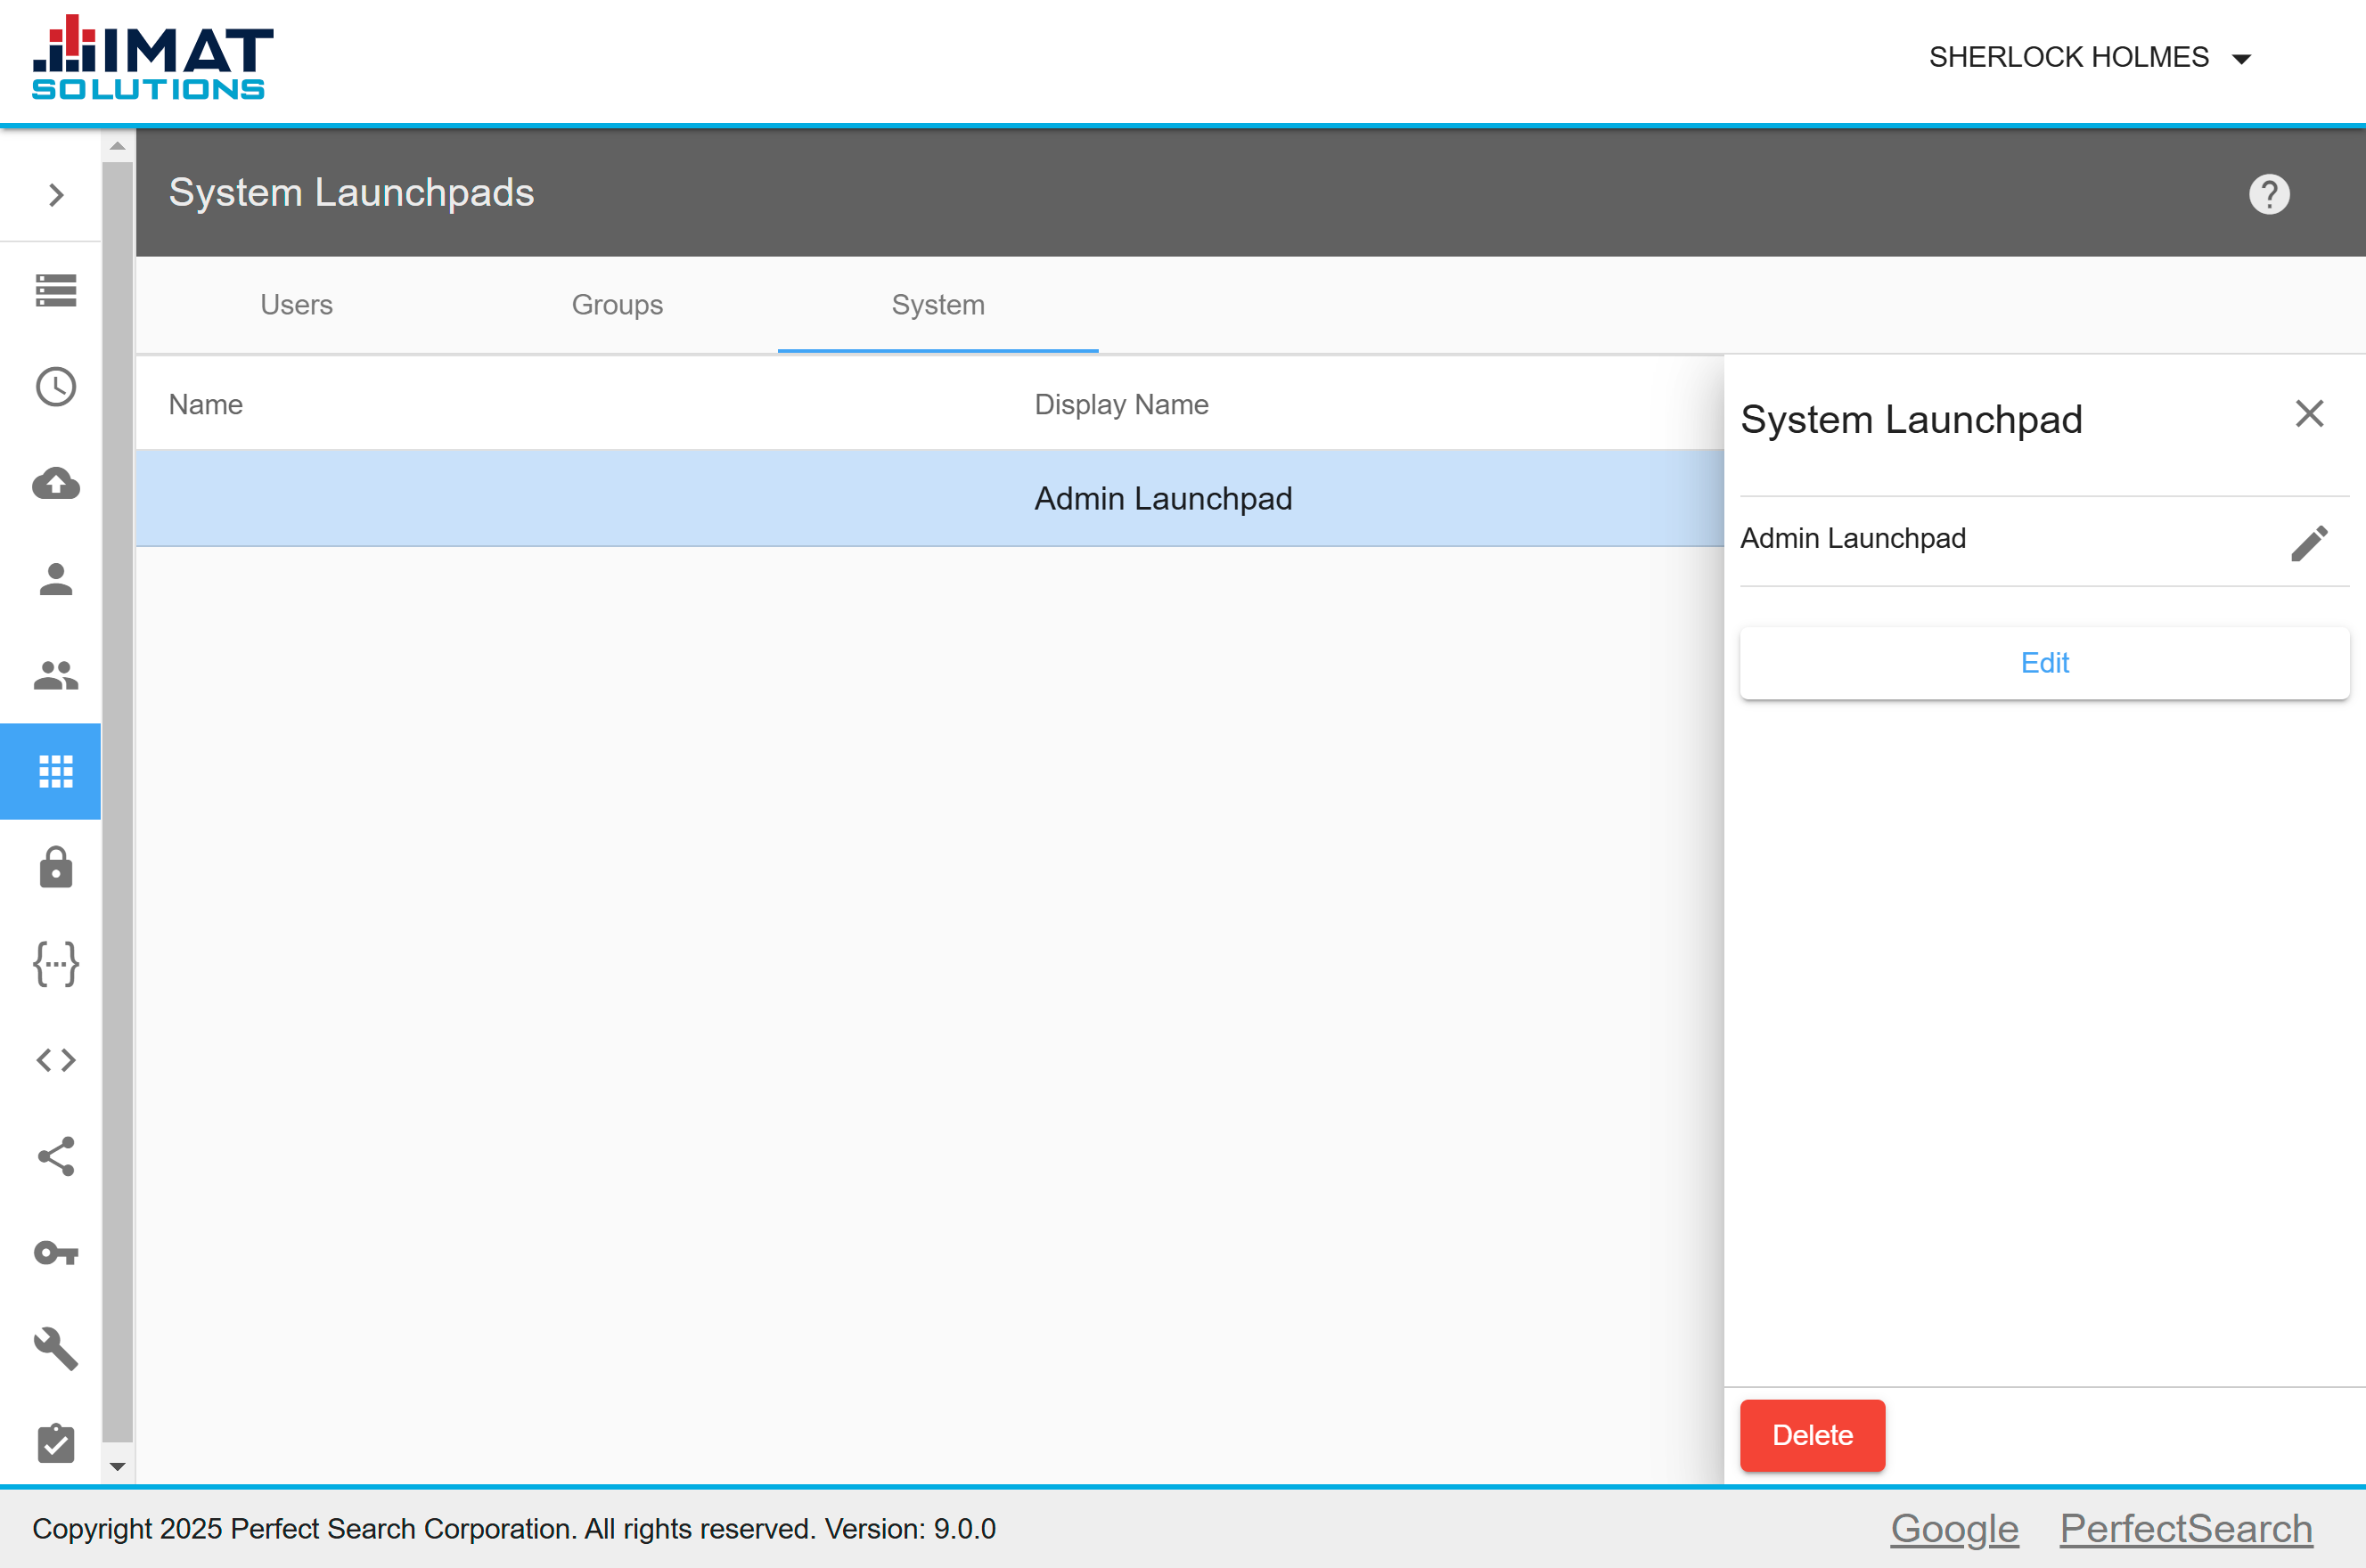
System Launchpads
Every user within your organization will be able to see the system launchpad. A system launchpad can be added, edited, or deleted by an administrator. However, it is important to note that editing permissions for users cannot be changed on a system launchpad—only the administrator may edit a system launchpad.
Be aware that if a tile is added to the system launchpad, any user will be able to see the tile when they view the launchpad, regardless of their permissions. However, if the user's assigned searchappliance_* groups do not allow, they will be unable to access the IMAT tool if they click on the tile.
For users to view or execute reports, you must also share the reports.
Only one system launchpad may exist at a time for each provider. It will appear at the bottom of the launchpad list on the home page.