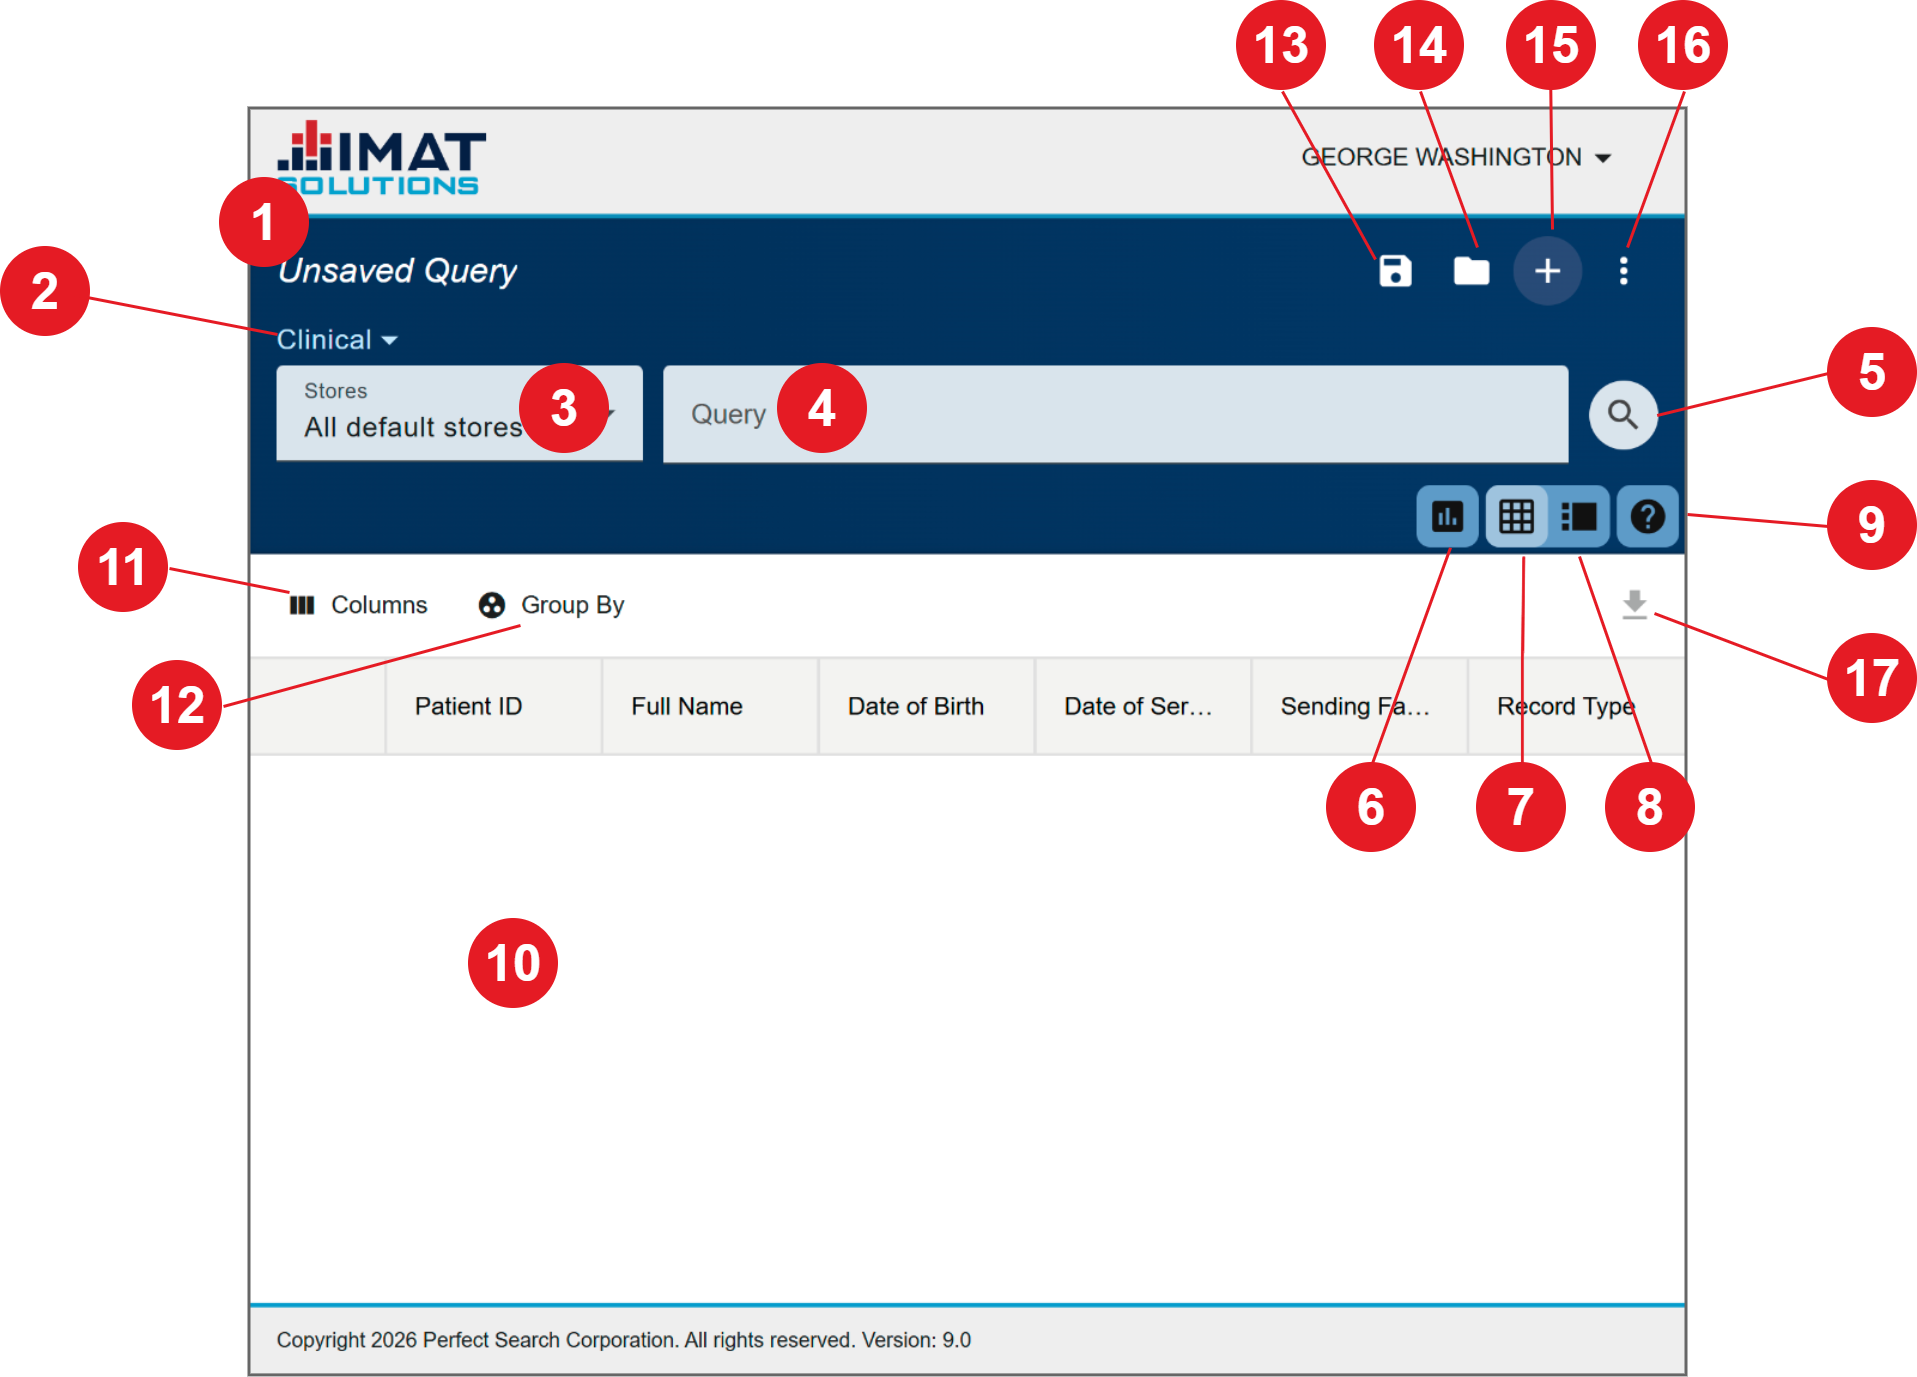
The Search page builds queries to request and receive information from the search server. It is intended for searches that can be achieved through a single query. However, that query may have multiple terms.
Search Page
Query name
Store service type
Stores
Query
Run query
View chart
Table view
Record detail view
Help
Results area
Choose columns
Group by
Save query
Open saved query
New query
More options
Export results
Build the Query
A query is a request for information from the search server. Queries execute one request from the search server at a time but may contain multiple terms within that request. To use the query builder, follow these steps:
Choose the Store Service Type. The available roles depend on your assigned search roles.
Audit: audit log stores
Auxiliary: miscellaneous stores that didn’t fit in the other categories
Clinical: clinical record stores
Medical codes: medical code stores
MPI: MPI stores
Select the Store. Some store types allow you to select multiple stores for searching.
Enter your Query.
You may use as many terms as you need and are not limited to just one type or just one term of each type. Start typing the field or set name, and all matches appear. The four types:
Field: provides a list of symbols and indexed fields
Set: provides a list of set definitions created by admins and shared with the user
Text: finds text within records; no dropdown list is provided
Advanced: grants freedom to enter the query using proper query syntax without using the prompts provided by the other three options (see the Quick Reference Guide for help)
Select the operator. Options change depending on the category you chose, but most have some version of these:
has (contains the value)
has not (NOT)
has multiple (IN)
multiple has not (NOT field_name:IN(a b c))
range ([…TO…])
Enter the word, phrase, dates, or numbers you are searching for.
Complete the search term by clicking .
Build a new term.
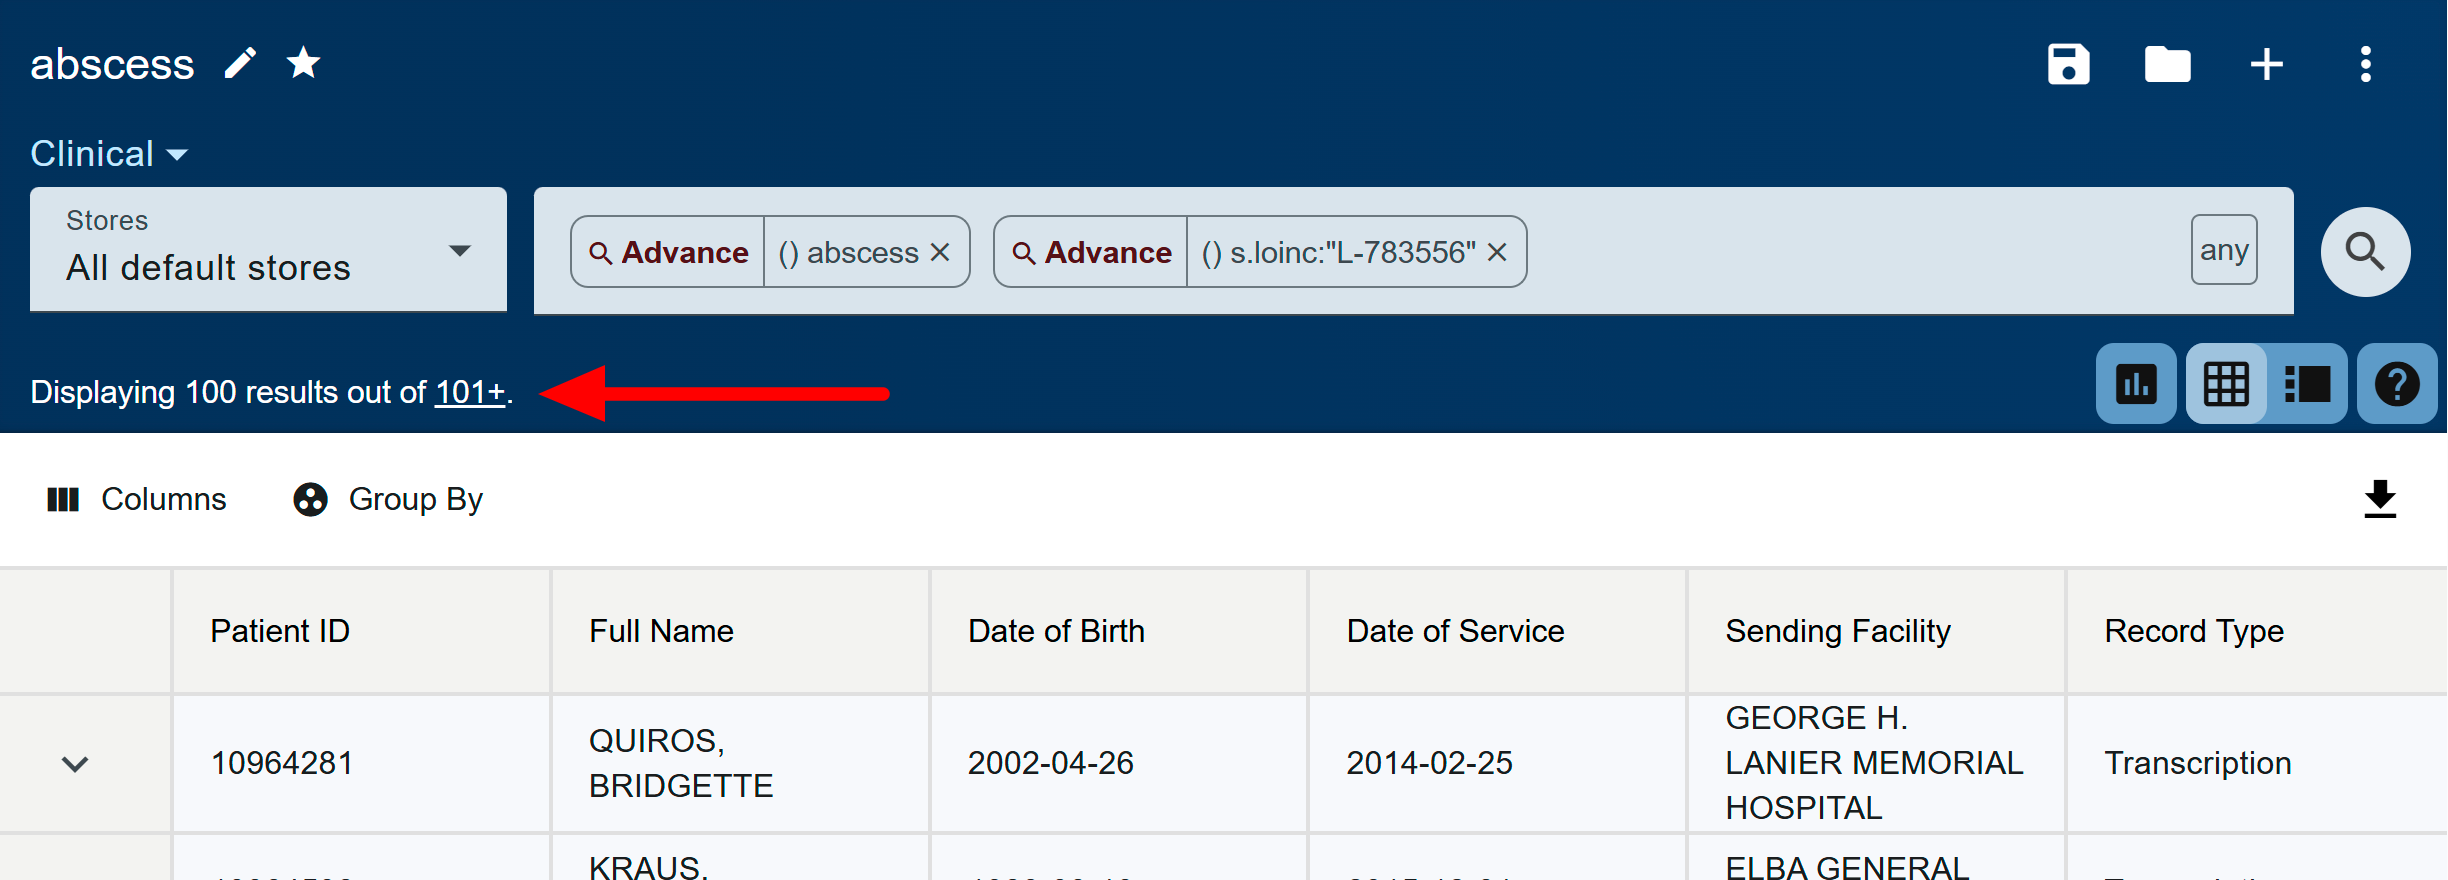
If multiple terms are entered, a box appears to the right of the terms. Click it to change from all (AND) to any (OR). All terms in the query have the same operator between them—term 1 OR term 2 OR term 3 OR term 4.
If using the advanced option, you may have built these into the query already, ()p.patient_last_name:”lincoln” gunshot OR (s.loinc:"L-783556" NOT s.loinc:”L-784546"), and the all/any button may not be available. (Spaces between terms indicate an AND.) Advanced allows for mixing AND and OR operators.
Click after all terms are entered to run the query.
 Click on the image to zoom.
Results
When a search is completed, the first 100 results appear in the table. The number of hits appears above the query section. If more than 100 results meet the query criteria, it will say, "Displaying 100 results out of 101+." Click 101+ to get the total number of hits.
Click on the image to zoom.
Change View
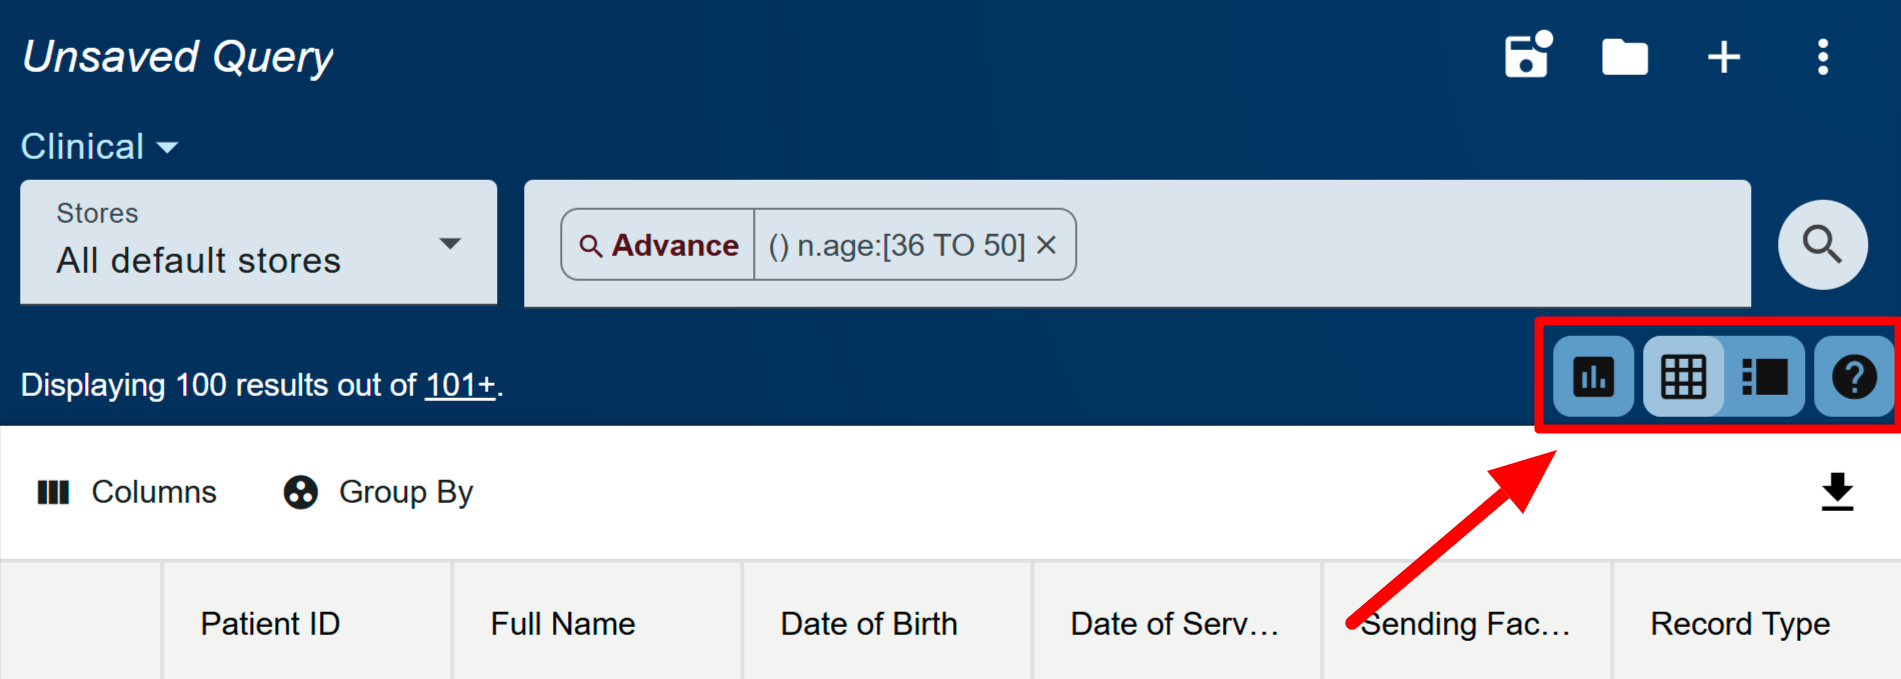
Clicking the buttons below the query changes the view. By default, the results are in table view, . However, you can switch to record detail view, , to view the record’s details.
You can also open the graph view, . For now, the graph only shows dates the records on the current page were committed to the search server.
Table View
The table shows some of the most common data types needed to identify a record.
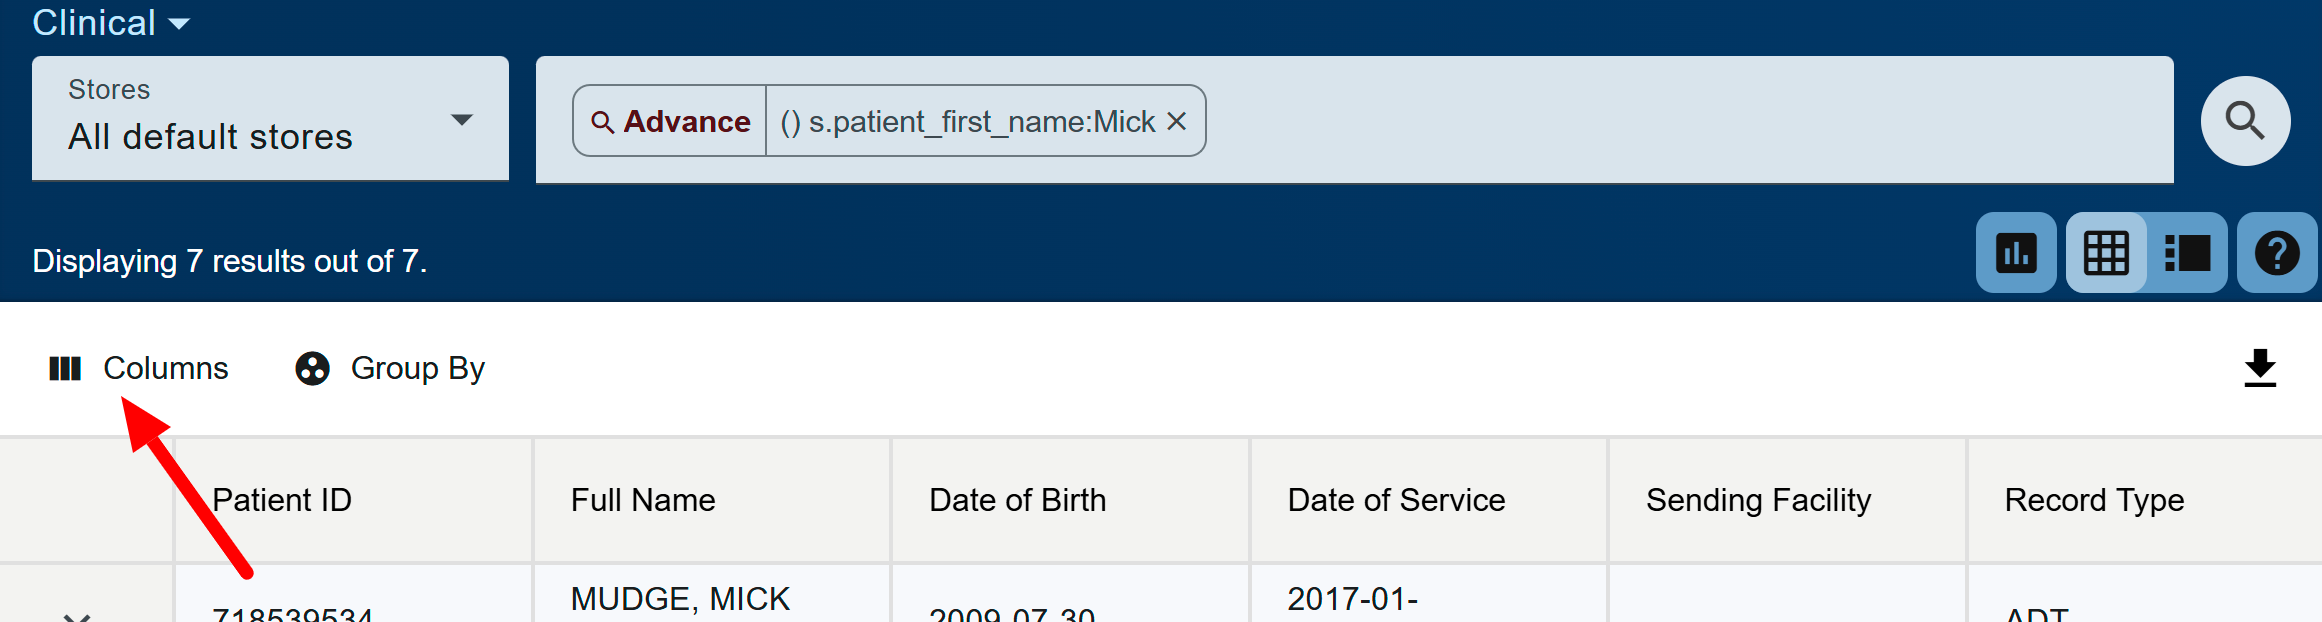
You can customize the Table view by hiding or unhiding, sorting, and reordering columns. You can also group data.
 Click on the image to zoom.
Columns
Click Columns found to the top-left of the Results area. Here you can hide or unhide columns by clicking on the checkbox. The available column options are determined by the data found in the page results.
 Click on the image to zoom.
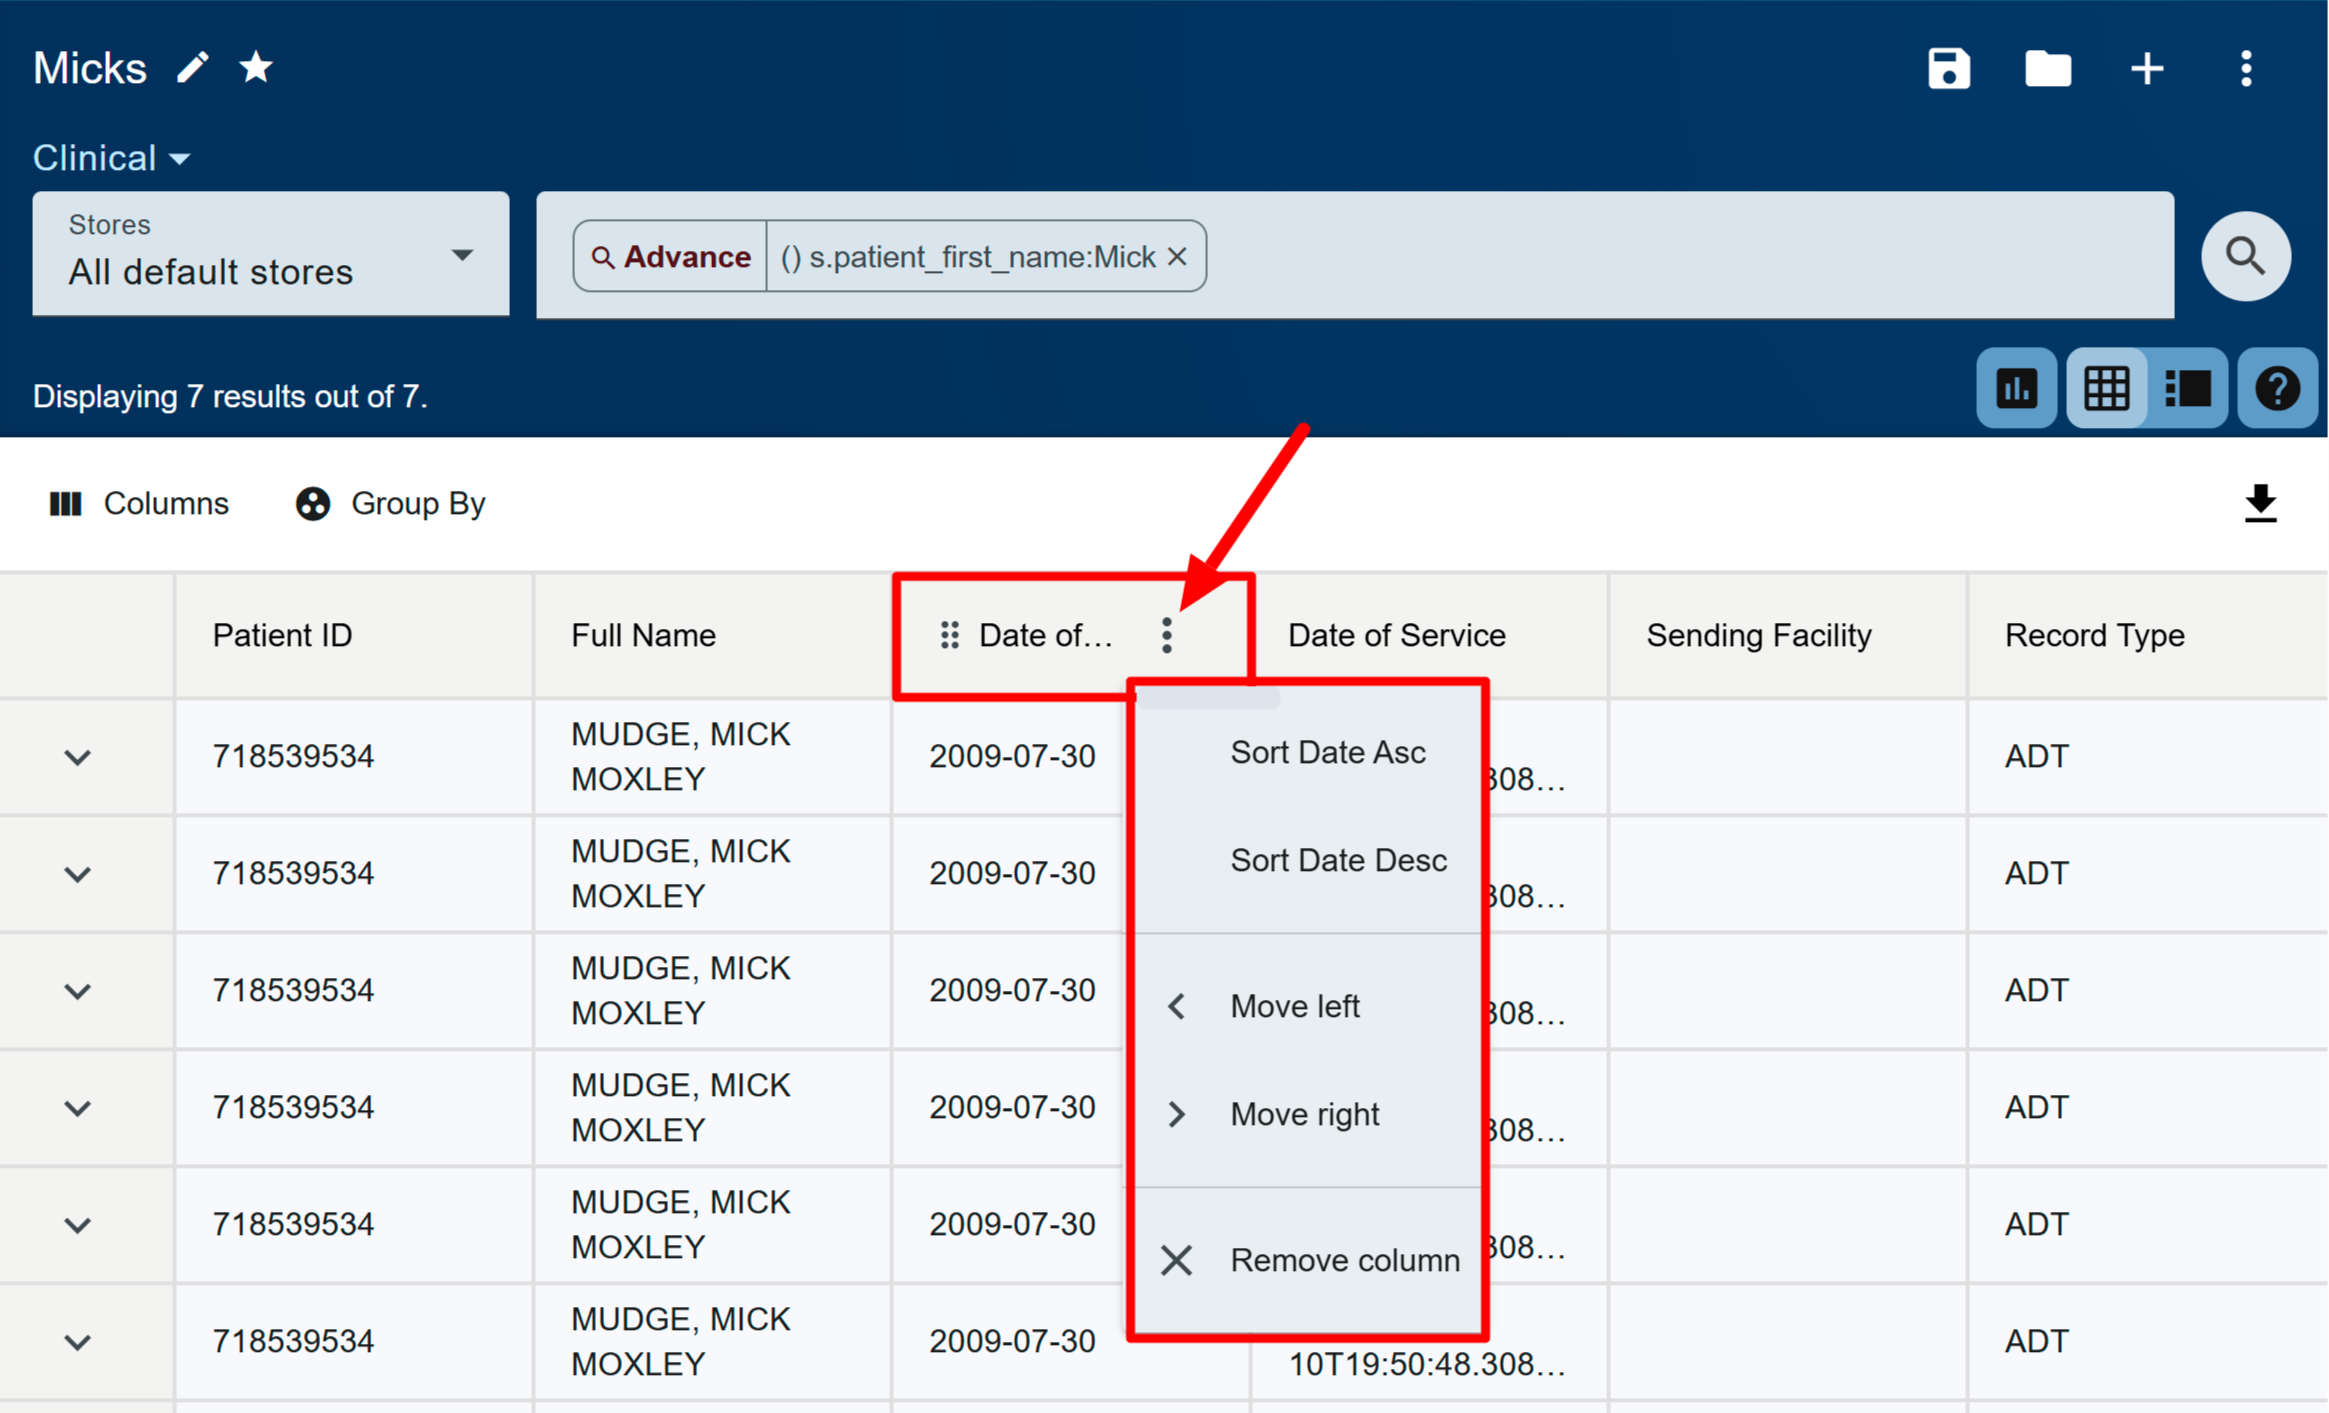
Hovering over any column header shows more customization options. Click on the icon that appears. From this menu, you can sort the results on the current page, move the column one column to the right or left, and remove the column.
Alternatively, you can drag and drop the column to where you want it.
 Click on the image to zoom.
Group By
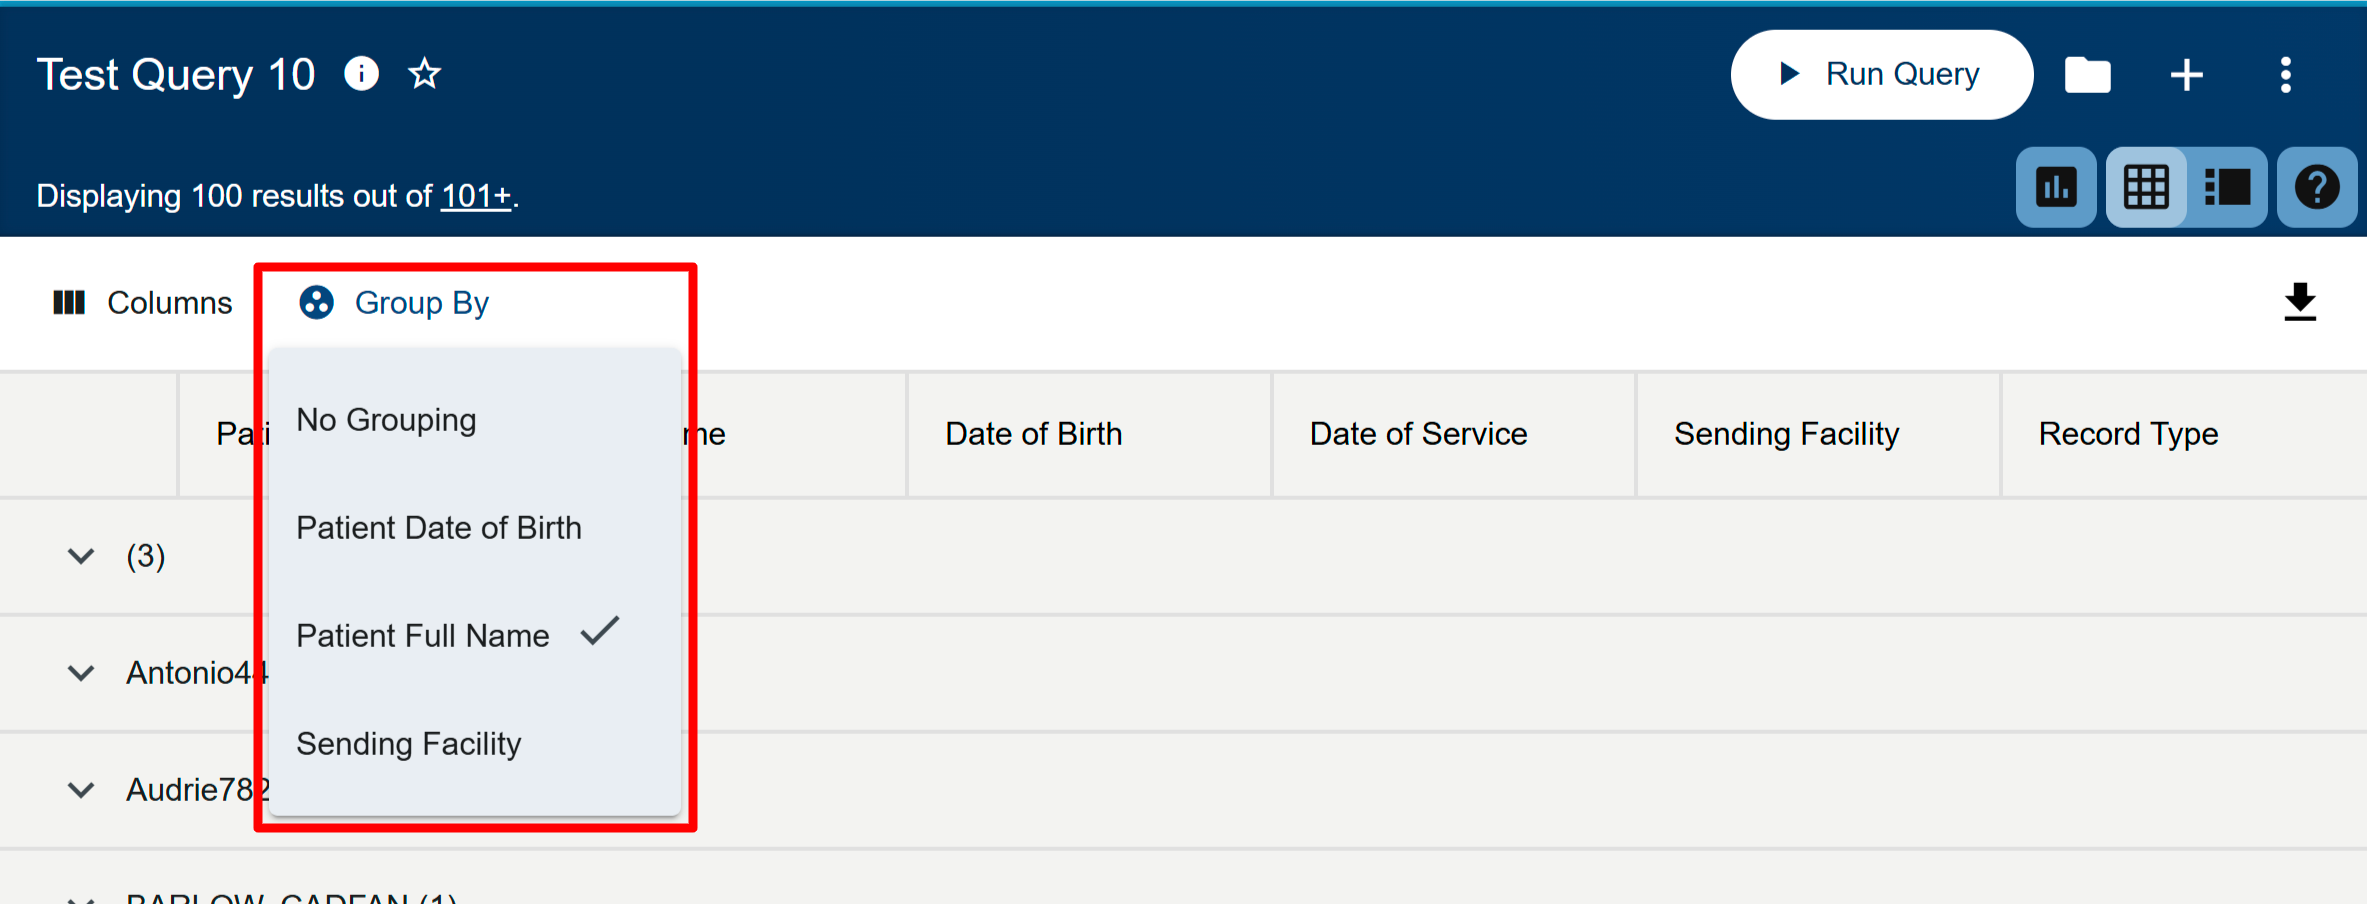
Click Group By to group the records. Your four grouping options:
No grouping
Patient date of birth
Patient name
Sending facility
Using Group By groups only the records currently showing on the page.
 Click on the image to zoom.
 Click on the image to zoom.
View Records
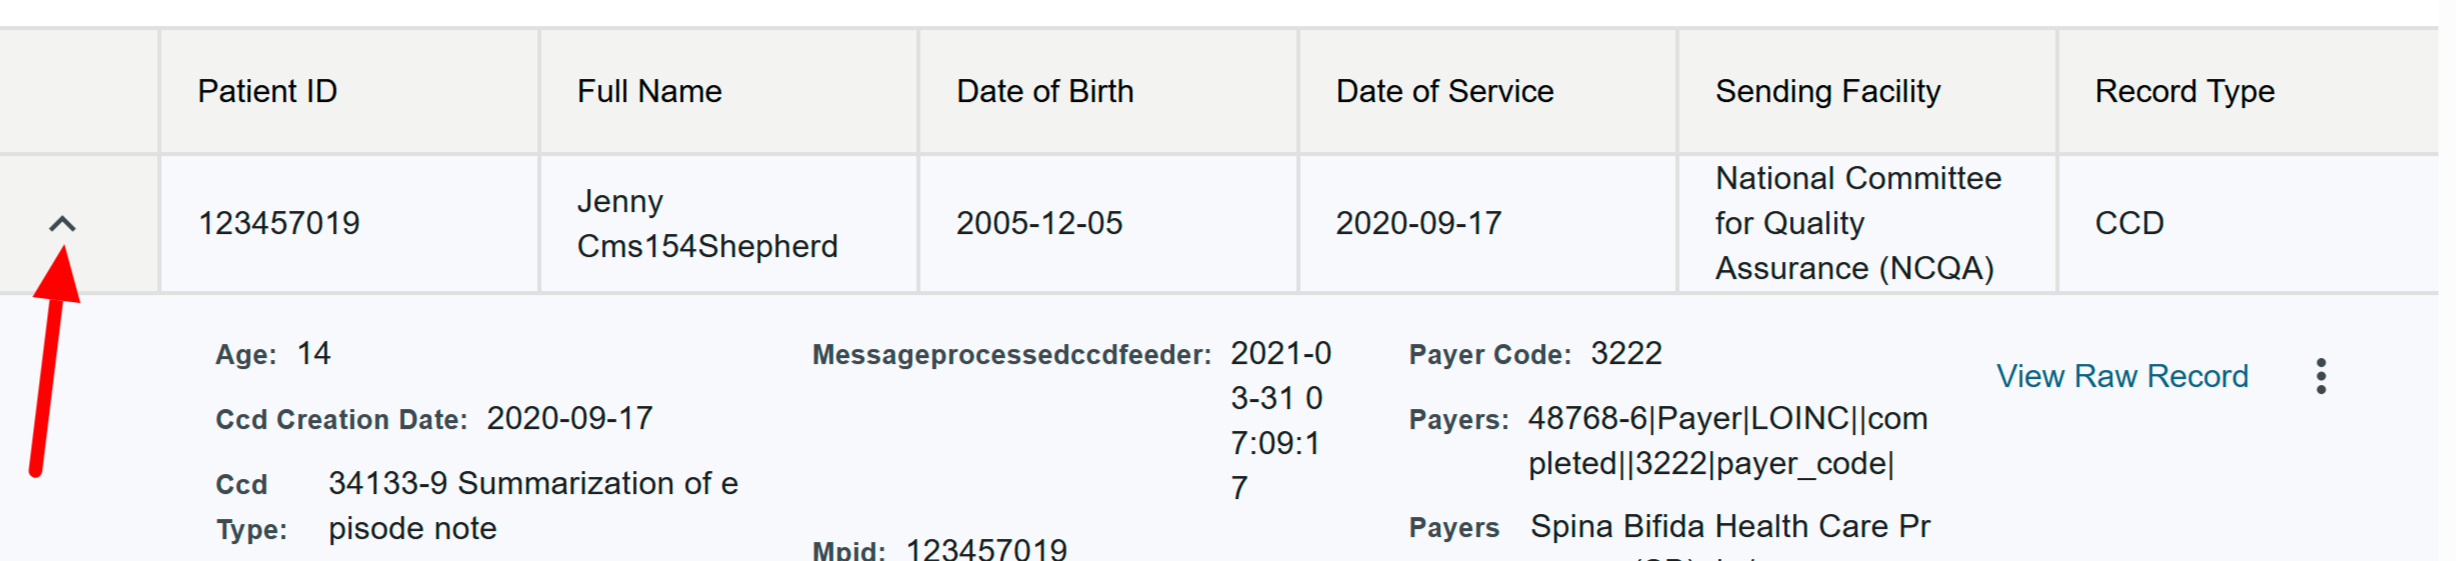
Expand record information by clicking on the record row. This shows the extracted information from the original record.
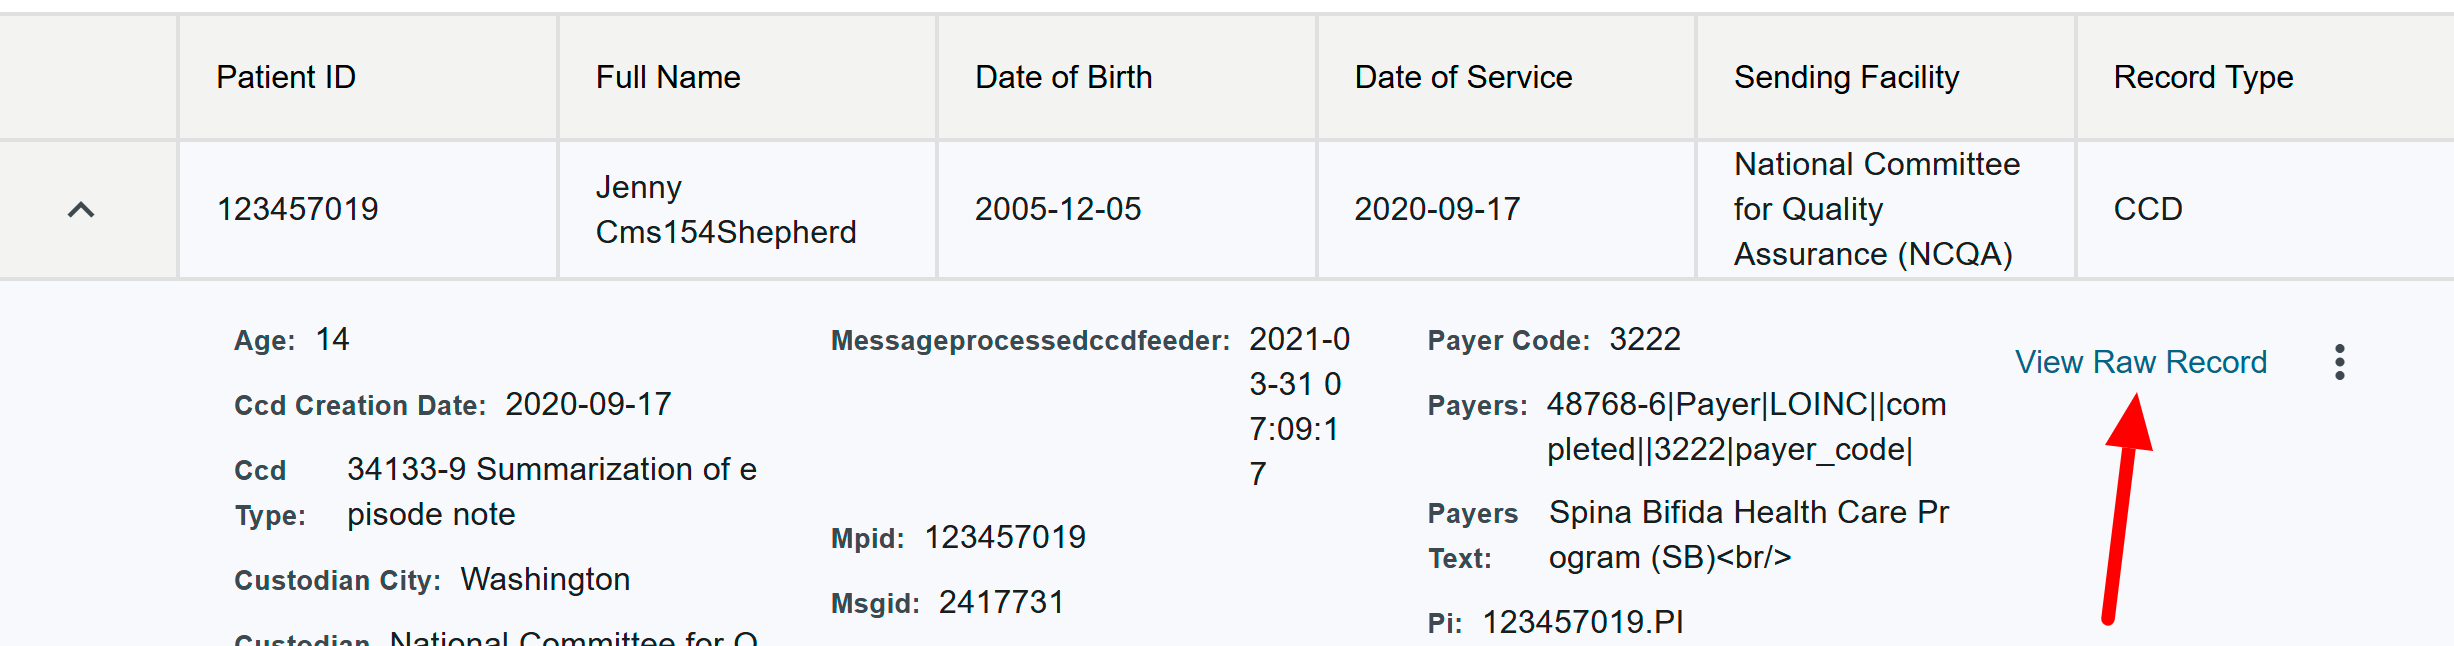
View the raw record by clicking the link provided while viewing the expanded patient information. A dialog opens with the raw record. By default, pretty print is turned on, but you may toggle it off.
The dialog also allows you to copy the raw XML record.
 Click on the image to zoom.
 Click on the image to zoom.
Export Results
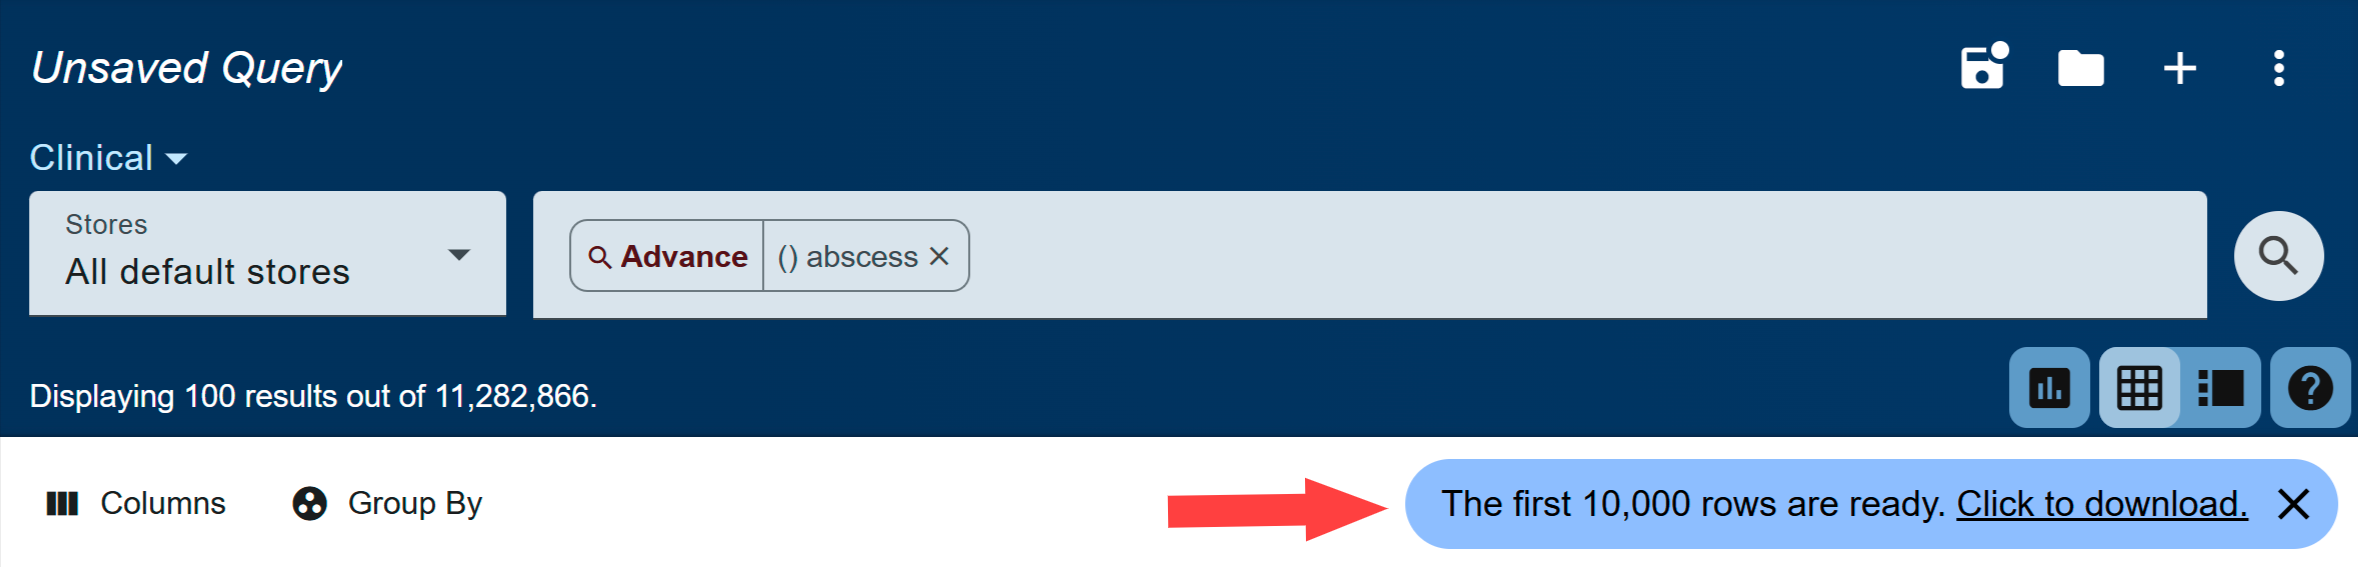
If you have the correct permissions, you can export a CSV file of the results for use later. You may download up to 10,000 lines of data. If the query returns more records than that, you are still restricted to 10,000 records. The selected columns determine the downloaded information.
To export data:
Build and run the query.
Click .
After the file is ready to download, click the link to download.
Click to close the message.
Note:
The downloaded data may contain PII or PHI. Follow your company’s guidelines about downloading and storing that type of data.
Record Detail View
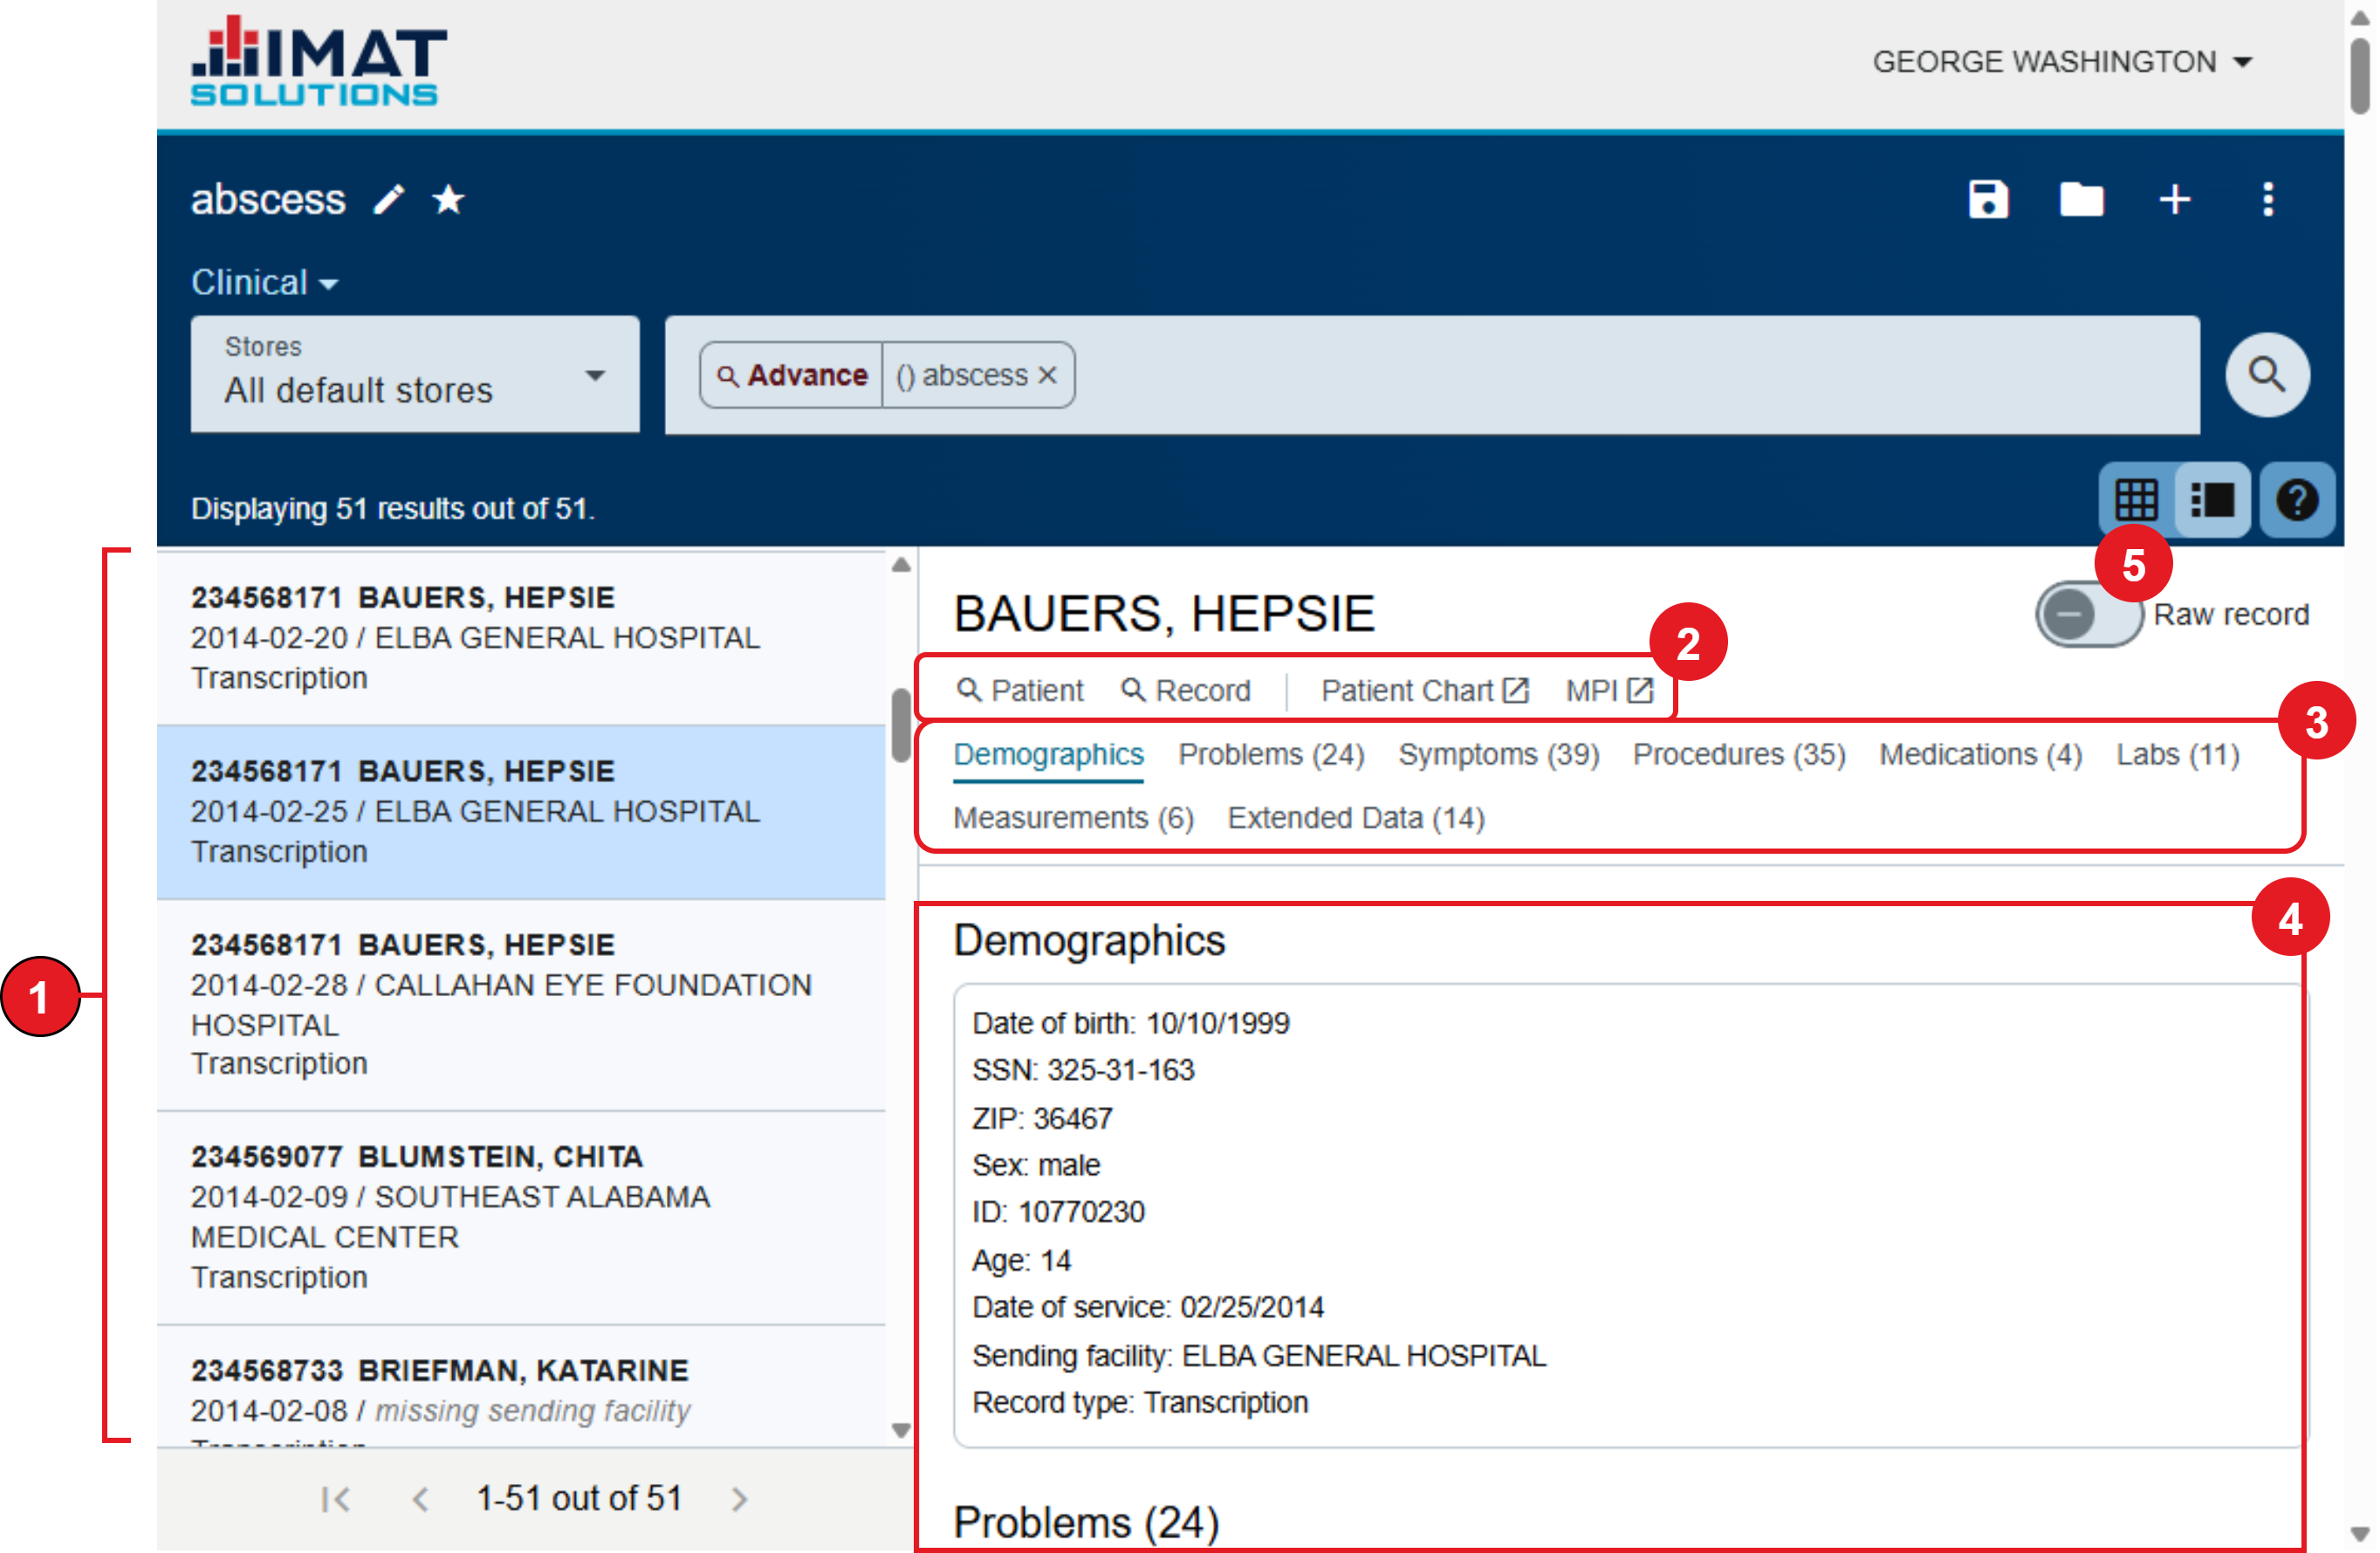
The record detail view receives its information from the raw record. It looks through the raw record, finds the different sections (such as labs), extracts information, and converts that into tables. The information here can be different than the expanded extract information found in Table View. It is not available for those in the searchappliance_search_by_id role. This view is only available for the Clinical service type. The option to switch to this view is removed for those services (e.g., Auxiliary).
 Click on the image to zoom.
The numbers on the list below correspond to the numbers on the record detail view image.
Results list: The list of results that match your search.
Links:
Patient: Executes a search for the patient.
Record: Executes a search for the record.
Patient Chart: Opens the patient in the VHR app.
MPI: Opens the patient in the MPI app.
Concept links: Takes you to that section in the concept summary details. A link only appears if there is information in that concept. Some options include:
Demographics
Problems
Symptoms
Procedures
Medications
Labs
Measurements
Allergies
Extended Data
Concept summary details: Each summary contains rows of clinical concepts extracted from the original document. Problem, Symptom, or Procedure concepts display SNOMED values, Medication concepts display RxNorm values, and Labs display LOINC codes.
View raw record: Toggle on the raw record. It displays the original raw CXML. By default, pretty print is on, but you can toggle it off. Press to copy the raw record.
 Click on the image to zoom.
Save a Query
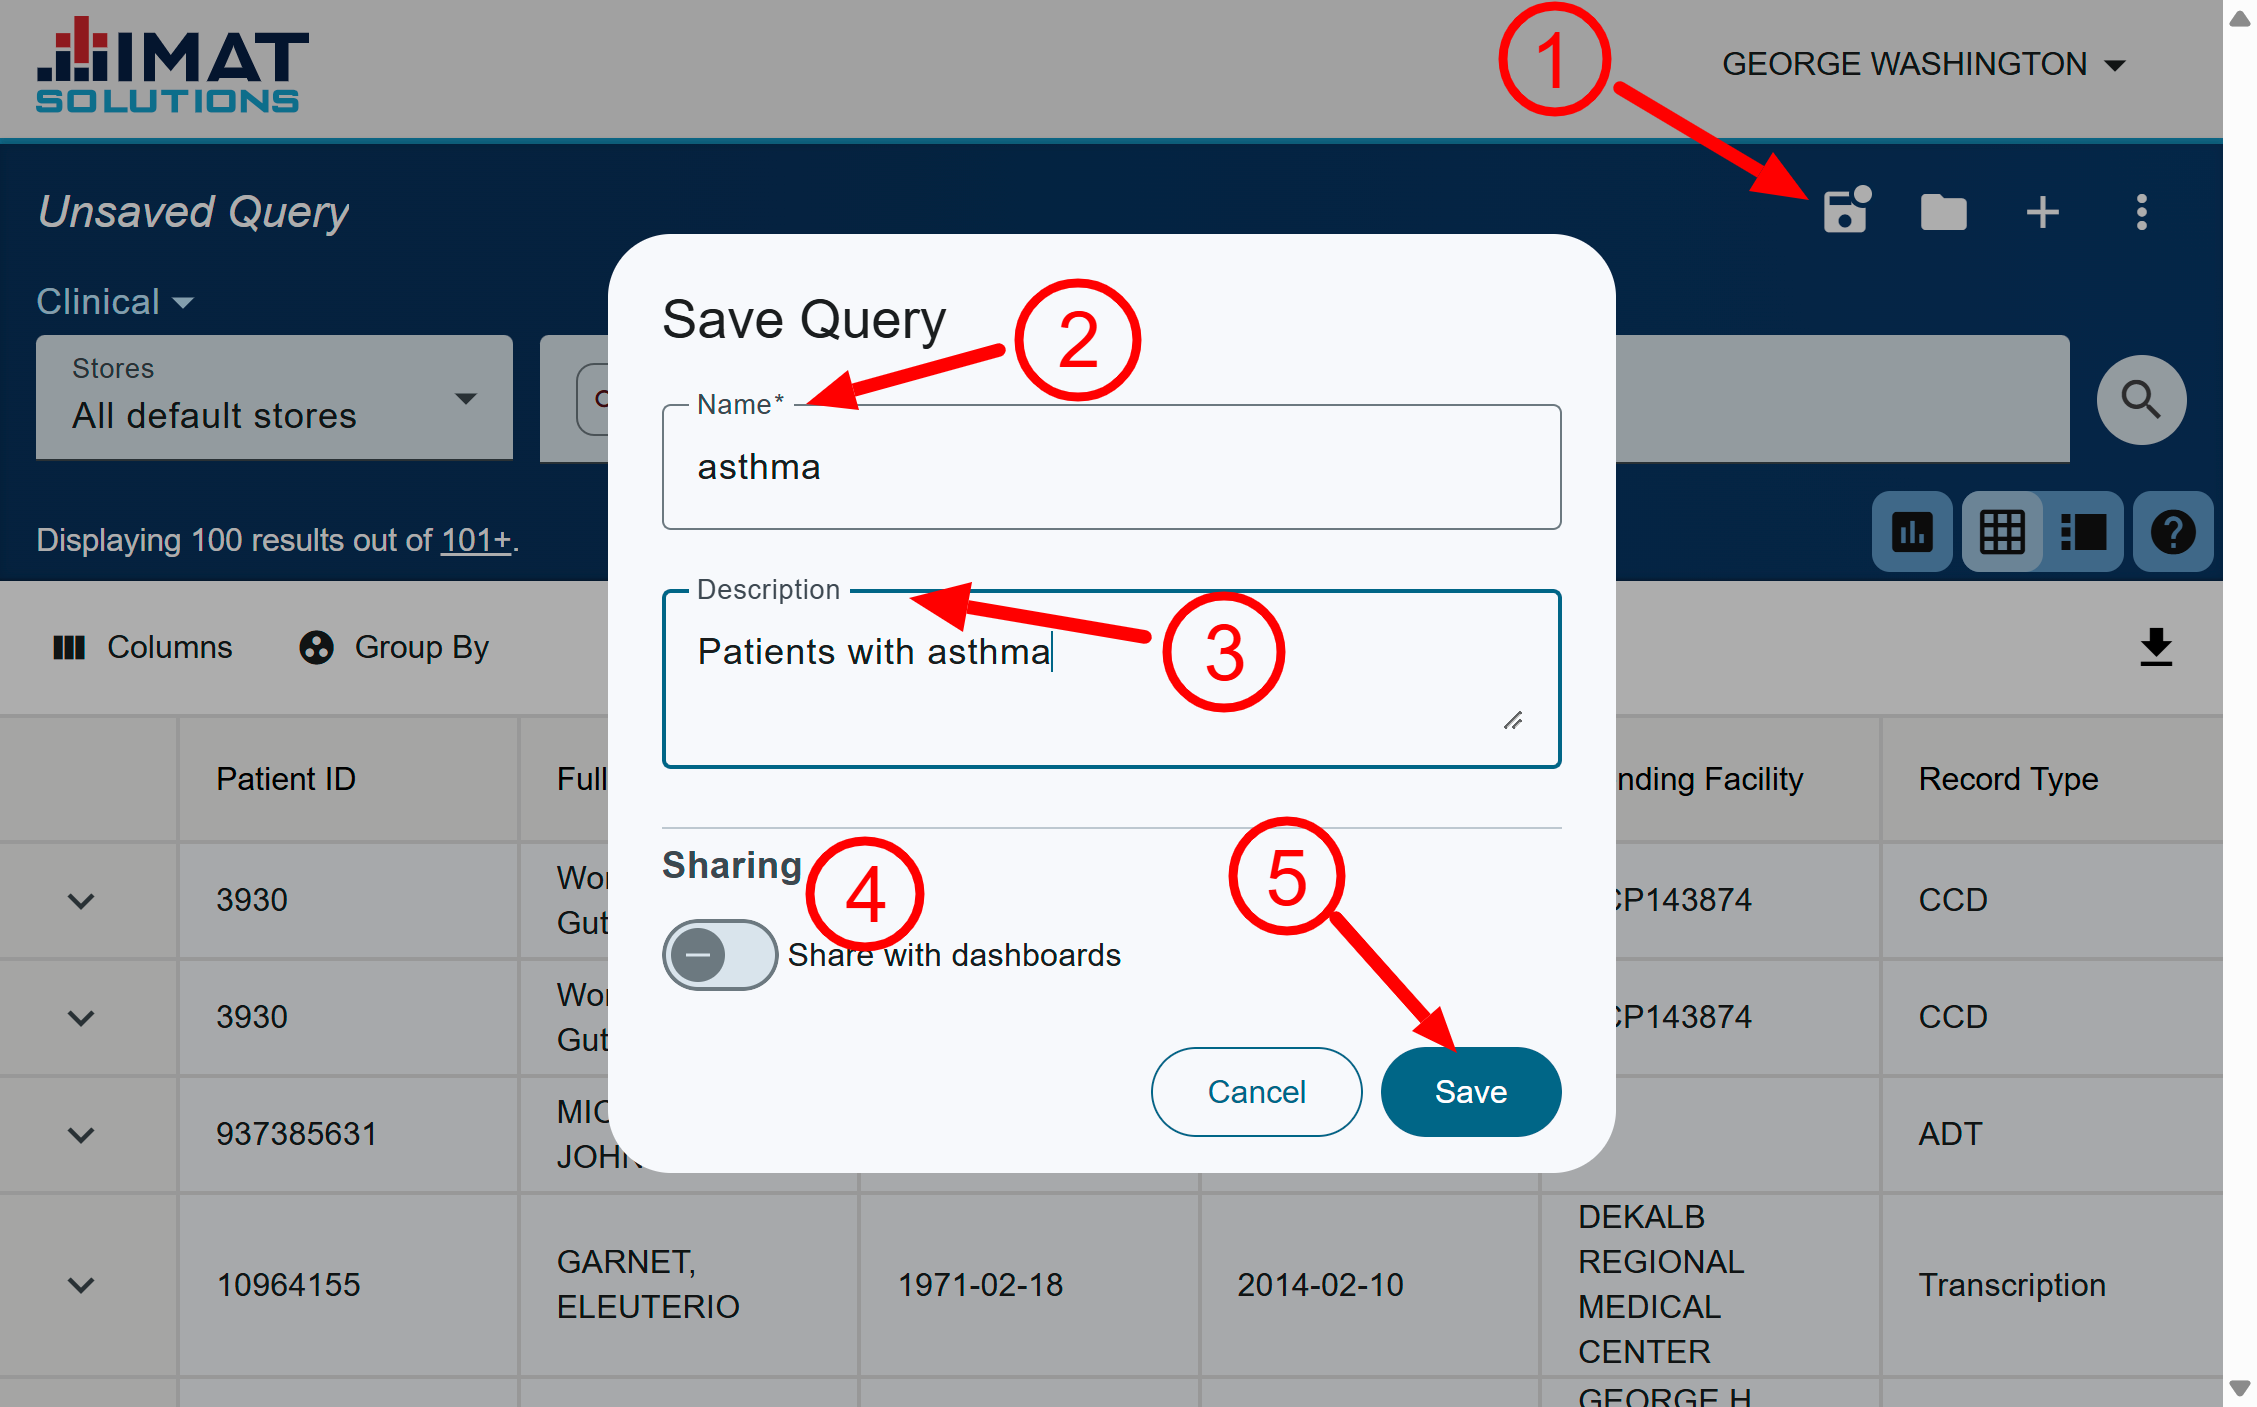
If you run the same query multiple times, you may save it for easy access without rebuilding it each time. Note that this saves the query only and not the results. You will need to rerun the query to get results each time you open the query.
Click or press ctrl+S (cmd+S for Mac) on your keyboard.
When the dialog opens, type in the query Name. Query names may contain up to 255 characters and all characters are allowed.
Enter a Description. Descriptions may contain up to 255 characters and all characters are allowed.
If you would like the query to be available in Dashboards, click the toggle. It will change from faded to dark. You may do this later if you do not do it now.
Click .
 Click on the image to zoom.
Open a Saved Query
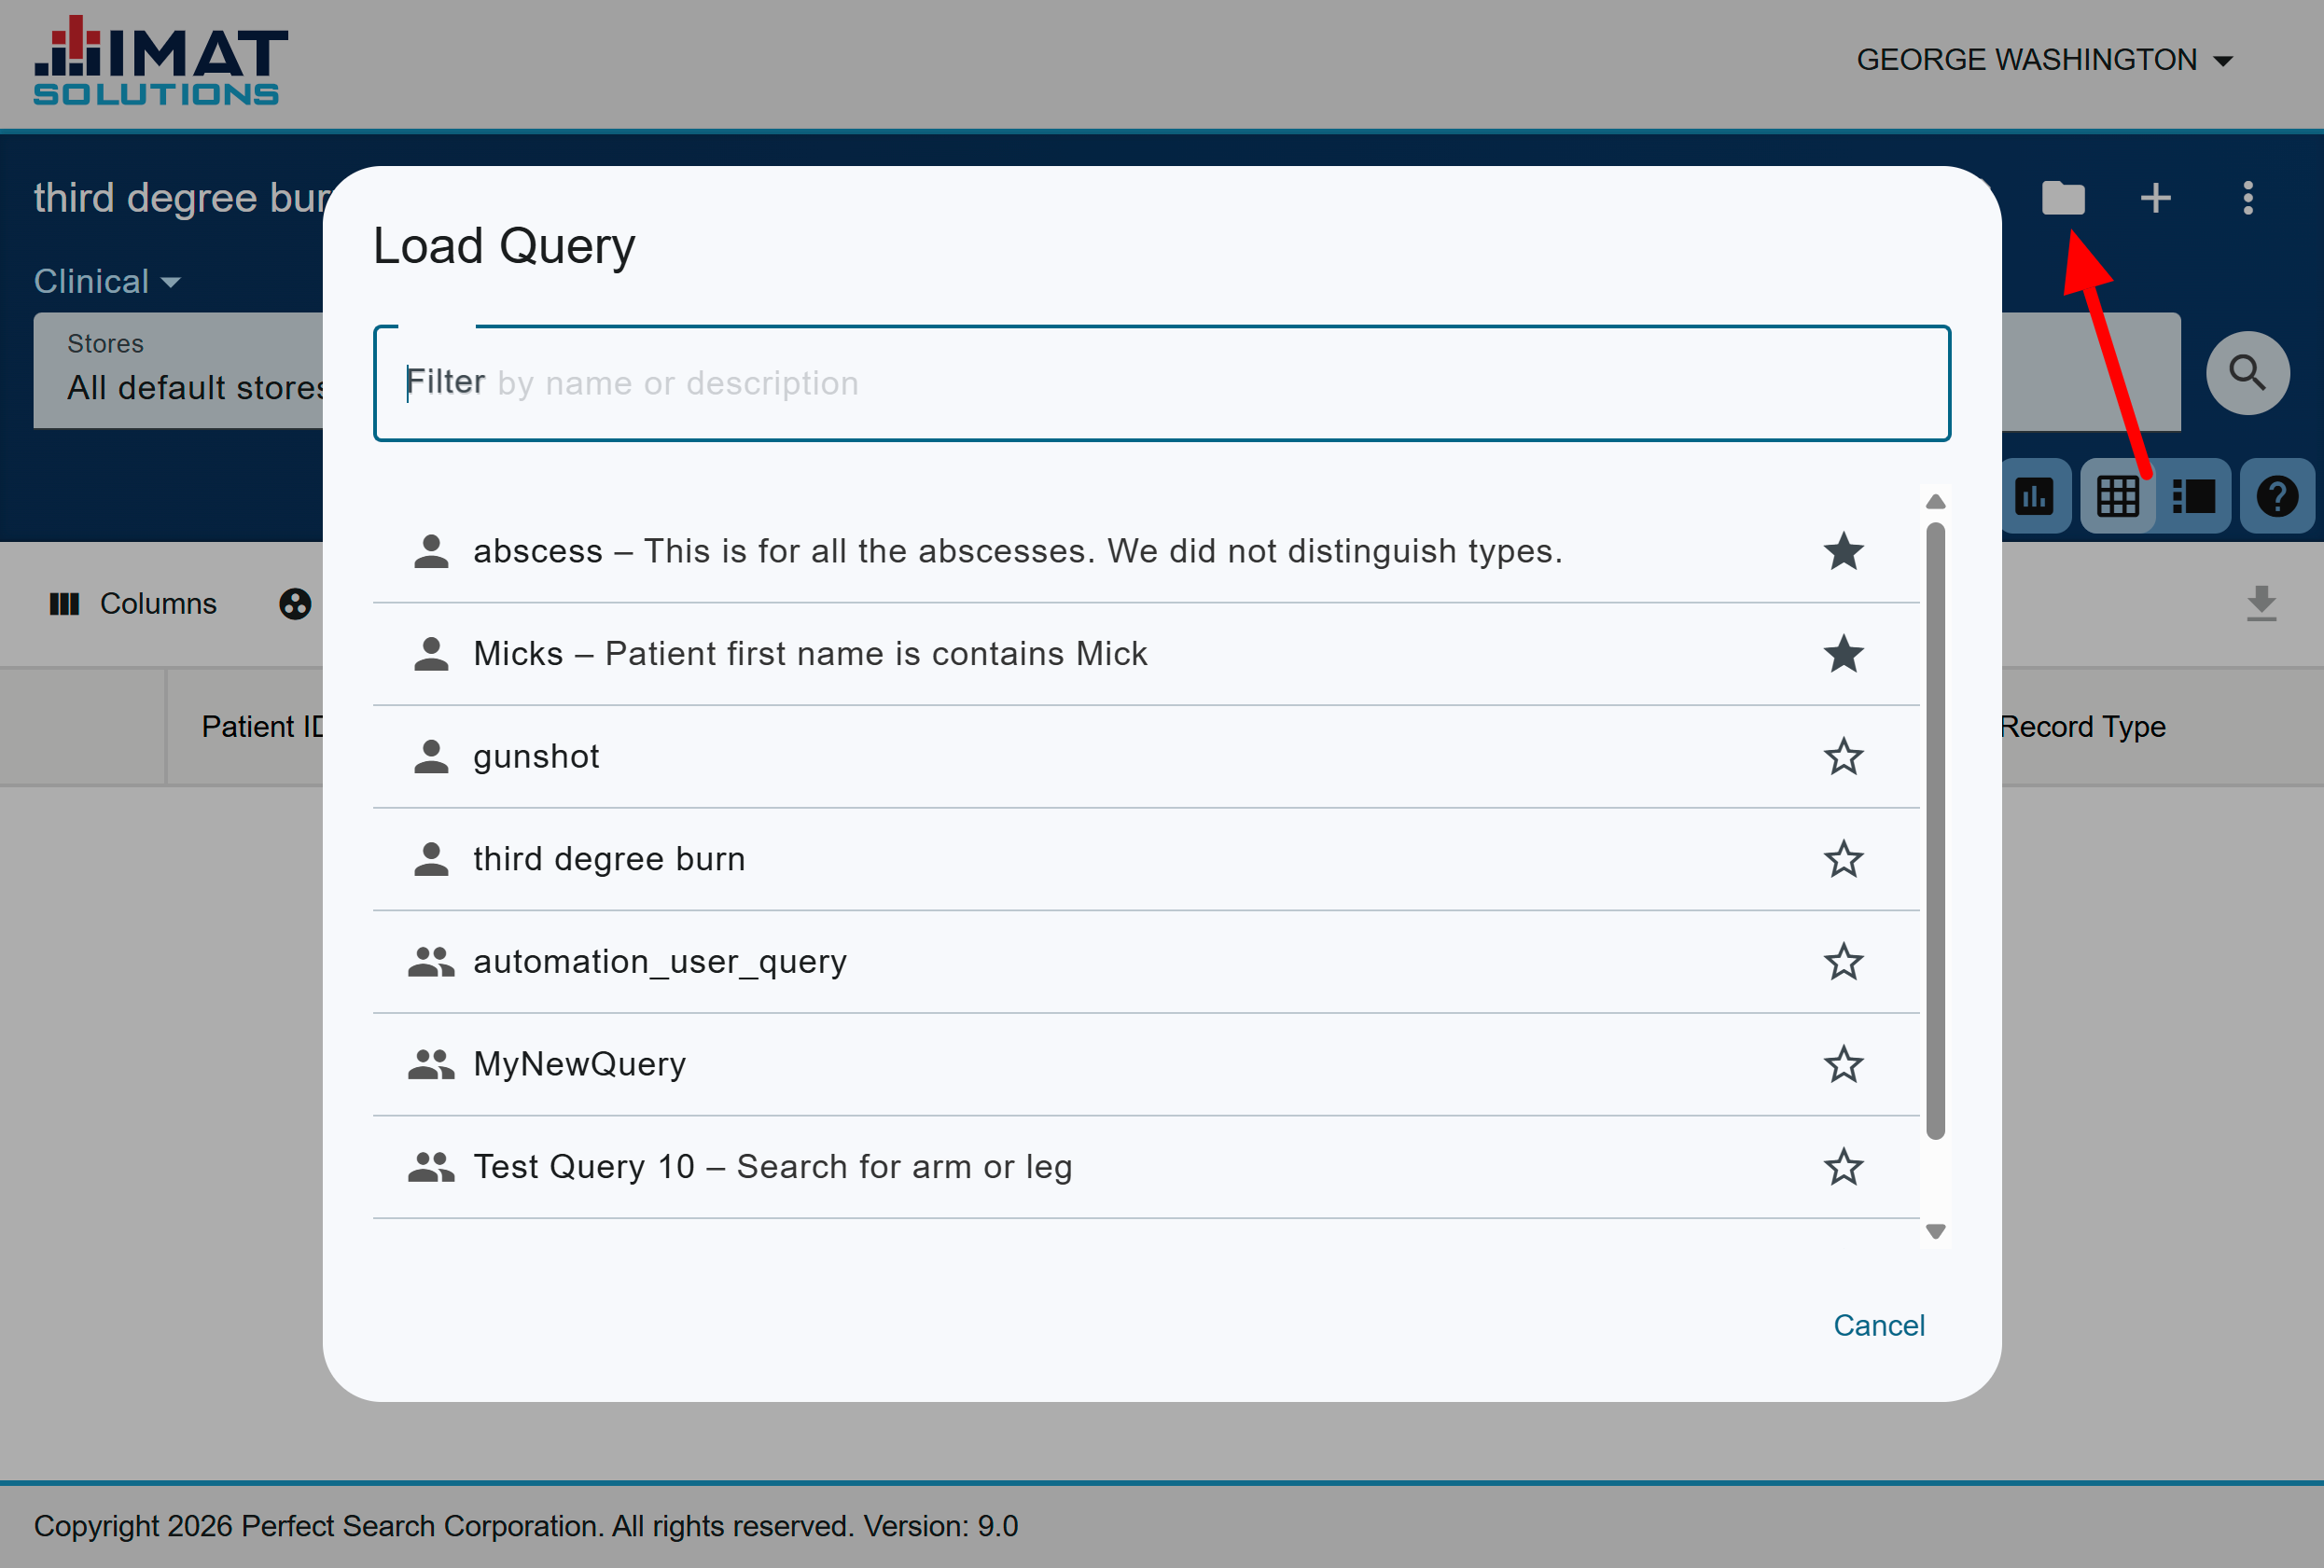
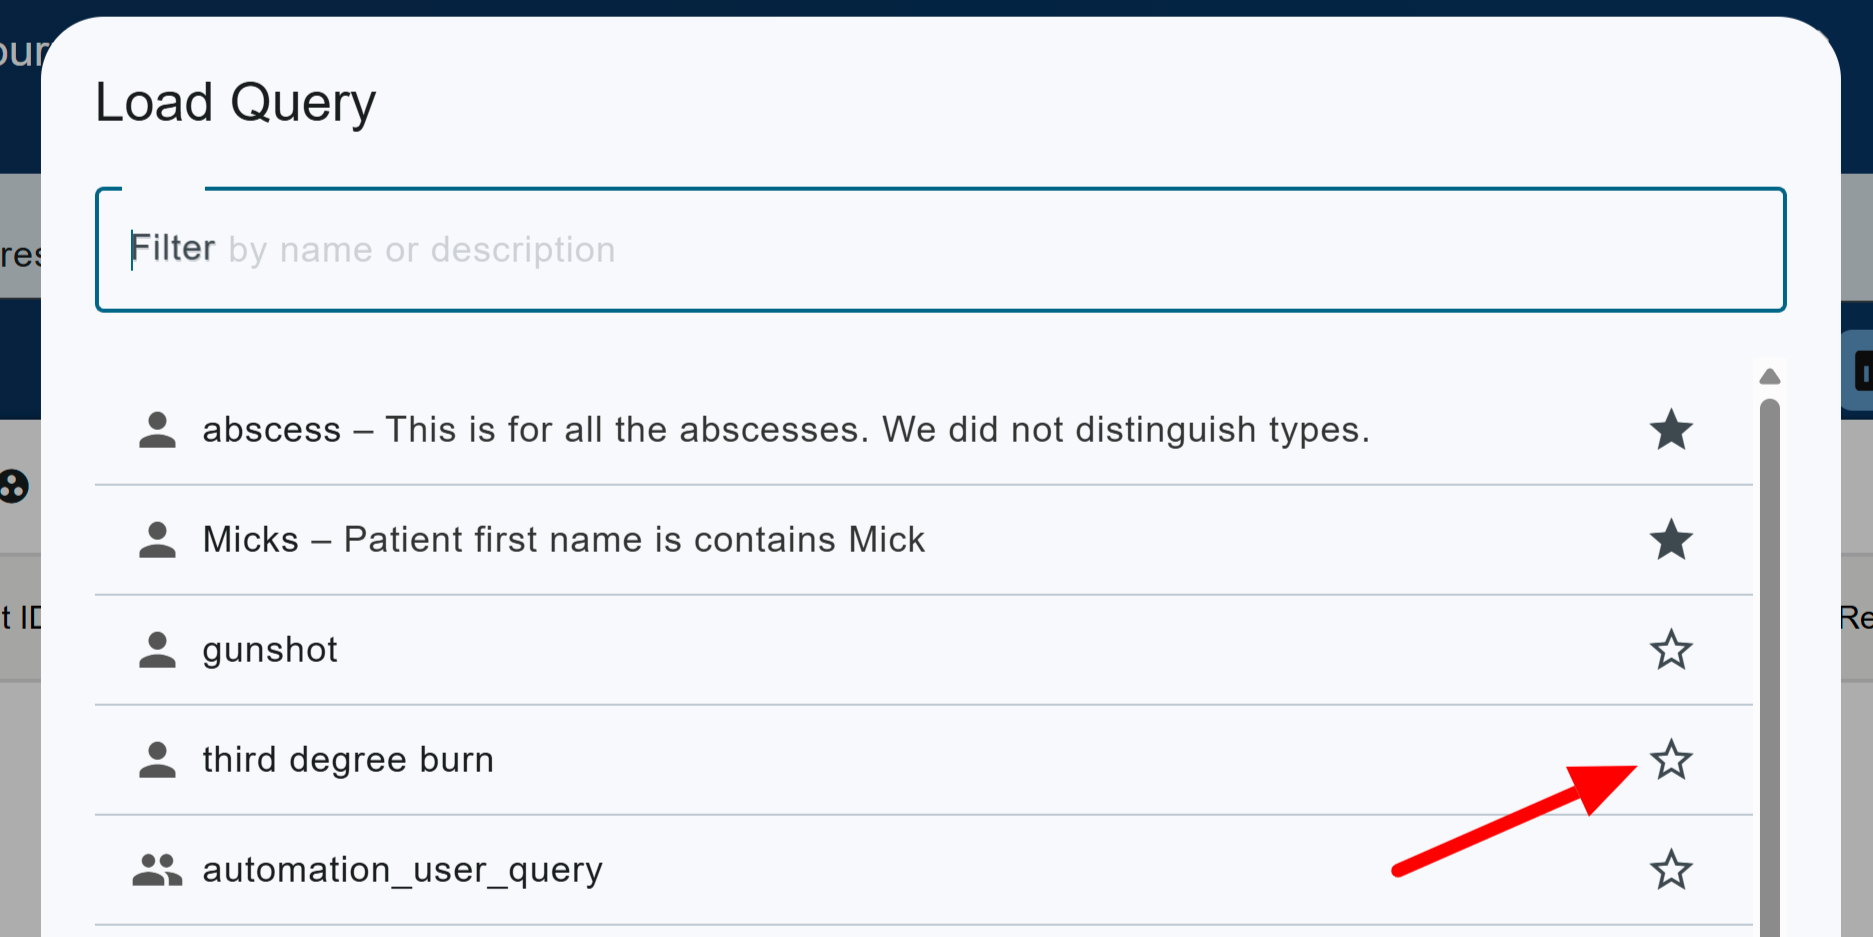
View a saved query by clicking or ctrl+O (cmd+O for Mac) on your keyboard to open the Load Query list.
Select the query you’d like to open. There is a Filter available if you know the name, or partial name, of the query.
If you have an unsaved query started, a prompt appears asking if you’d like to discard the query.
After the query is selected, the dialog closes and the query appears in the query bar.
Click to run the query.
 Click on the image to zoom.
 Click on the image to zoom.
Star a Query
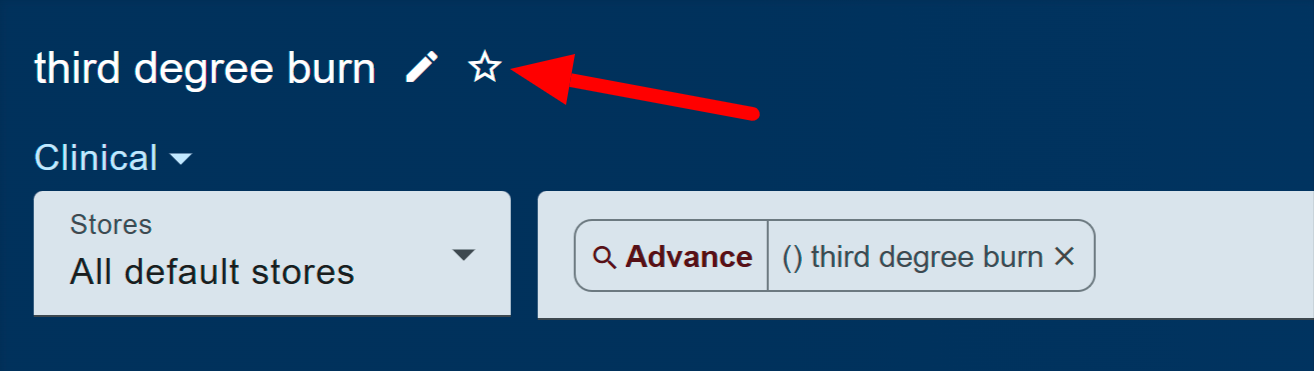
Starring a query as a favorite moves it to the top of the saved list. Click in the open query list. Alternatively, you can star a query after it opens by clicking by the query name in the top left.
Click the star again to remove it from the favorites list. It will change from to .
 Click on the image to zoom.
Edit a Saved Query
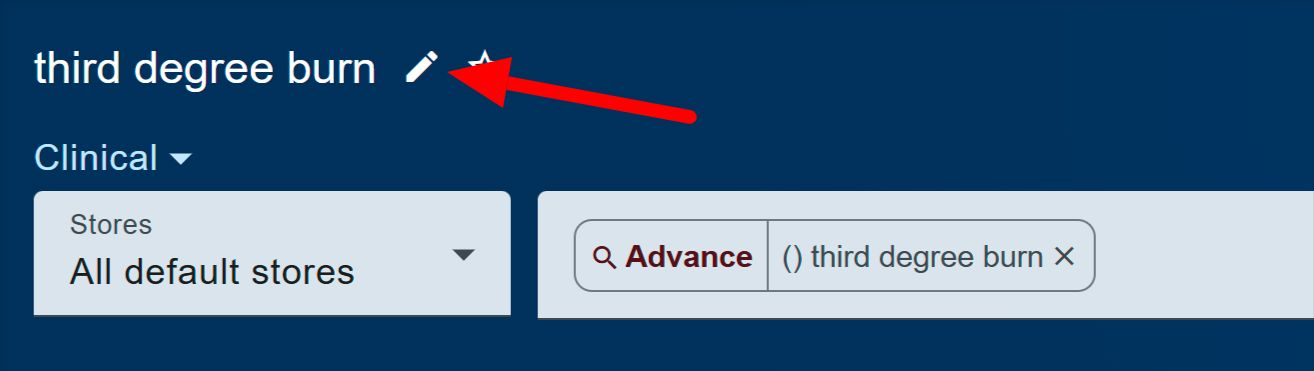
You can rename a query or edit the description:
Click .
Type in the new Name.
Type in the new Description.
Click Save.
If you make a change to the query, such as add another term, click or press ctrl+S (cmd+S for Mac) on your keyboard.
 Click on the image to zoom.
Run as Execute Only User
If a query has been shared with you with execute-only permissions, you will be unable to view the query or the search button. Click to execute the search.
 Click on the image to zoom.
Build a New Query
To start a new query, click . If you already have a query started, a prompt appears asking if you’d like to save or discard the changes to any query you may have in the query box.
More Options
Click to open more query options.
 Click on the image to zoom.
View Built Query
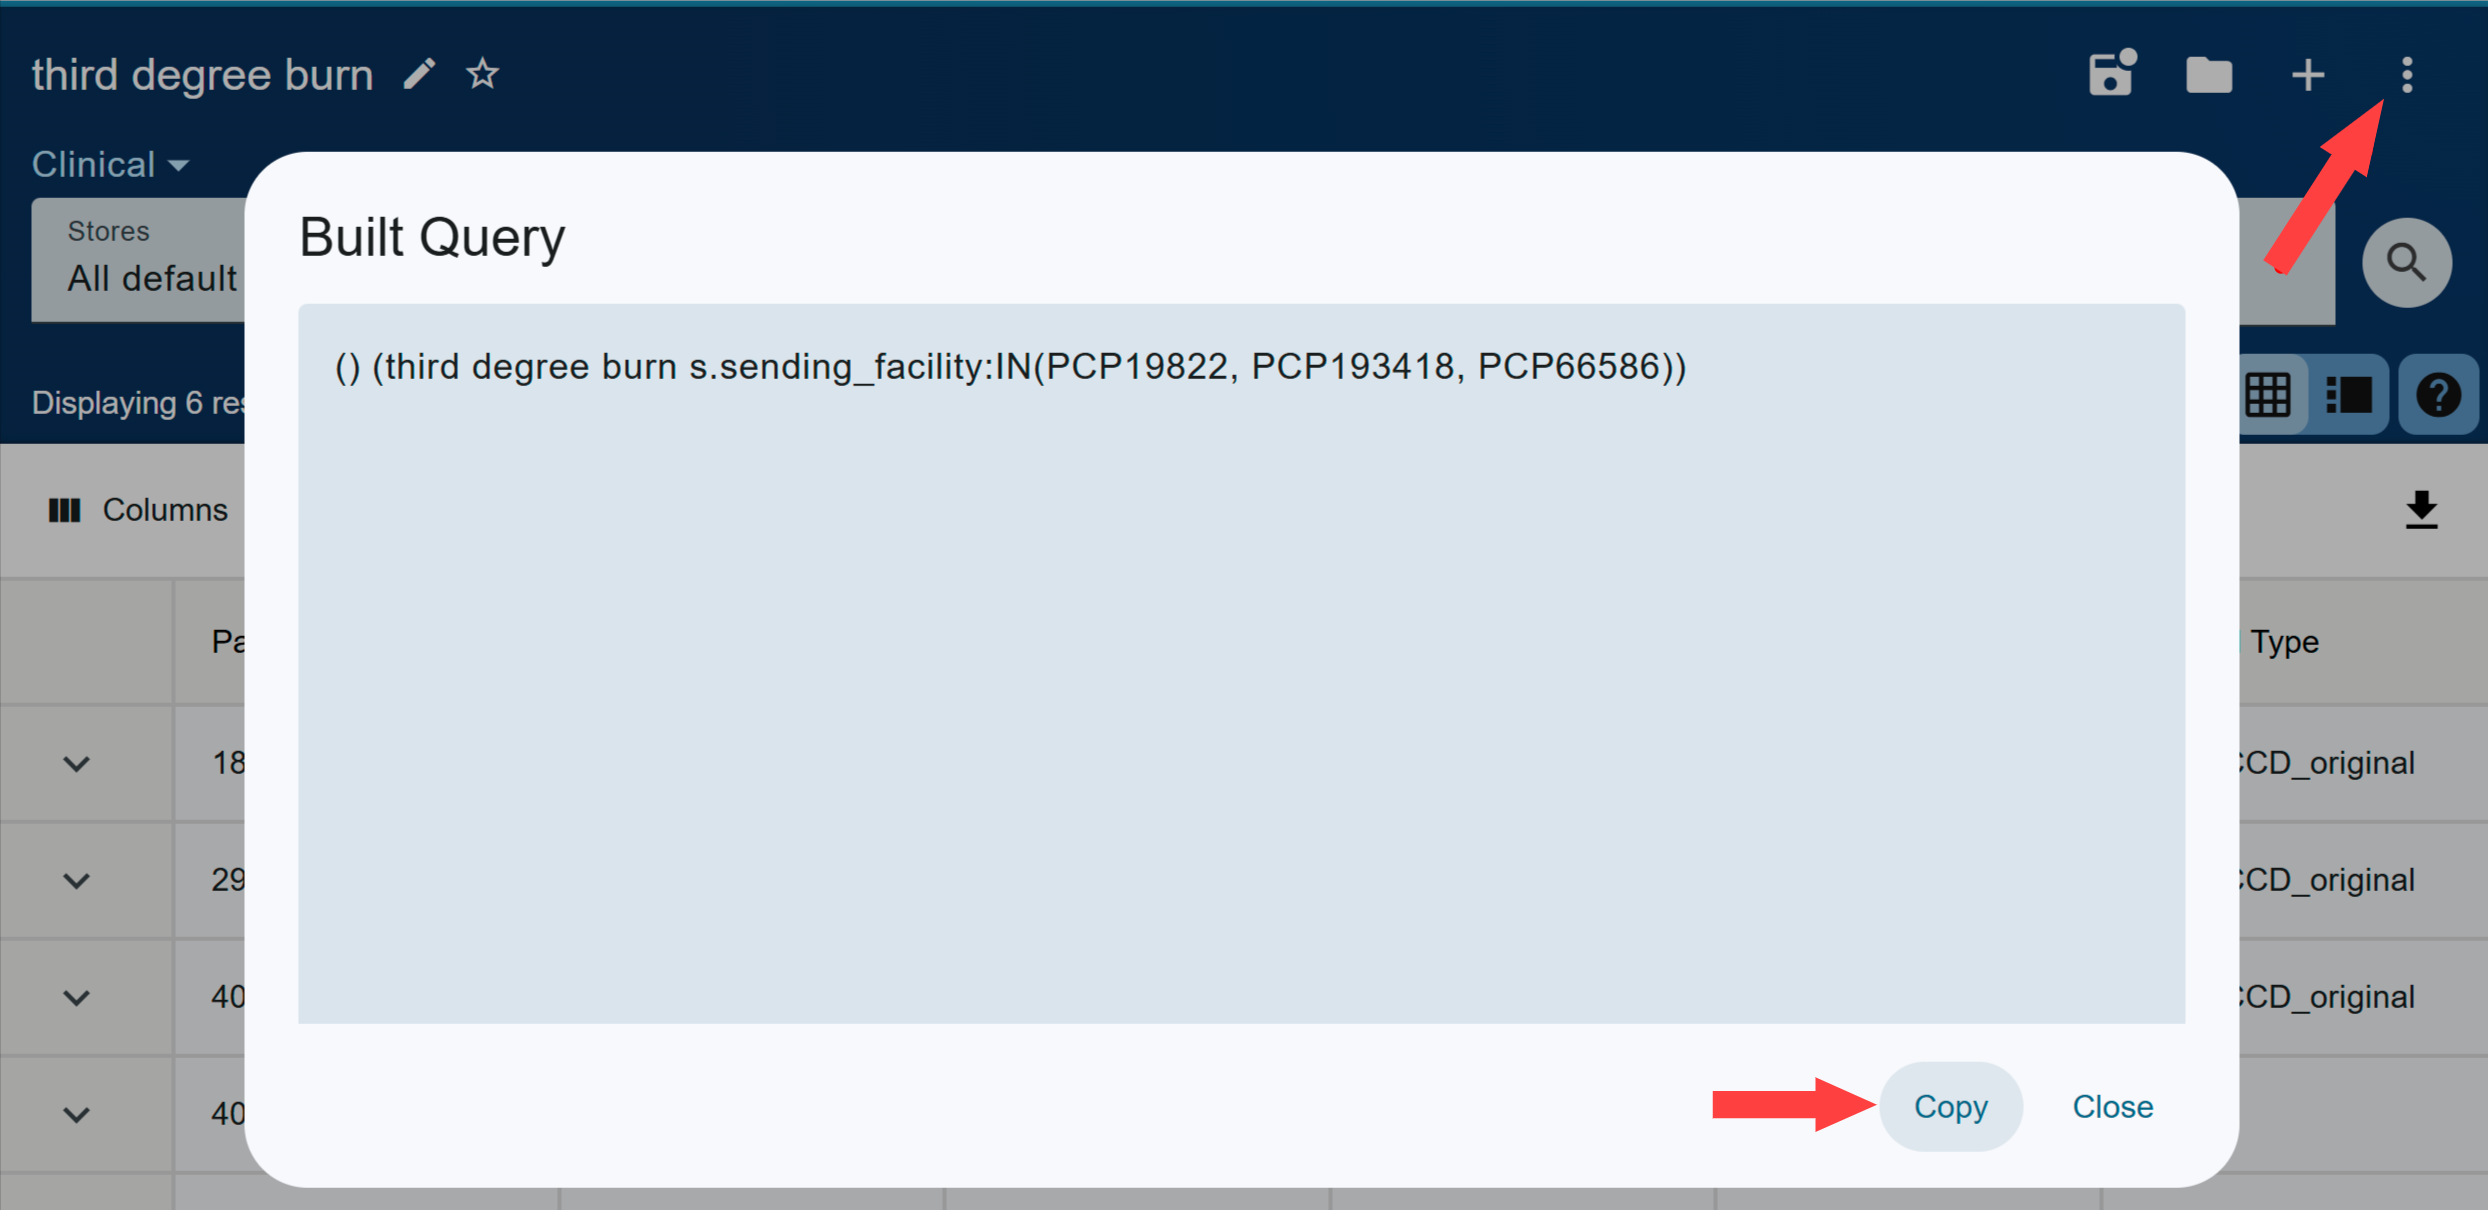
To copy and paste the query into other locations (e.g., Set Definitions, Security Collections, or Reports), you’ll need the proper query syntax. To view the built query with proper syntax:
Click .
Click View Built Query.
Click to copy the query to paste elsewhere.
 Click on the image to zoom.
Sharing
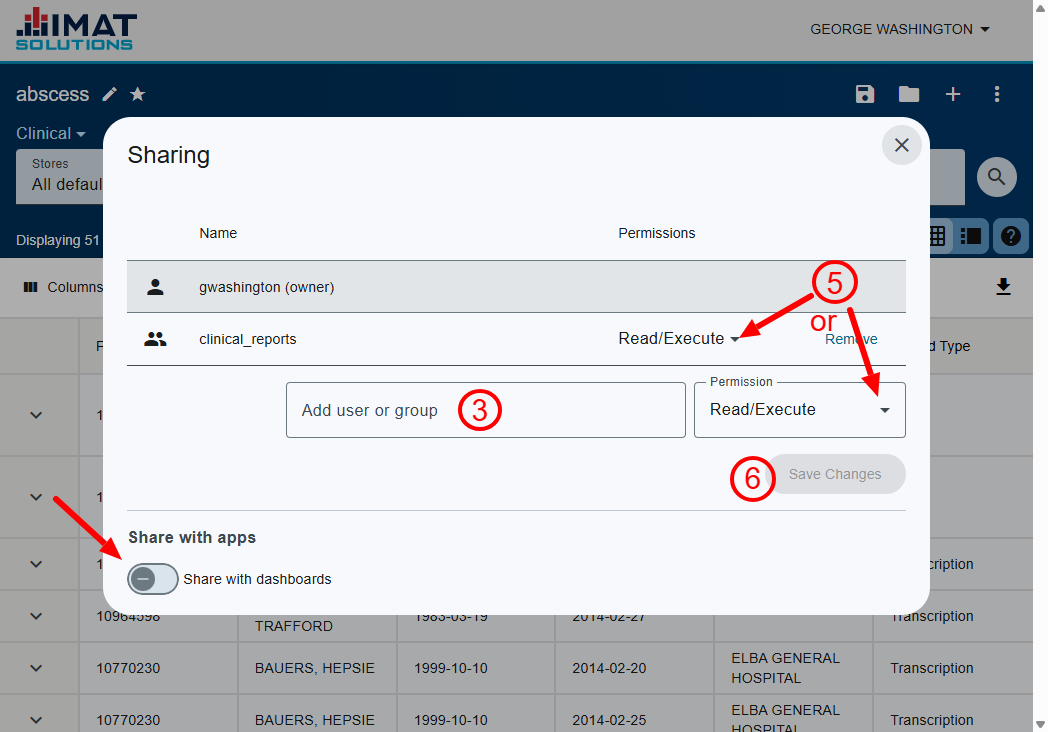
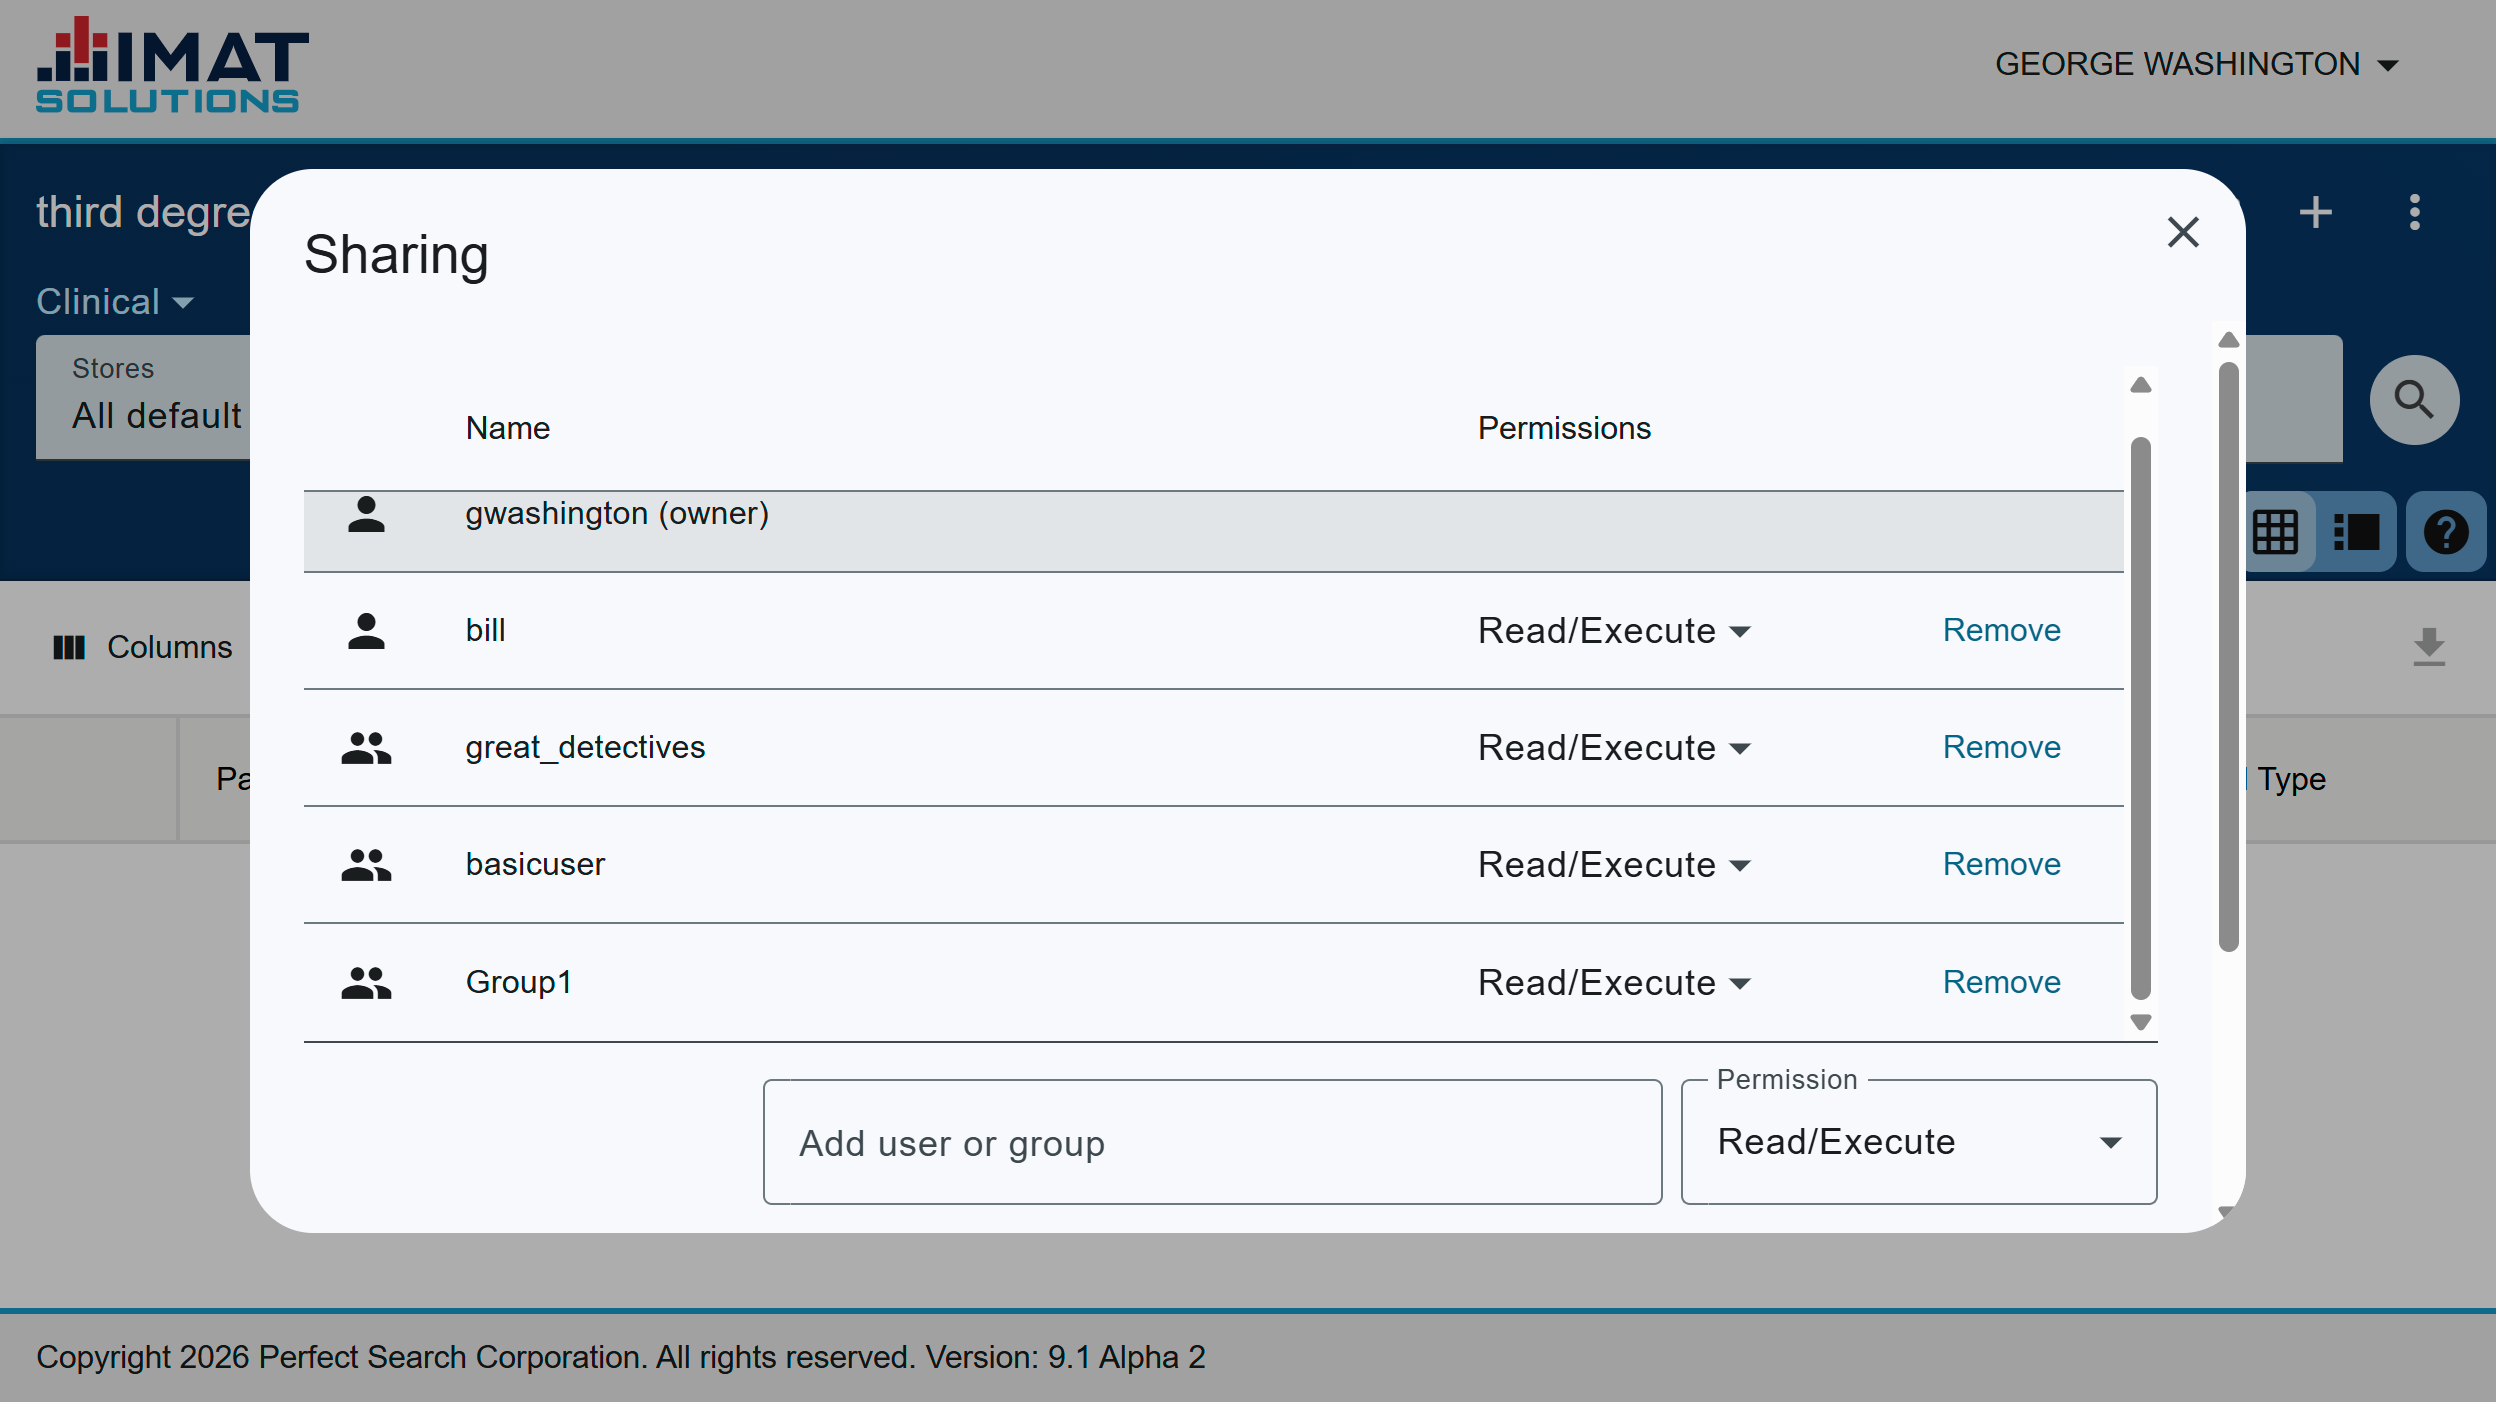
Share your query with other users or with Dashboards. When the dialog opens, you’ll also be able to see which users and groups already have permissions. Changes made through the Admin Sharing screen are also reflected here.
Click .
Click Sharing.
Click on the Add user or group box and select the name of the user or group you want to share with. Begin a search by typing the name of the user or group. Group selection is limited depending on the permissions your admin granted. Your admin can share the query if you cannot.
Selecting the name adds it to the list of shared users with the default Permission level selected.
By default, the Permission level is Read/Execute. Select the permission level. This can be done either by the name after it is added to the list or before the name is selected in Step 4.
Execute: can run the query
Read/Execute: can see and run the query
Full: can read, run, and edit the query
Click . No changes are final until this button is clicked.
Share with Dashboards
Toggle on Share with dashboards to make your query available in Dashboards. Anyone with permission to view the query can access it in Dashboards after you’ve shared it with Dashboards.
To stop sharing with Dashboards, toggle off the permissions. Dashboards permission changes are automatic, and no separate save is needed.
 Click on the image to zoom.
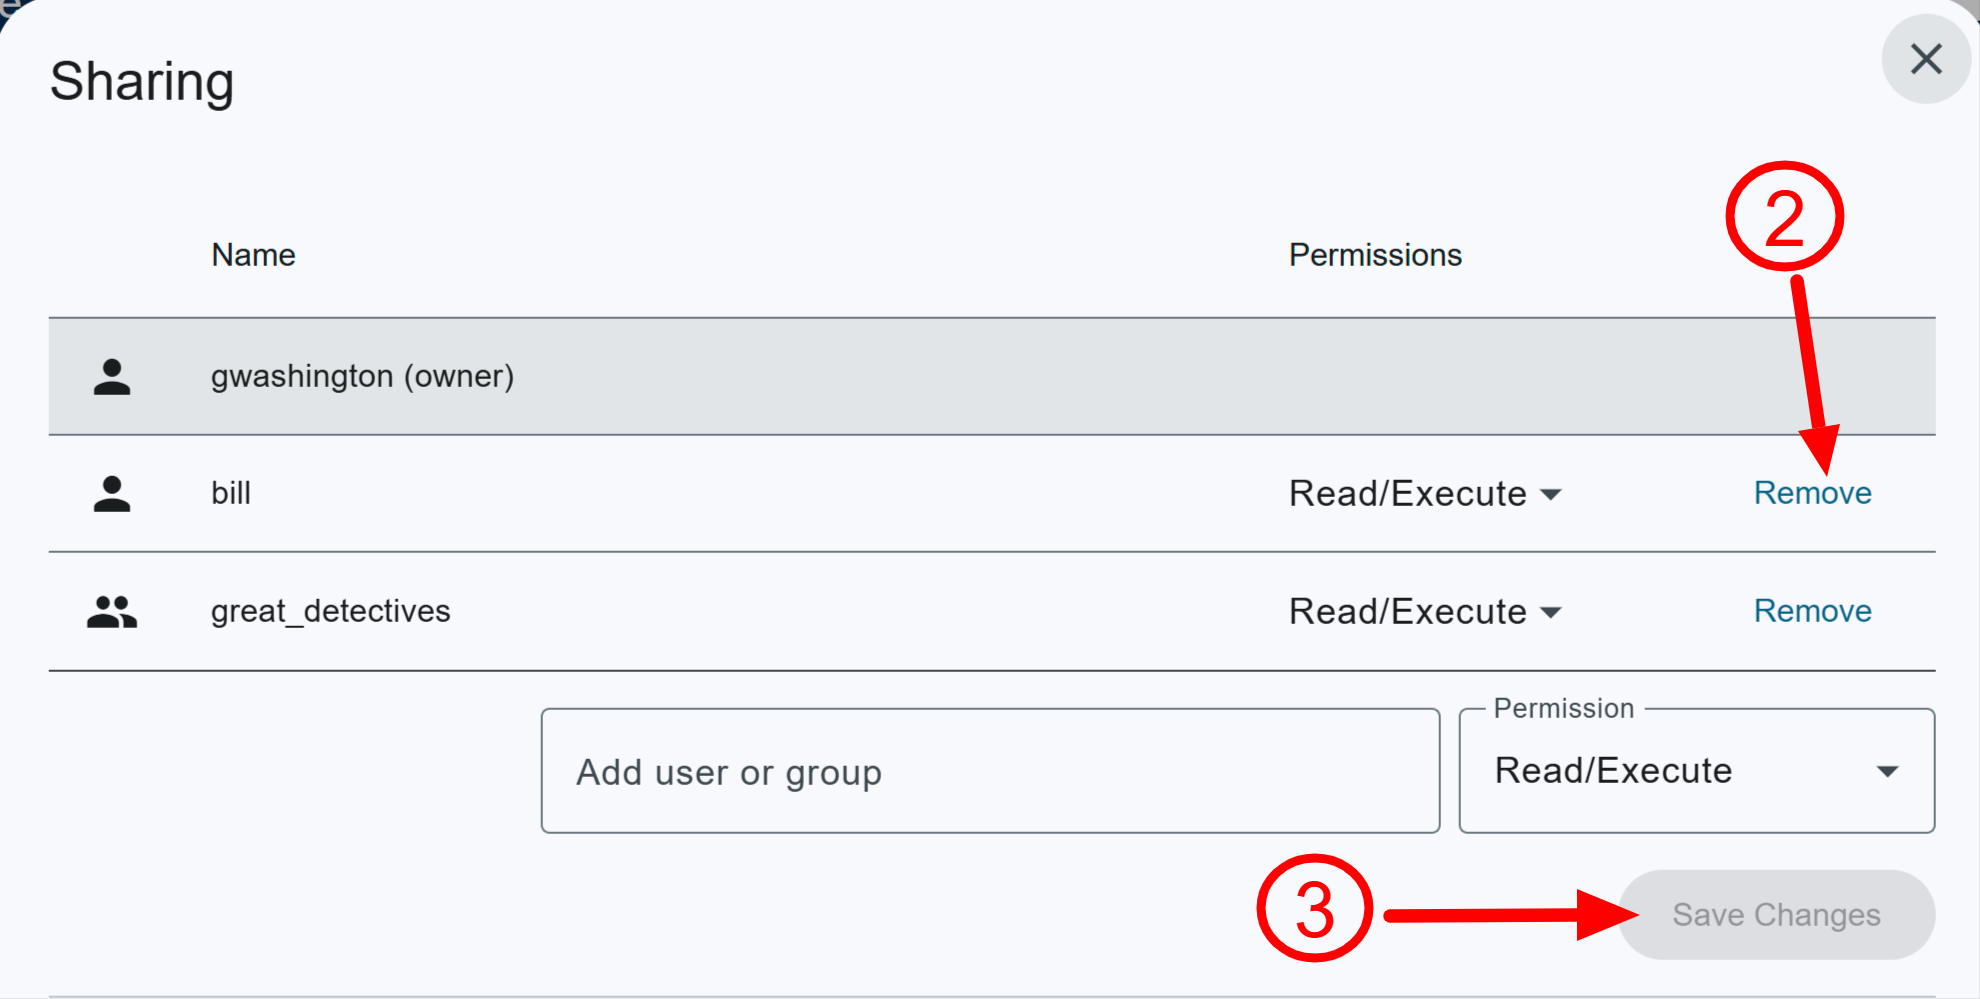
Remove Permissions
To remove permissions:
Return to the Sharing dialog.
Click Remove next to the permissions.
Click . No changes are final until this button is clicked.
 Click on the image to zoom.
Clone
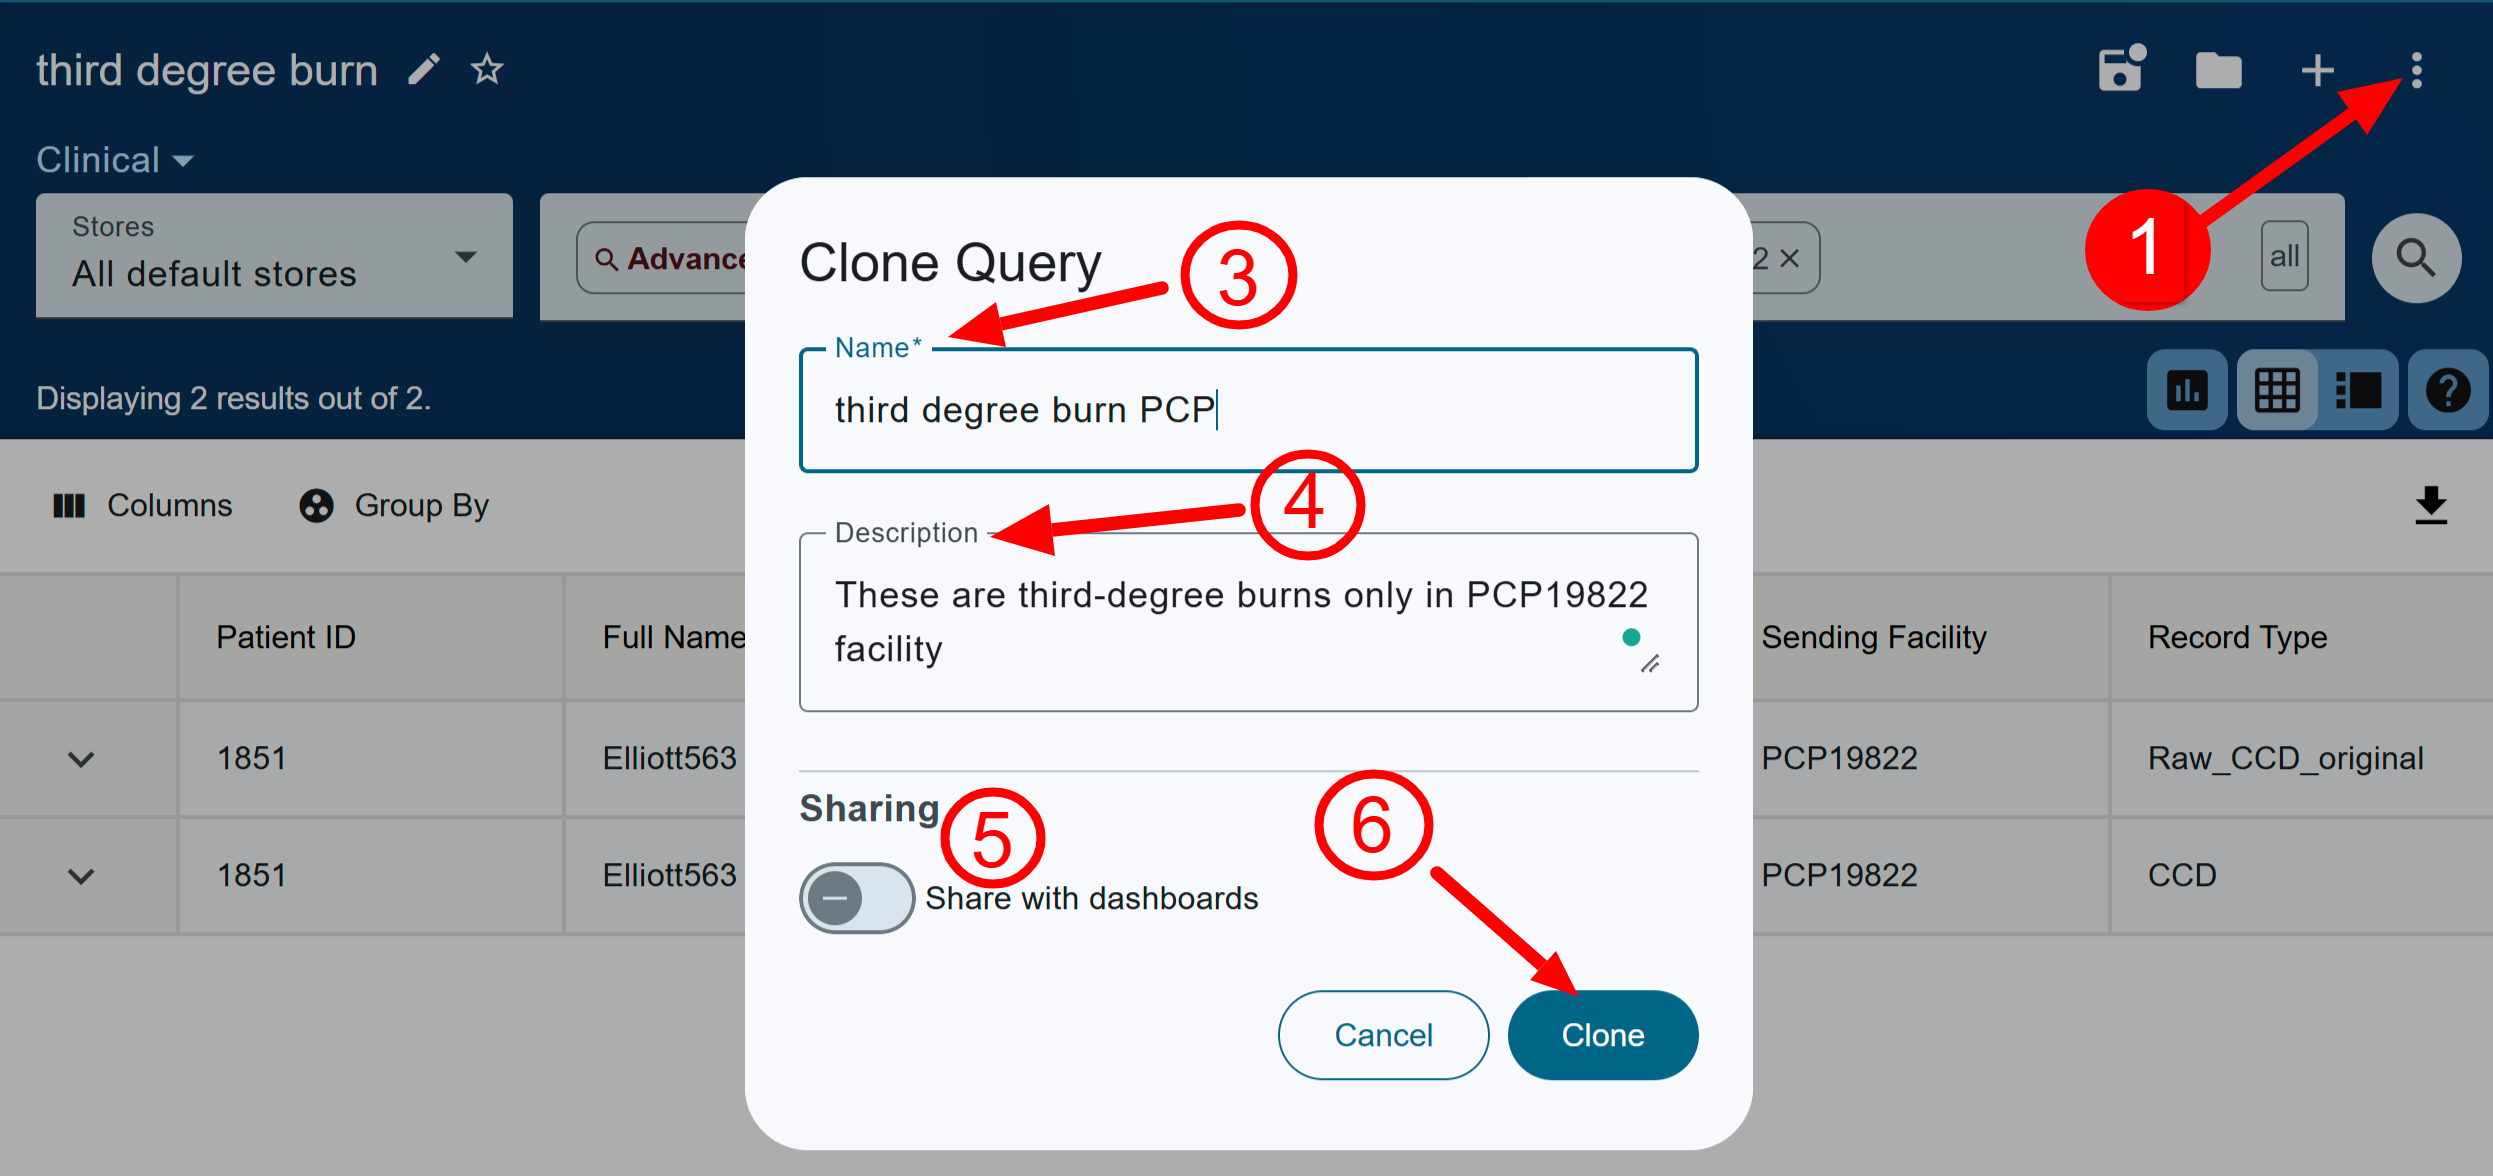
Use this option if you have made changes to your saved query and want to keep a copy of both the original saved query and the changes.
Click .
Click Clone.
Give the new query a Name.
Give the new query a Description.
Toggle on Share with dashboards if desired.
Click .
 Click on the image to zoom.
Export Query
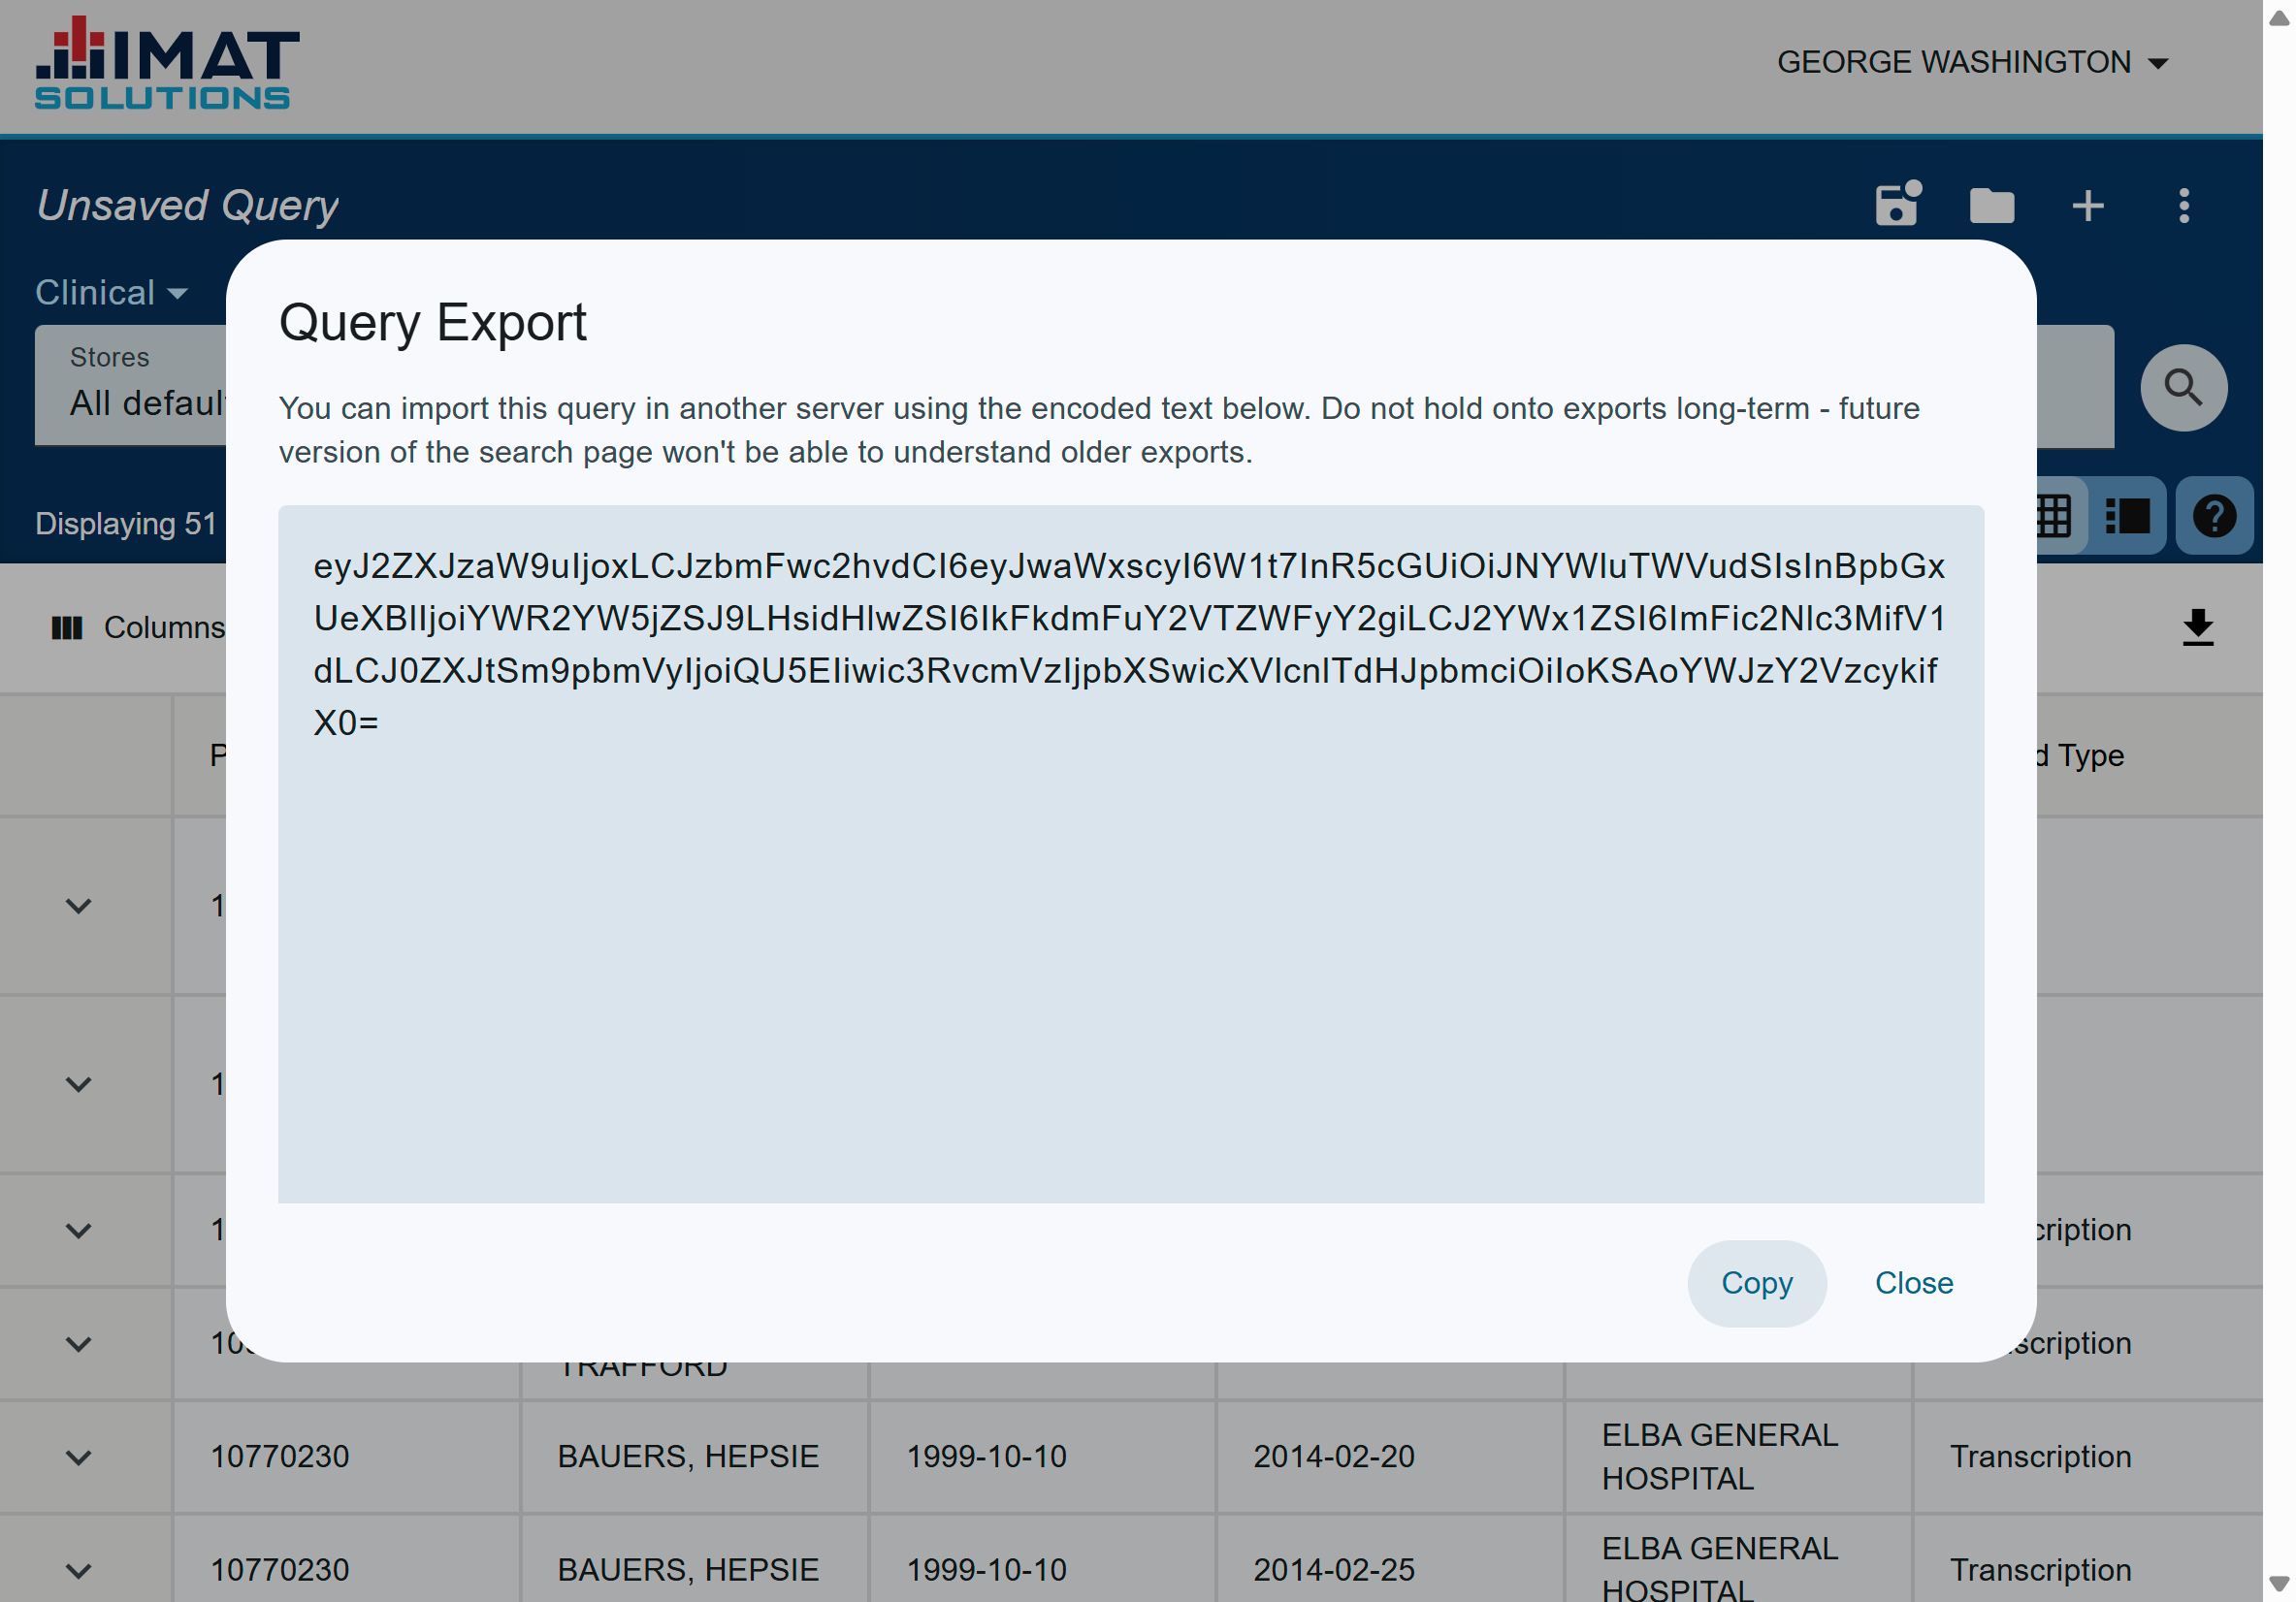
You can export the query to a different server as long as the two servers are using similar release versions. Exported information contains the query, store service selection, store, and the columns you've chosen to use.
To export a query:
Click .
Click Export from the list that appears.
Click Copy when the Query Export box opens. It’ll save a copy of the text to your computer’s clipboard.
Open the new server and import the query.
Import Query
Click .
Click Import from the list that appears.
Paste the query text from the exported query in the box provided.
Click .
Give the query a Name.
Give the query a Description.
Share with dashboards if desired.
Click . No changes are final until this button is clicked.
The query appears in the Load Query list after it imports.
 Click on the image to zoom.
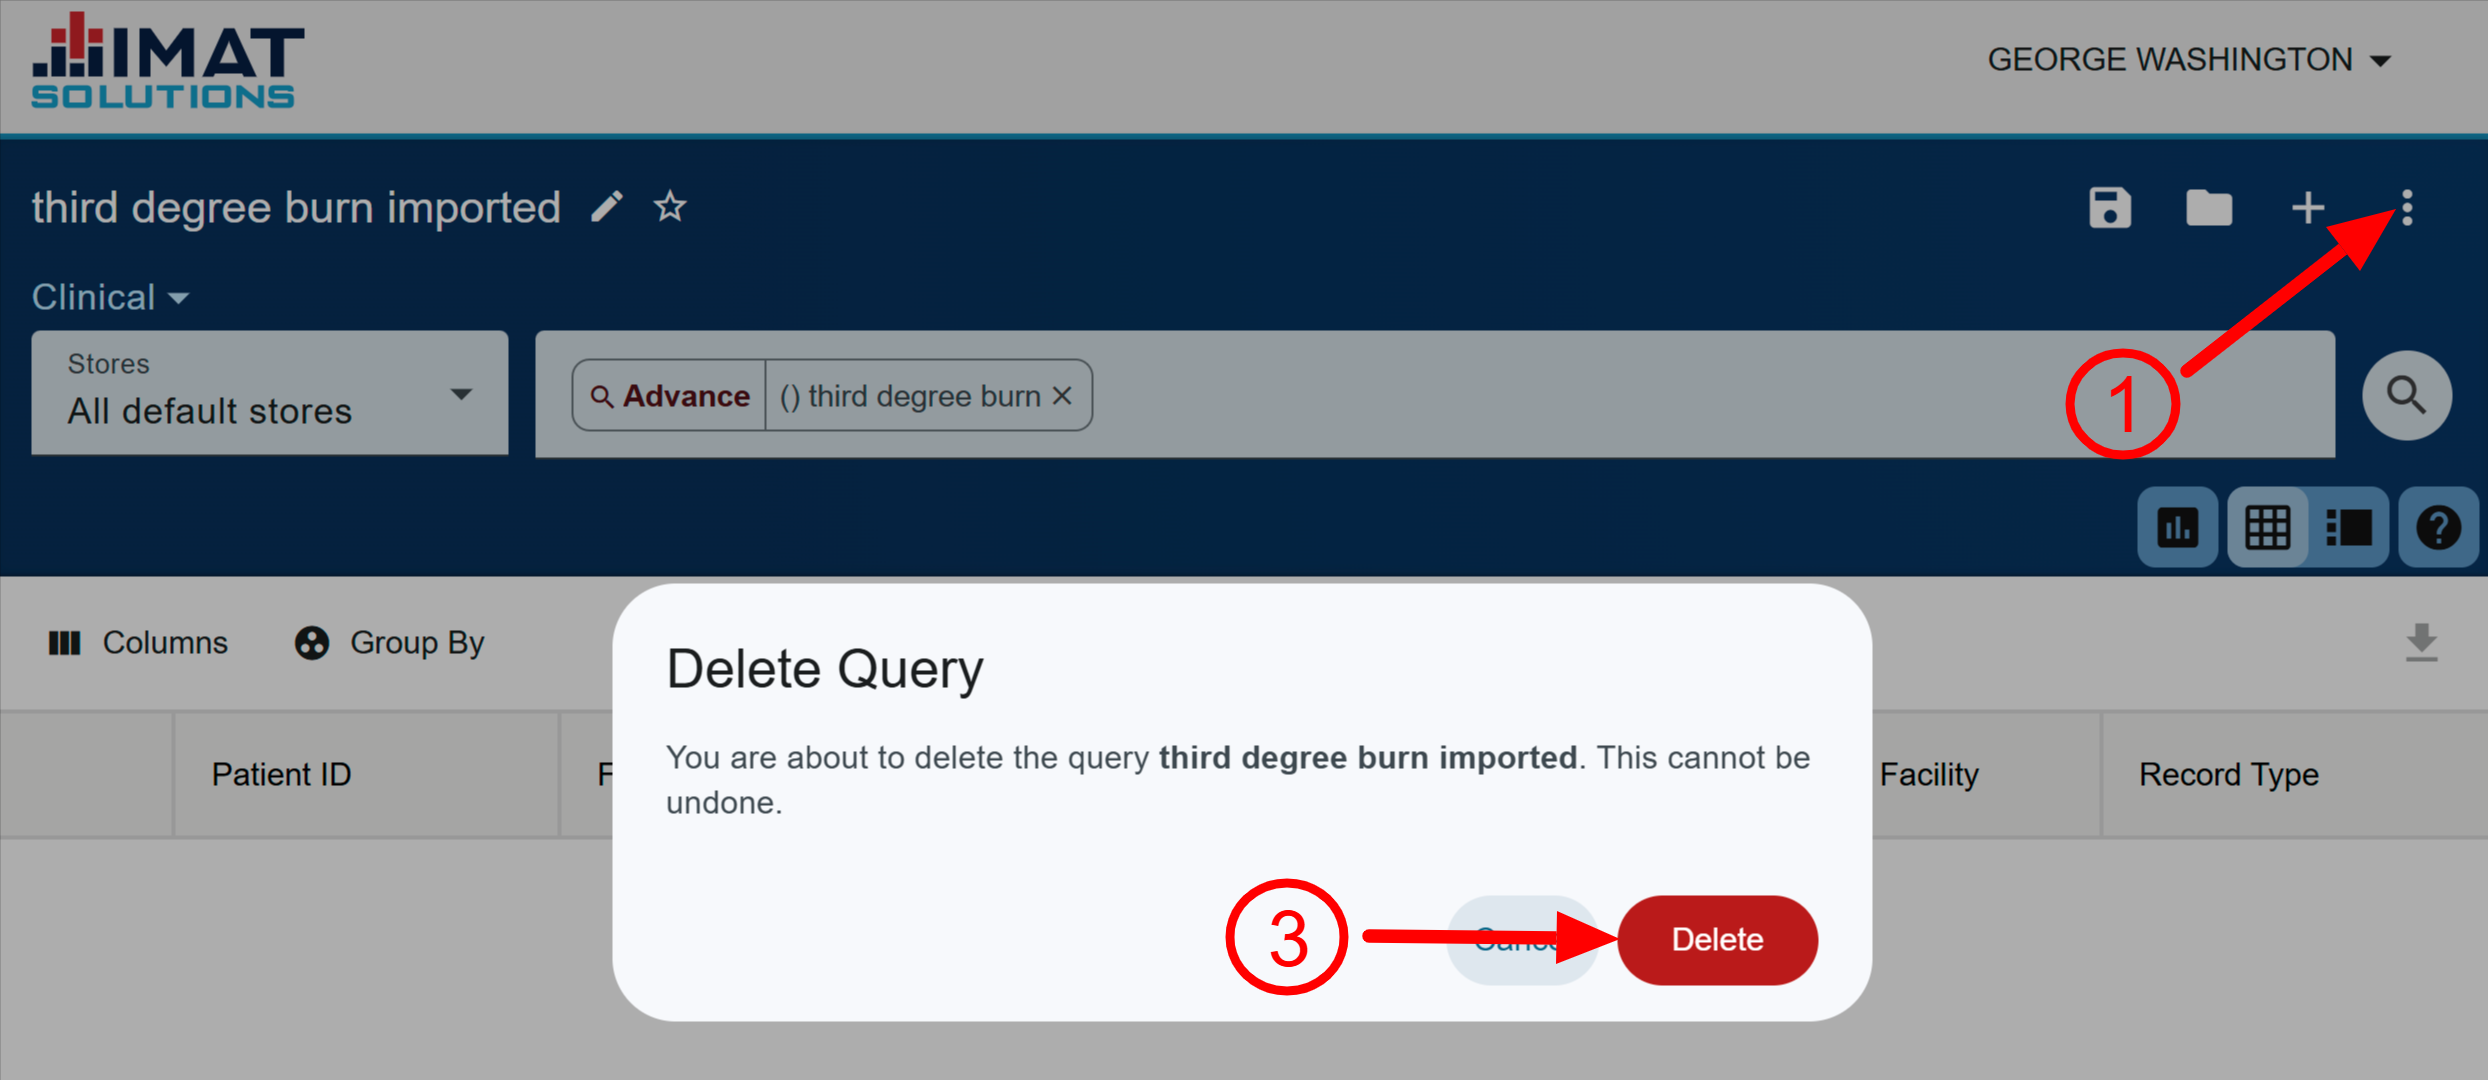
Delete Query
You can delete a query if it is no longer needed. Once a query is deleted, you cannot recover it and will have to rebuild it if you need it again.
Click .
Click Delete Query from the list that appears.
Click .
Role Variations
Search components and access vary depending on the user’s assigned role.
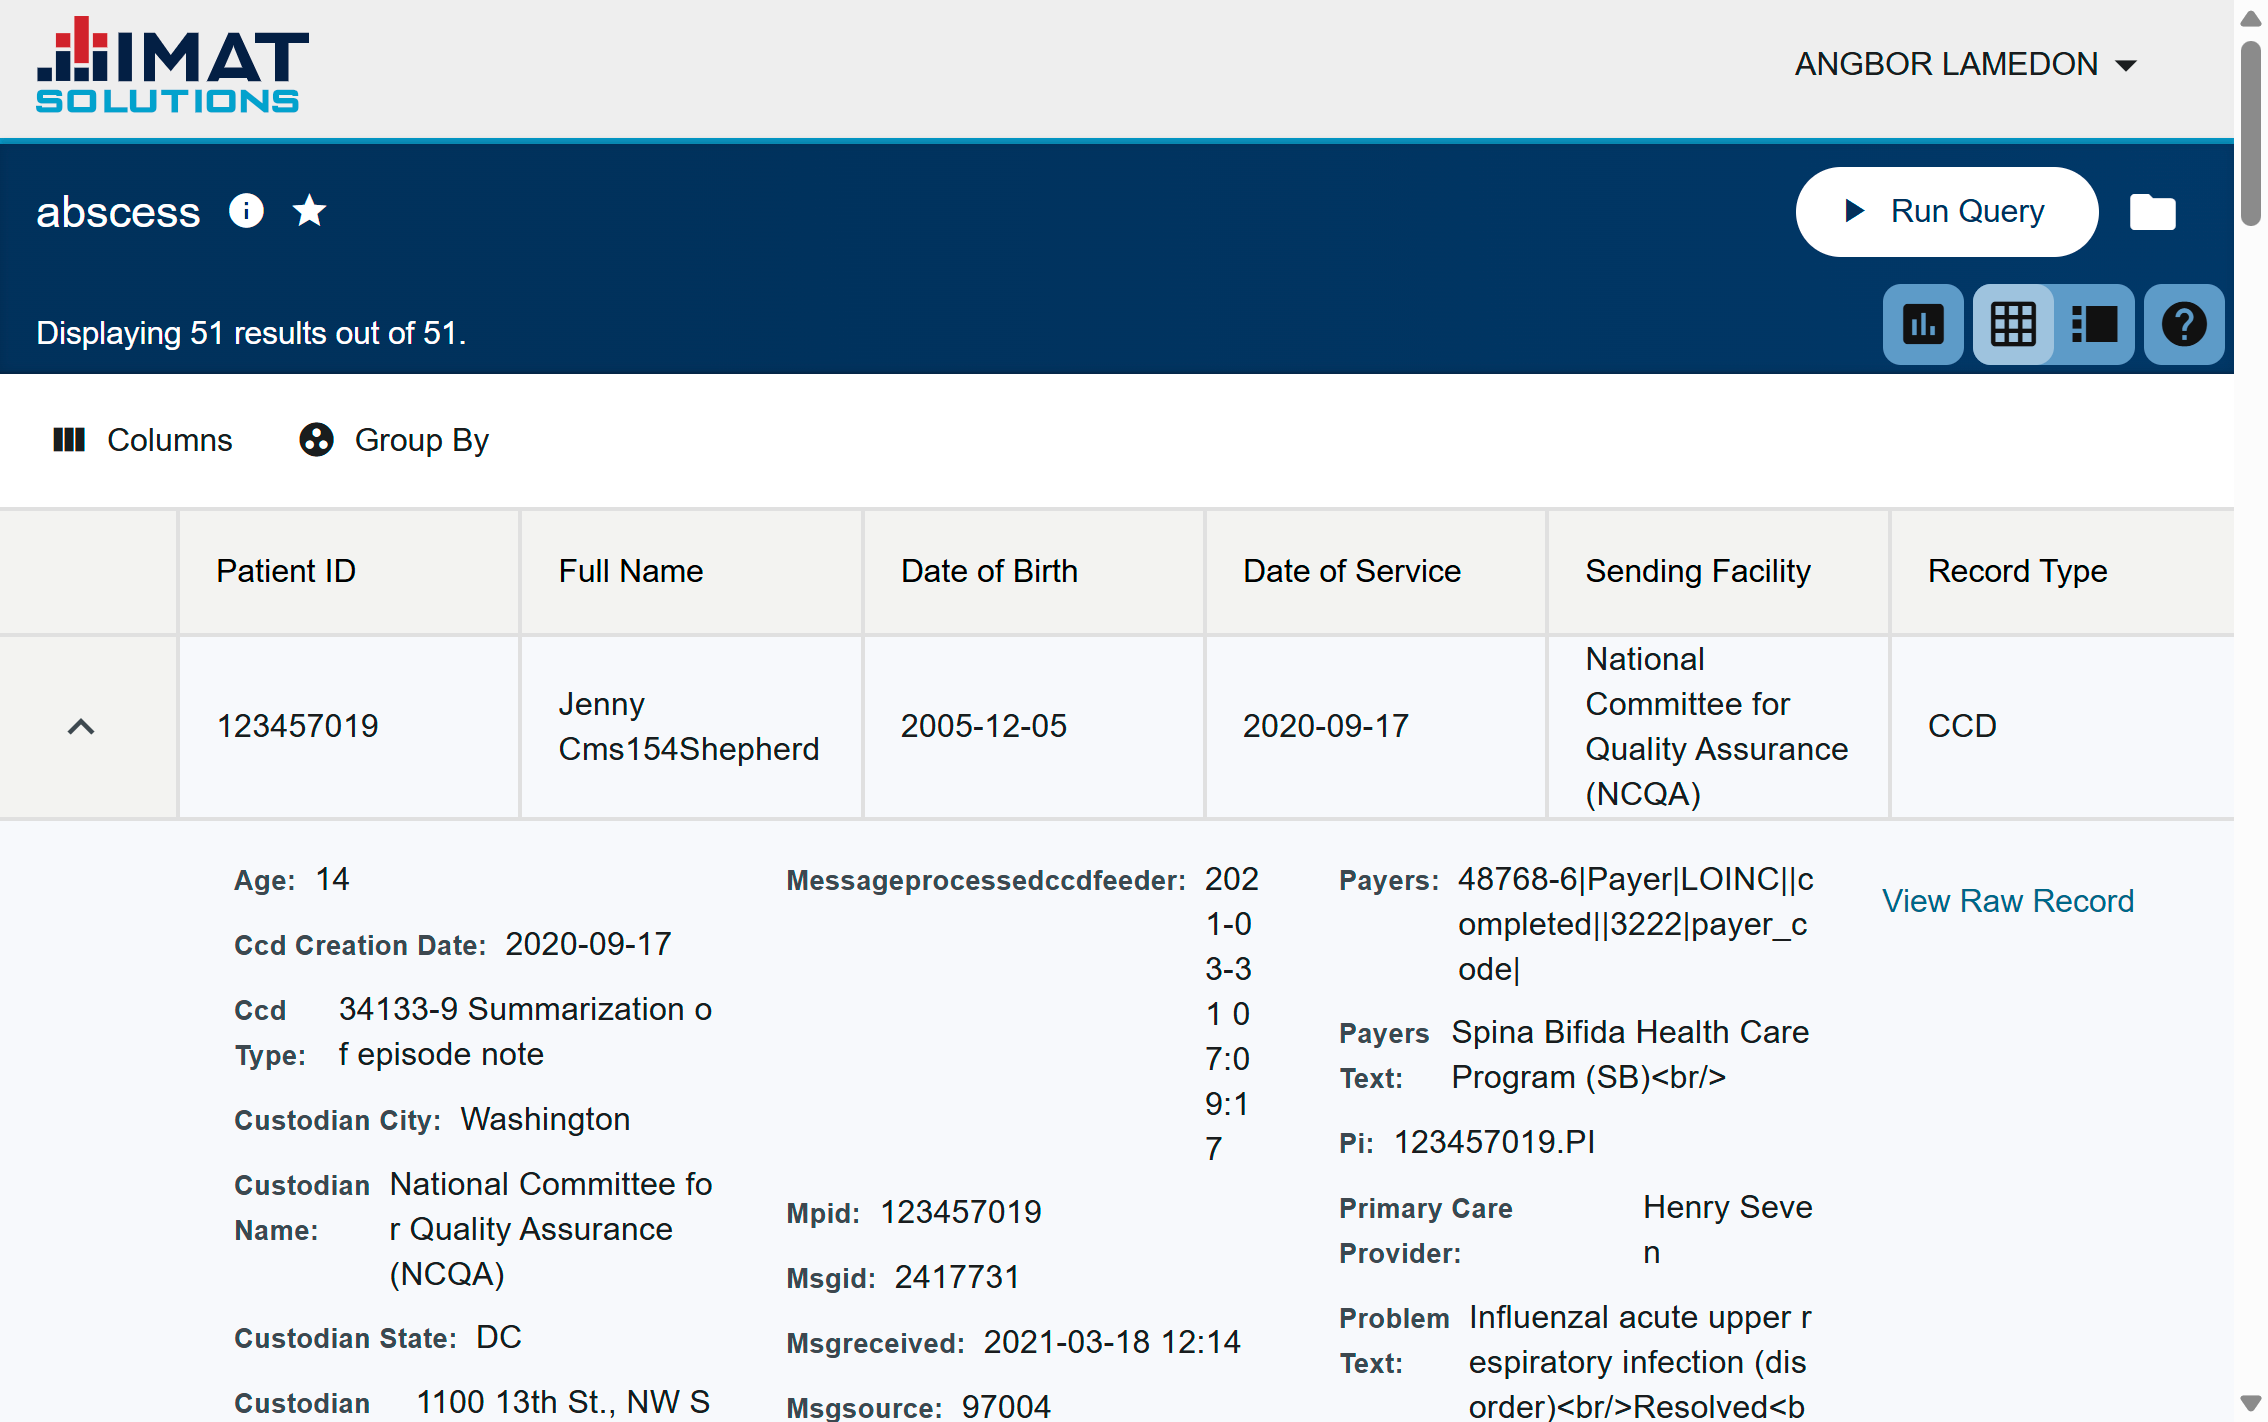
searchappliance_search
Everything presented so far in this document assumes the user is assigned to the searchappliance_search role.
 Click on the image to zoom.
searchappliance_search_by_id
If the user only has the searchappliance_search_by_id role, they are unable to write or edit queries.
They can do the following:
Open queries shared with them
Run queries shared with them by clicking
View query details (name and description)
Star a query
View extracted information in the Table View
They cannot do the following:
Edit the query details (name and description)
View the query (Read permissions)
Edit the query (Full permissions)
Save the query
Write a new query
Do anything in the menu
View information found in the Record Detail View
View the raw record
searchappliance_system
Admins have added benefits in Search that searchappliance_search and searchappliance_search_by_id users do not have.
 Click on the image to zoom.
Delete Record
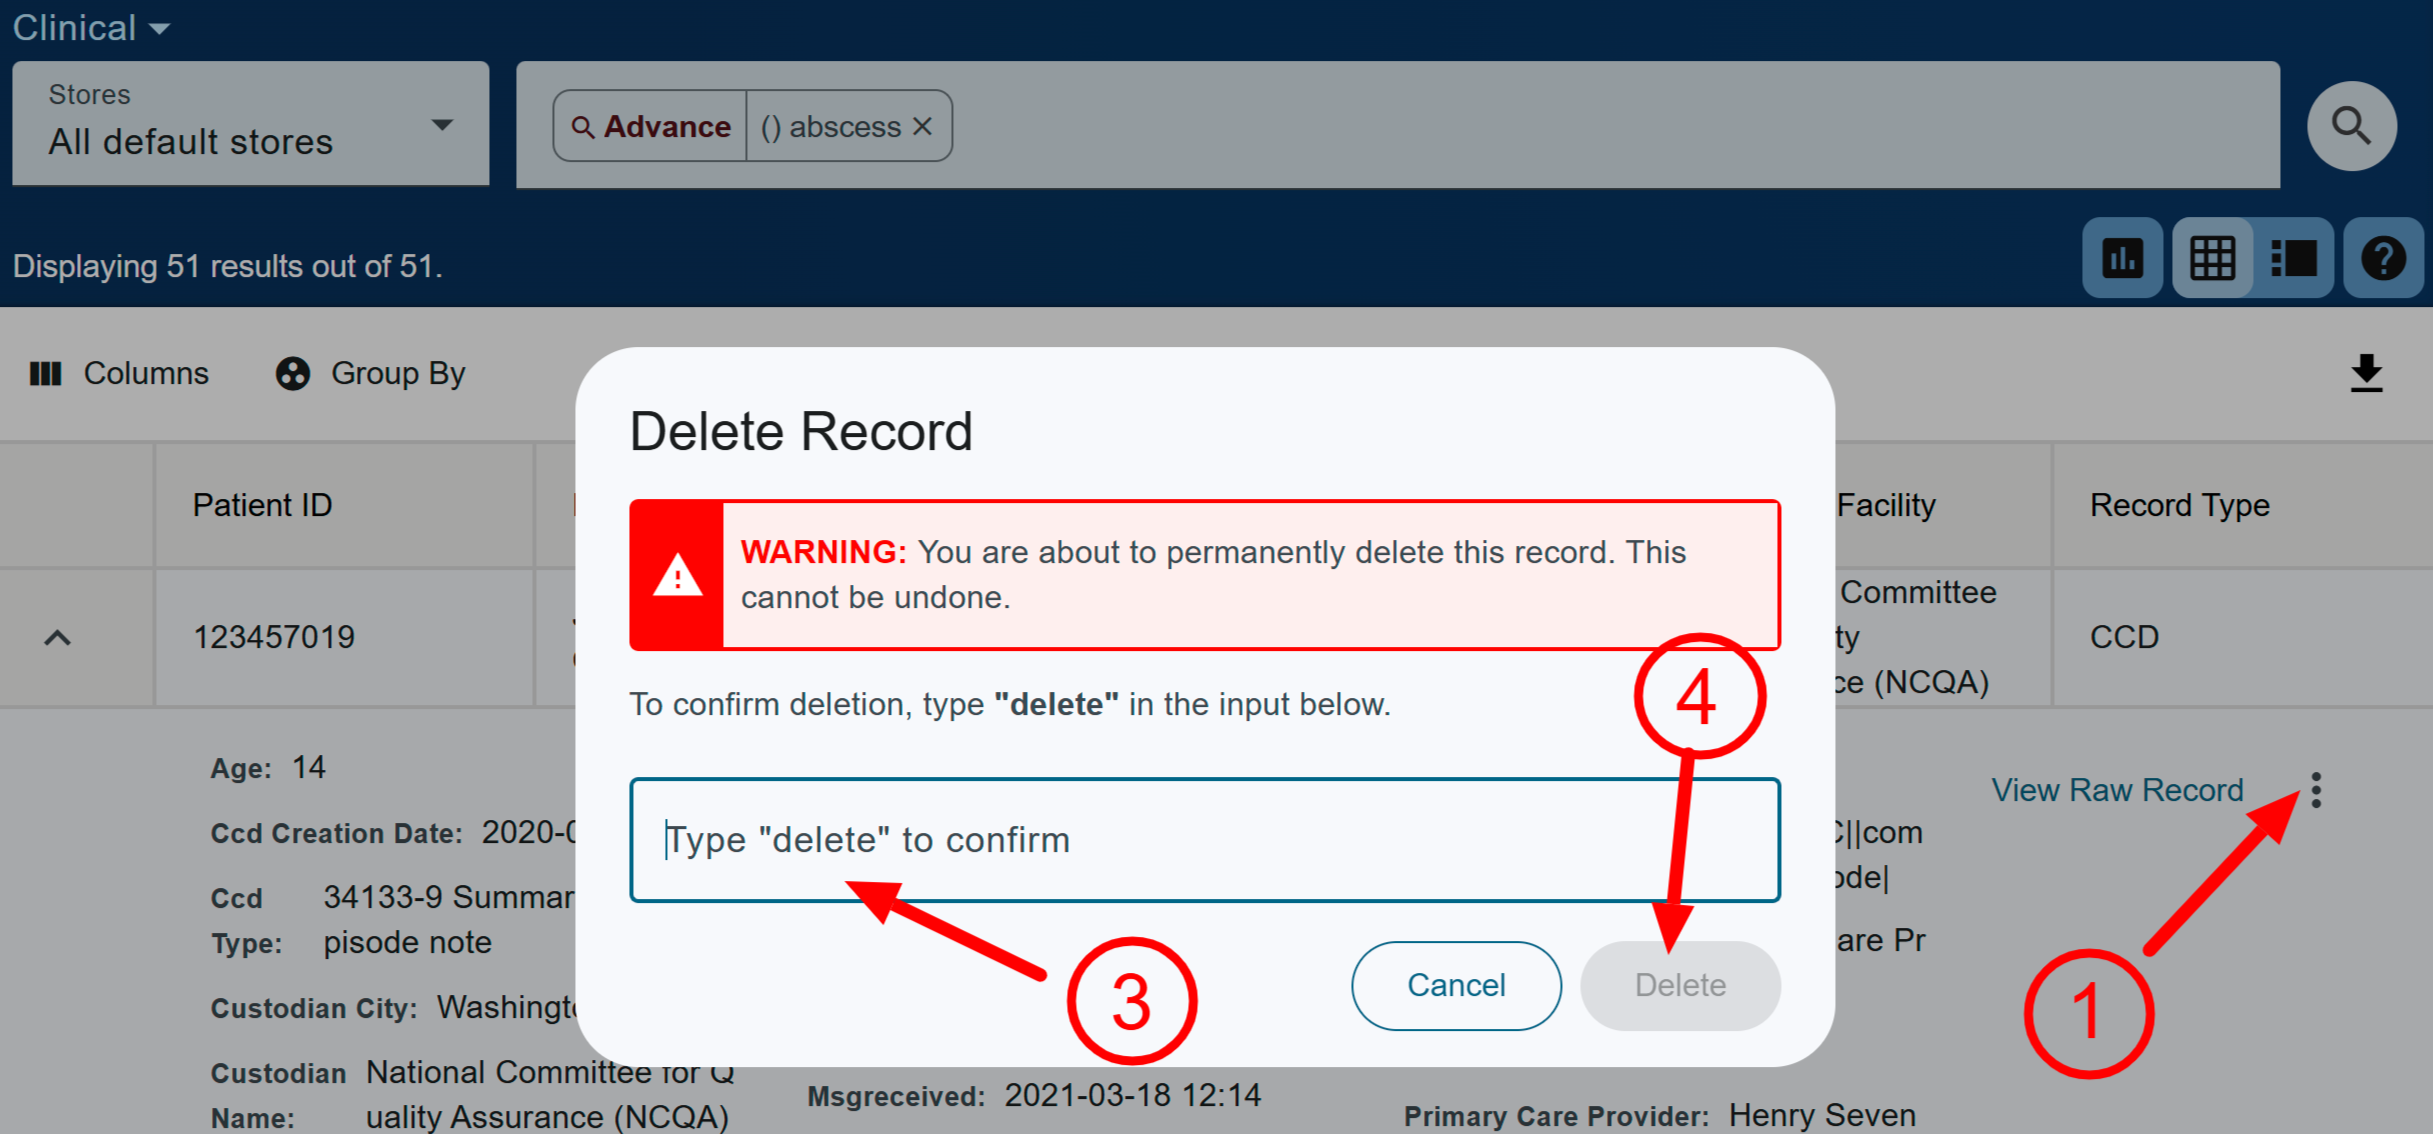
Admins can delete records from Search while in Table view:
On the right of the expanded record, click .
Click Delete Record.
Verify you want to delete the record by typing delete in the provided field.
Click .
 Click on the image to zoom.
Additional Links
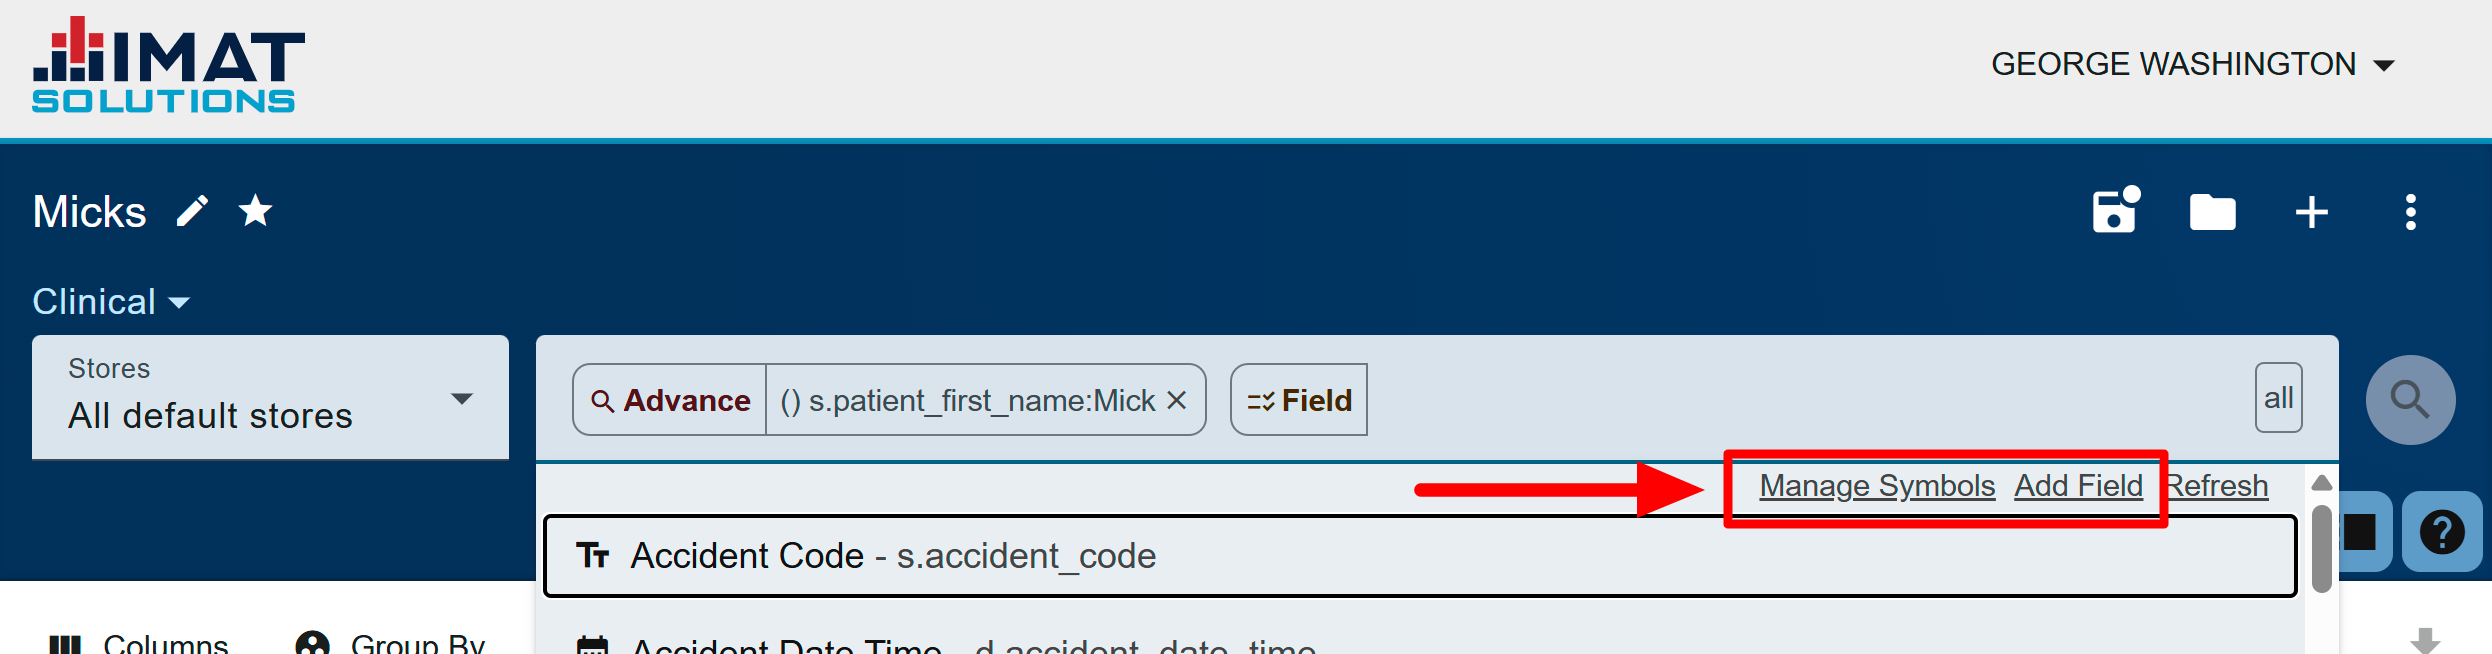
Admins have additional links found beneath the builder bar. They aid with managing searches. Links include:
Manage Symbols: takes you to the Admin Symbols page
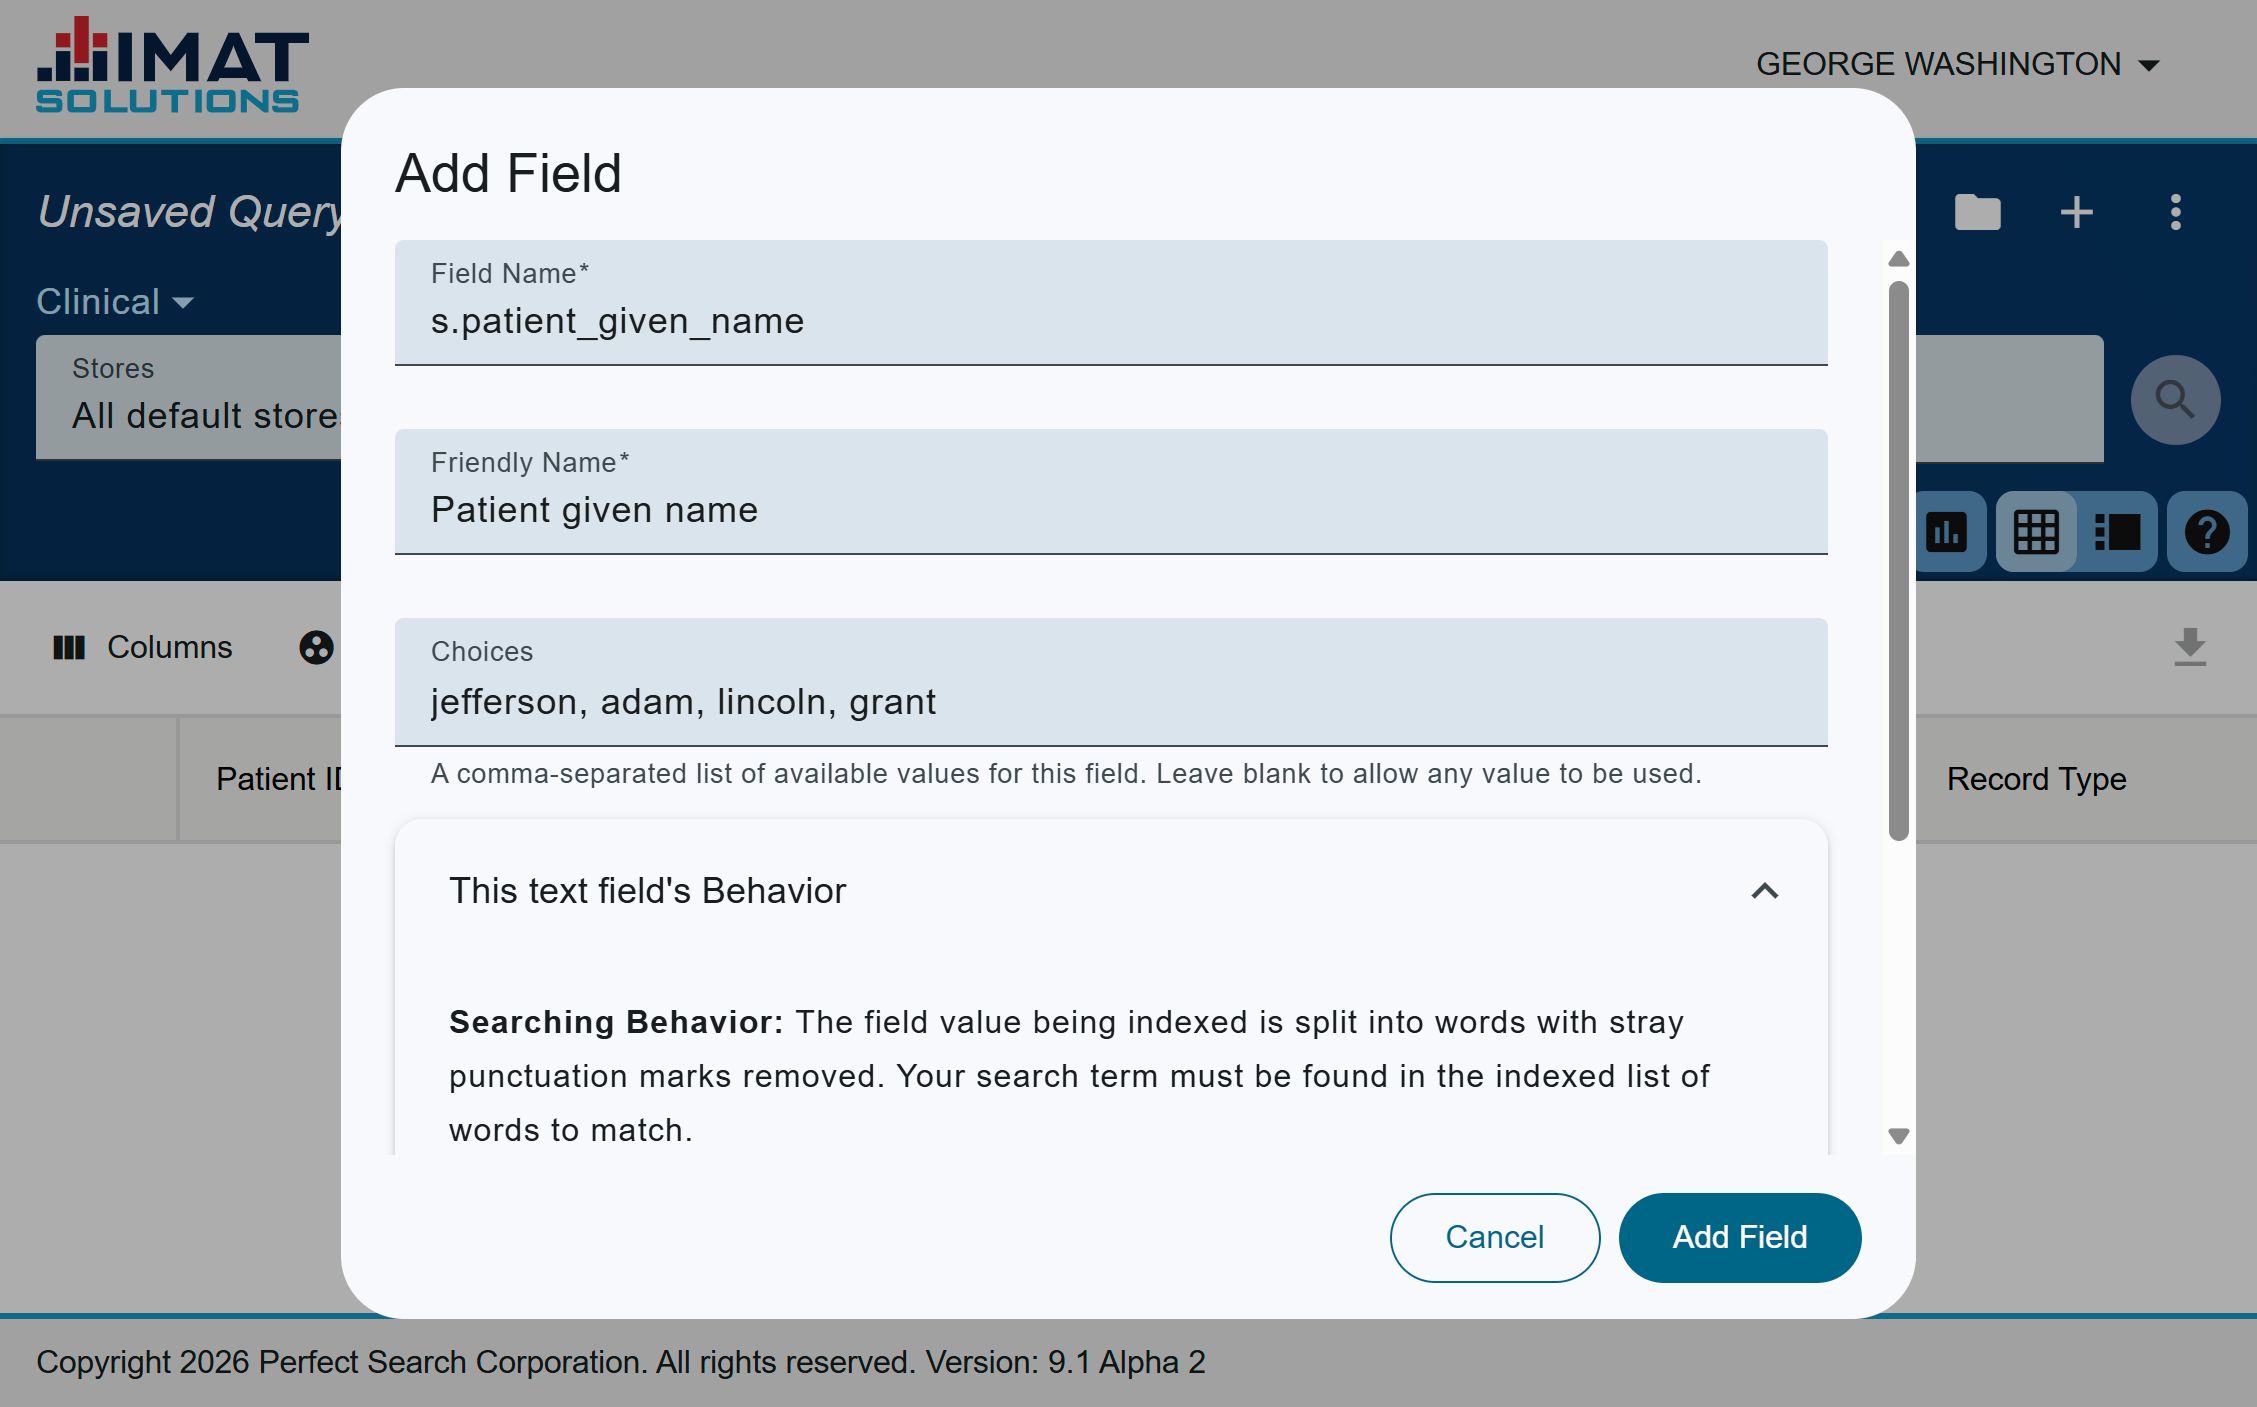
Add Fields: opens a dialog for creating new fields
Manage Sets: takes you to the Admin Set Definitions page
 Click on the image to zoom.
Add fields
Add new fields to the fields.xml file for searching.
Select Field from the query builder bar.
Click Add Fields that appears below the builder.
Enter the Field Name. Names should meet the following criteria:
Begin with the prefix: s. (string), d. (datetime), n. (number), h. (hierarchy), or v. (value)
The name should match something that is likely to be indexed
Enter a Friendly Name. Descriptions are limited to 100 characters.
Enter the Choices. This field only appears when string and value field names are provided. Enter a comma-separated list for valid choices. The choices appear as a drop-down when building a query with the new field.
Check the field’s Behavior. When expanded, it’ll tell you what rules the search server would follow when it indexes a field like that. Verify this is how you expect the search to behave. You cannot change this behavior other than choosing another prefix.
Click .
 Click on the image to zoom.
Sharing
Admins can share with all users and groups, while searchappliance_search users are limited to users and groups they belong to.