Certain specific tasks can only be accomplished by editing the configuration files displayed on the Configuration screen.
WARNING
Other than the modifications specifically explained in this document, you should make no modifications to any other files in this directory unless told to do so by a support technician.
Click on image to zoom
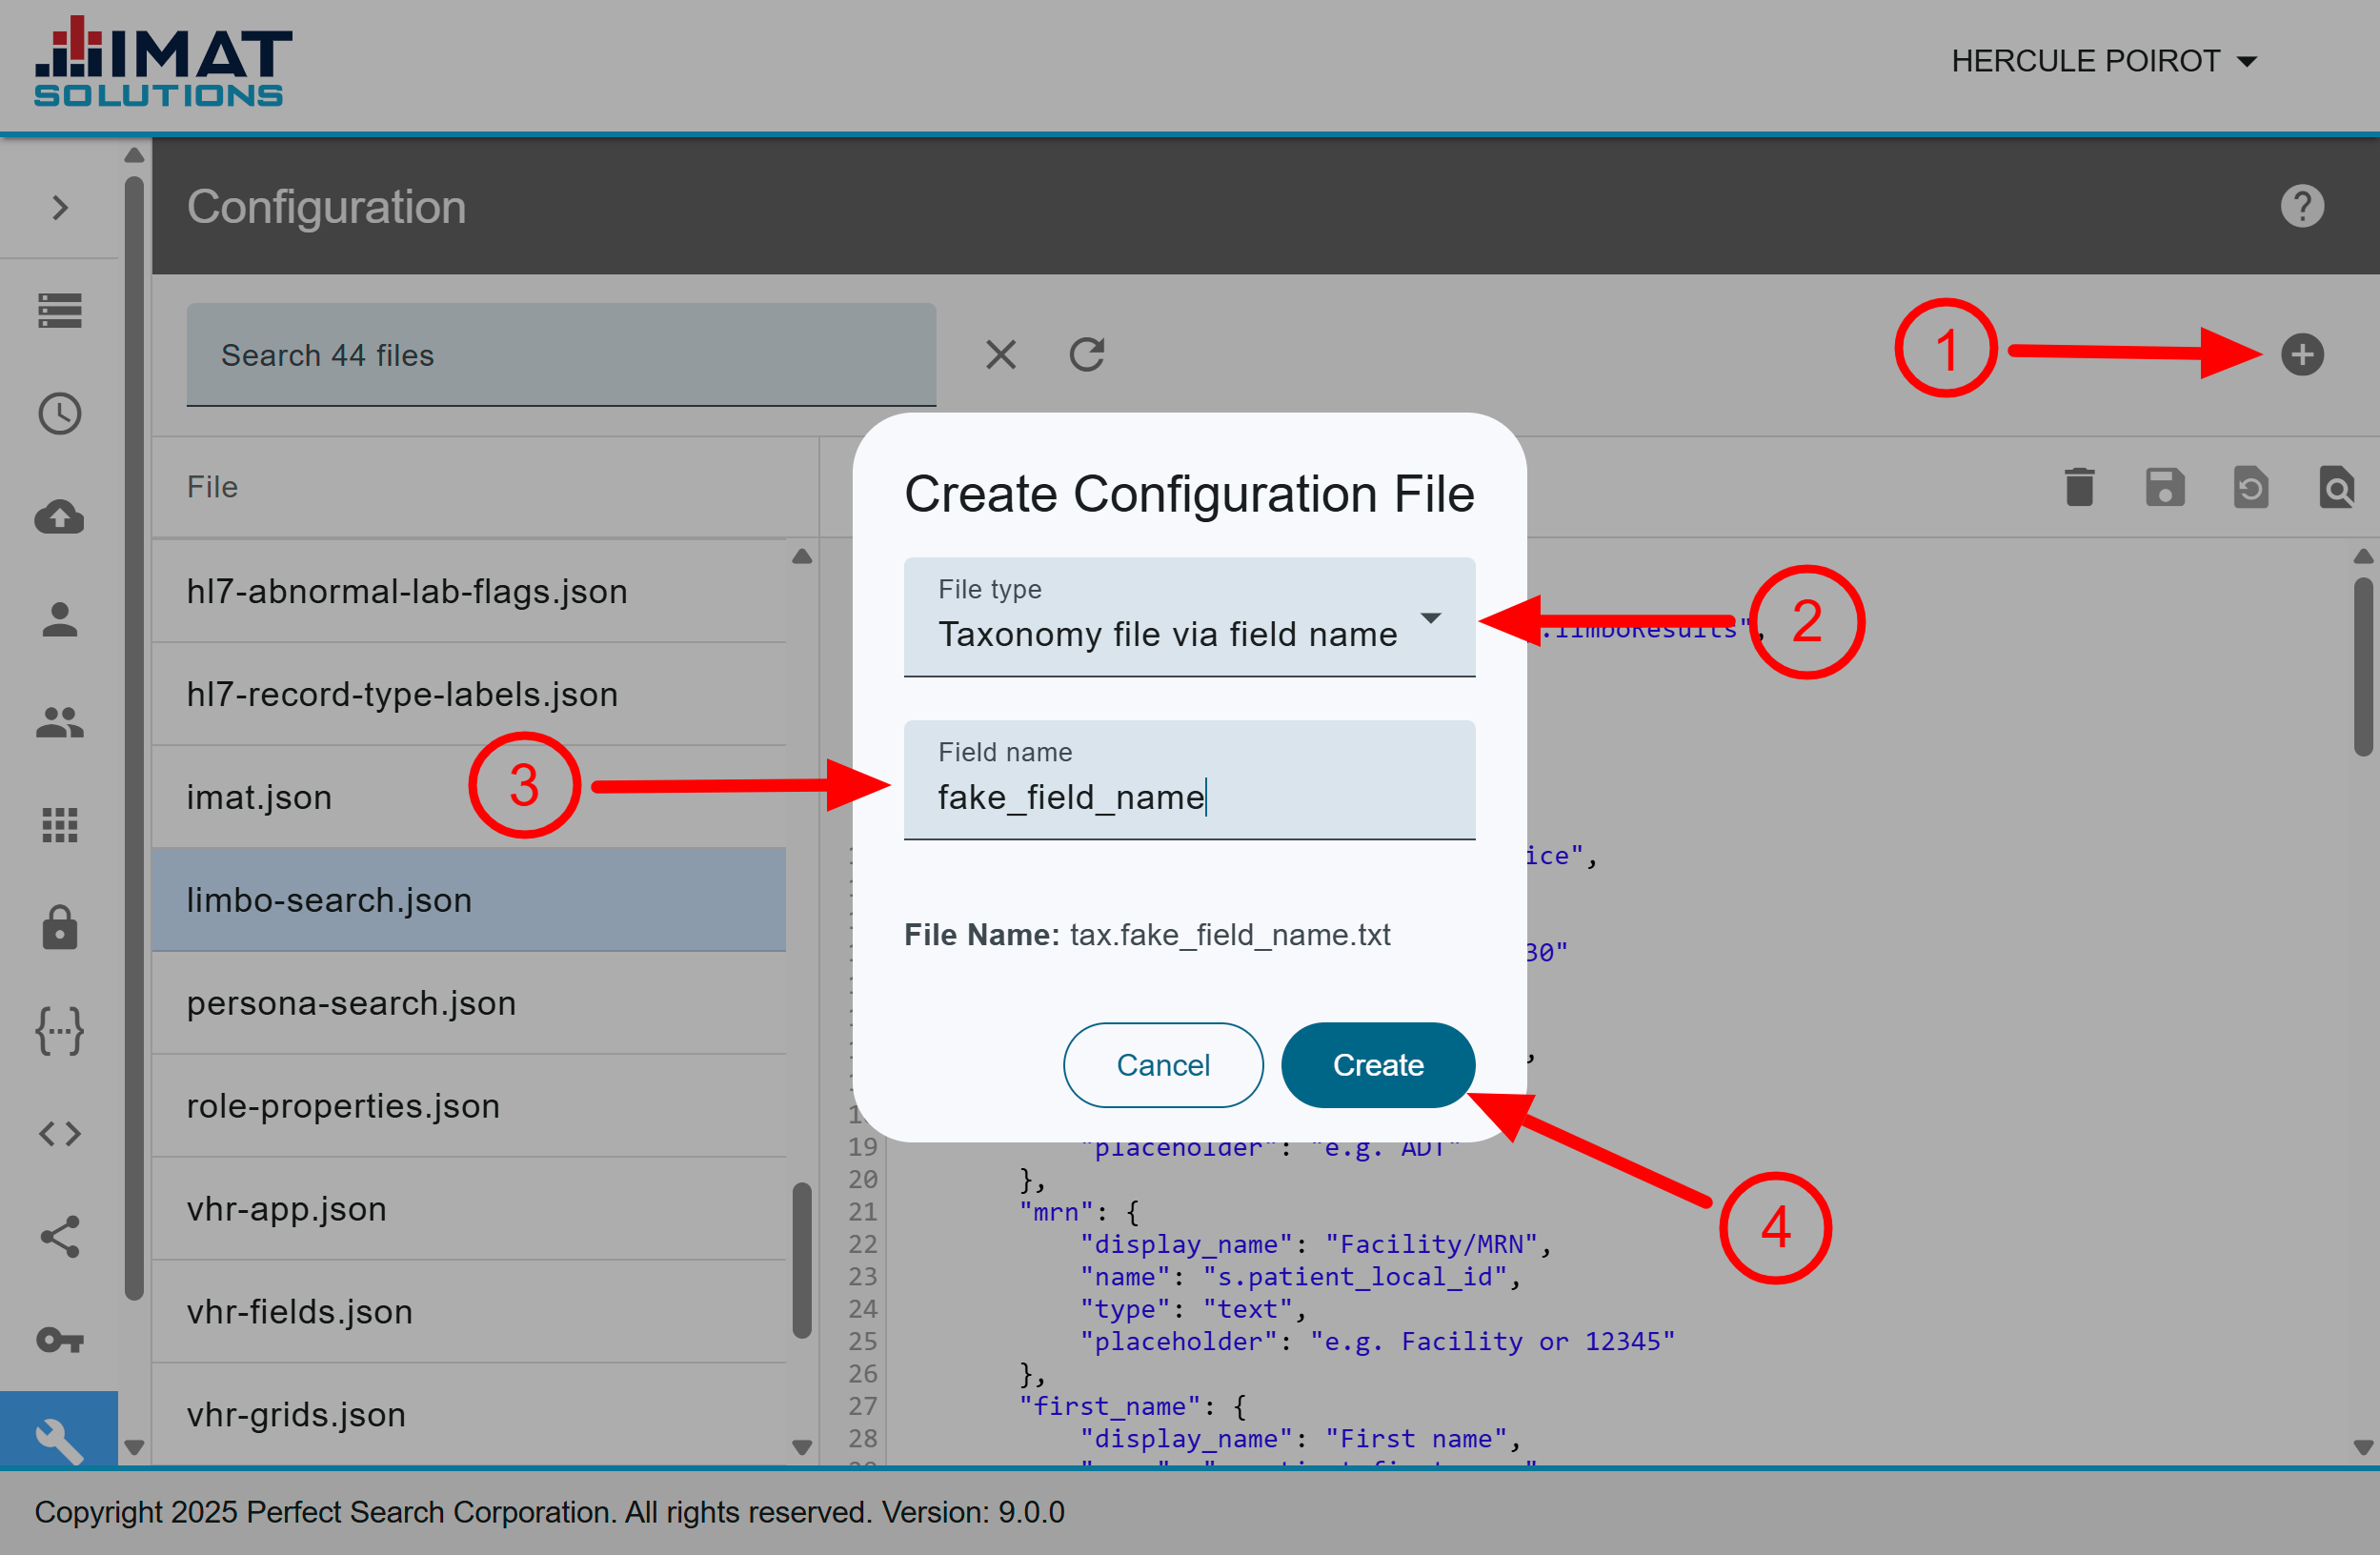
Create a New File
Follow these steps to create a new configuration file:
Click .
Choose the file type:
Taxonomy File via Field Name.
Taxonomy File via Store.
QuickTable File.
Choose the store or enter the field name, depending on your choice in Step 2. The File Name automatically generates; you cannot change it.
Click .

Click on image to zoom
Configuration
Each configuration change requires, at the very minimum, the three steps below. If more steps are needed, additional information is given with the configuration instructions.
Find the file from the Search input field or scroll through the list on the left.
Make the change or changes.
Press or use the keyboard shortcut ctrl+S (PC) or cmd+S (Mac).
Search Within Files
Click on the file from the file list.
Click anywhere in the text area.
Press , or Ctrl+F (PC), or Cmd+F (Mac) on your keyboard to search for a keyword.
Click Enter on your keyboard to cycle through all the hits for your search.
If you click on a word in the editor, all occurrences of that word are highlighted in yellow.
Reload Files
Clicking without saving the file reloads the file to the original settings.
Click on image to zoom
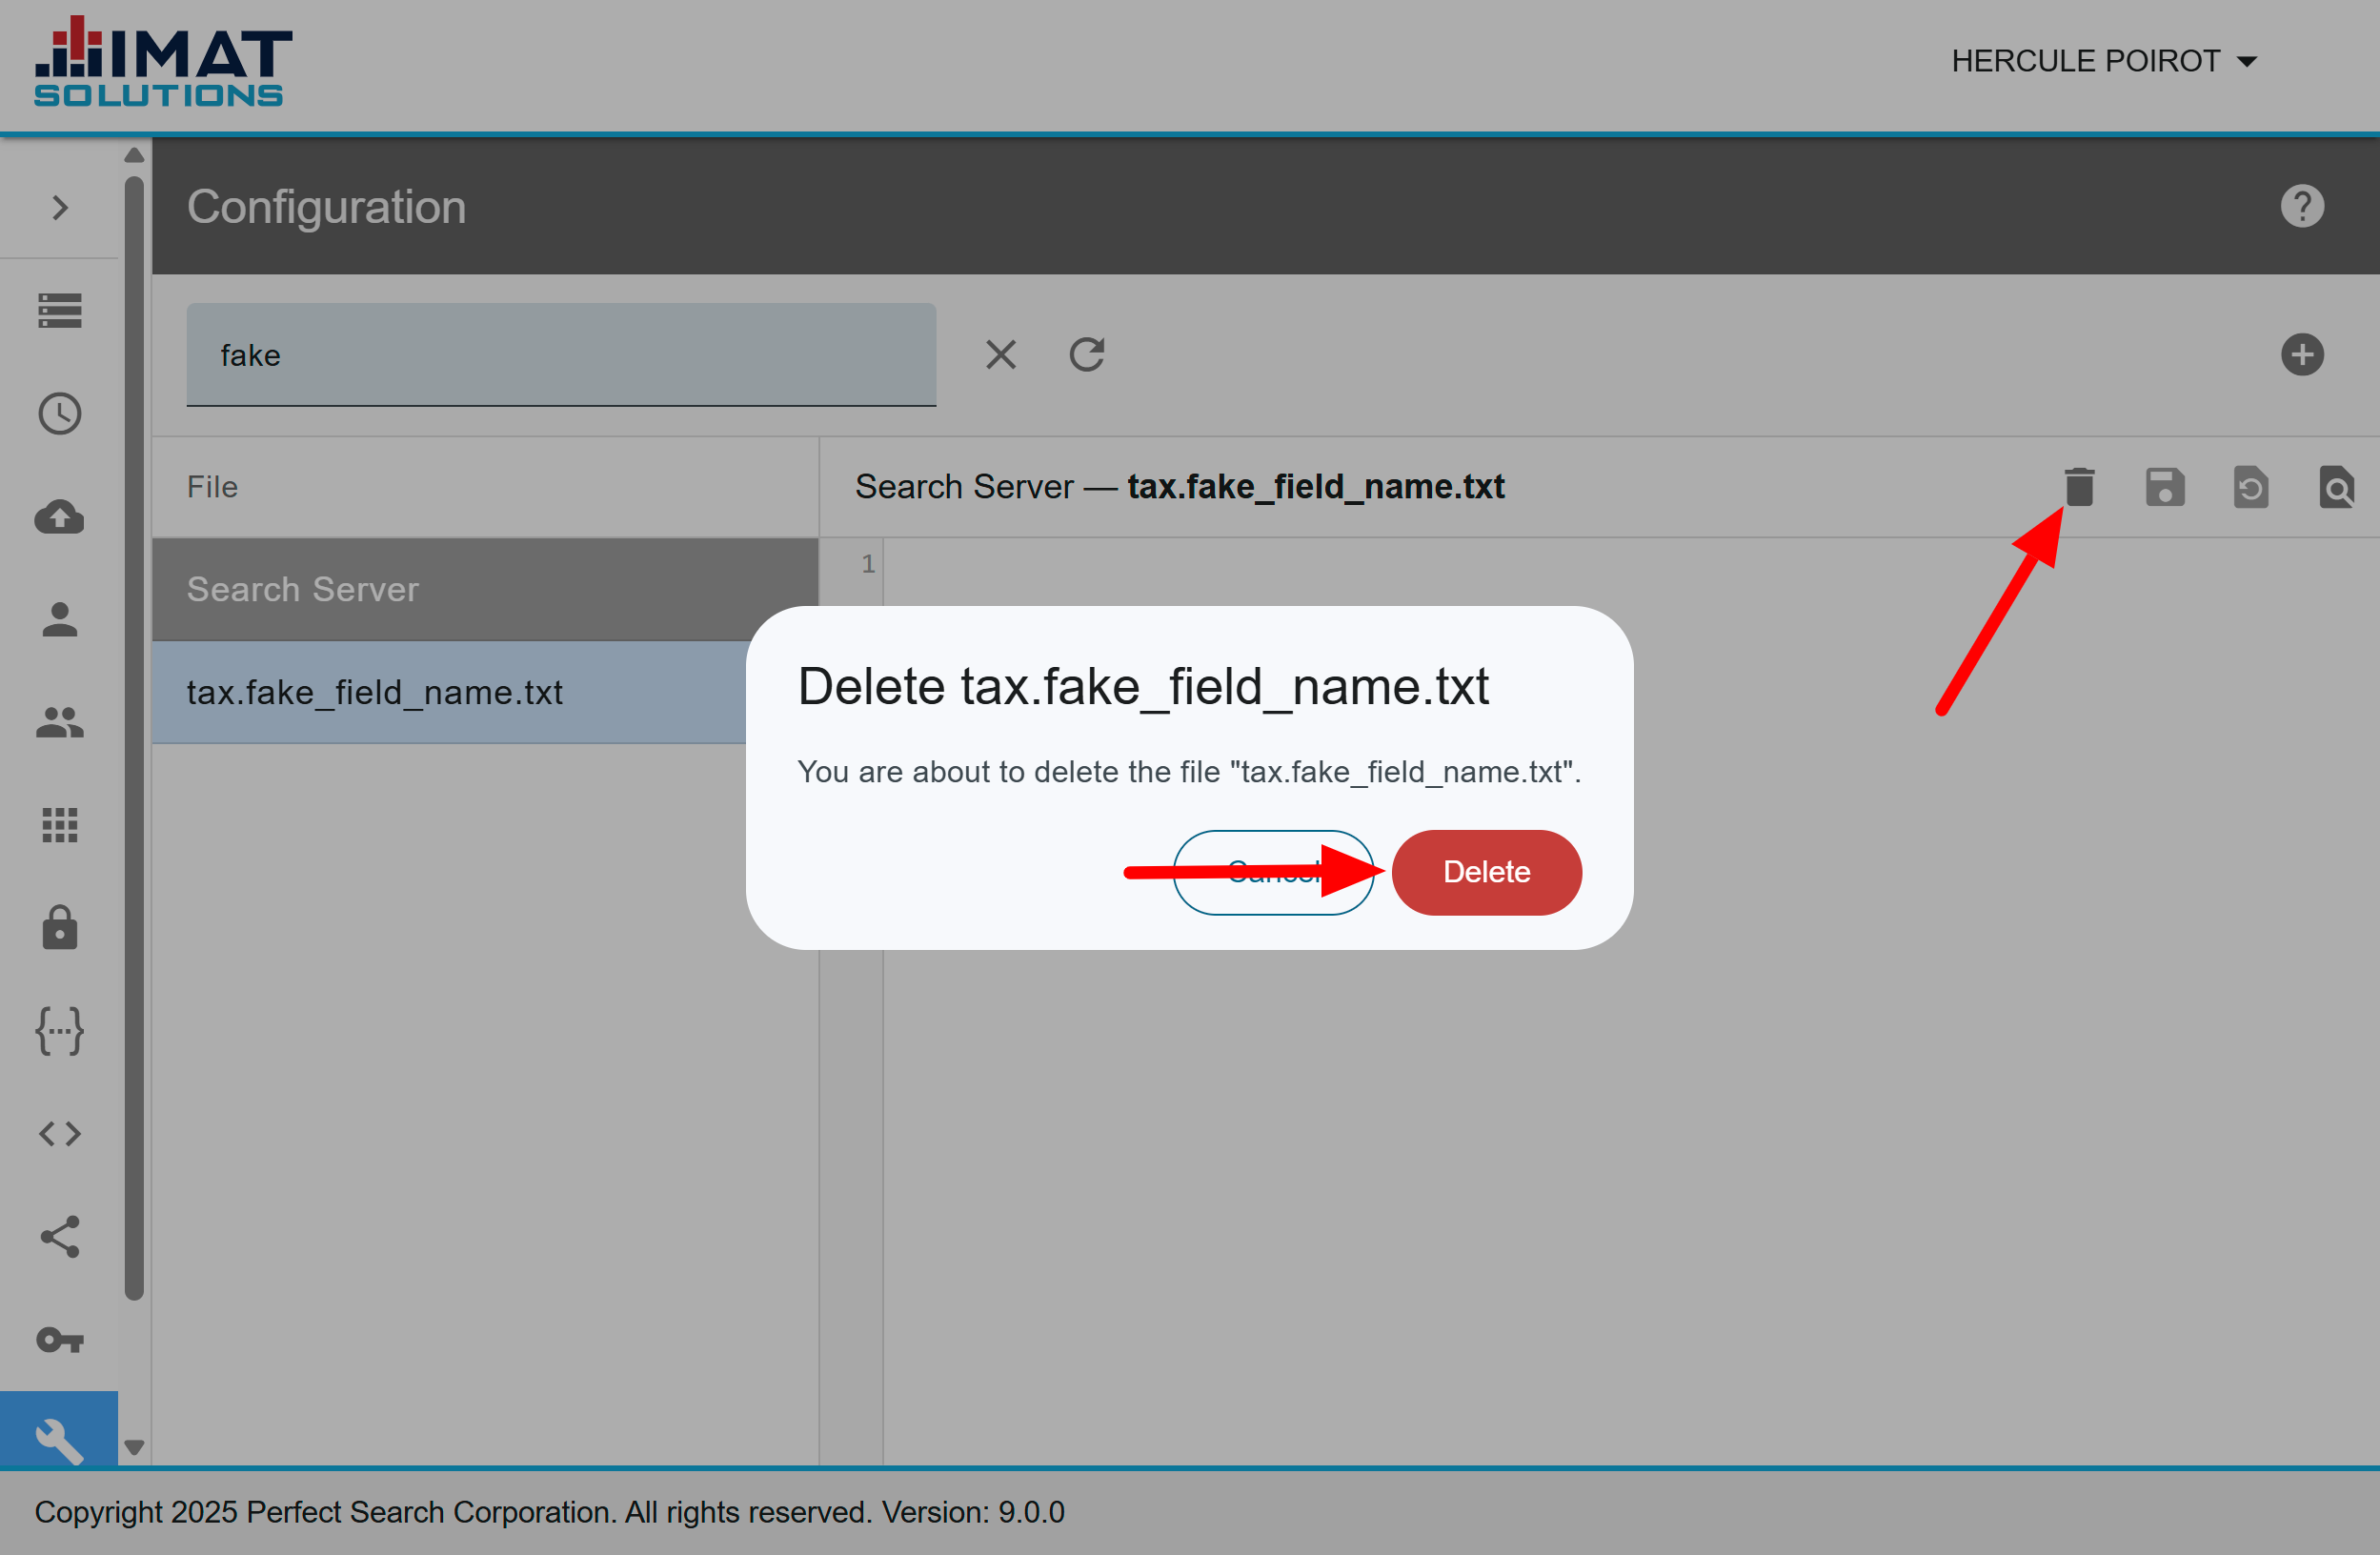
Delete Files
WARNING:
Be cautious when deleting a file. Depending on the file, queries, reports, IMAT applications, and links could all be negatively impacted when a file is deleted. Review each file carefully before deleting.
To delete a file that is no longer needed, follow these steps:
Locate the file.
Click .
Click to confirm you want to delete the file.
Click to acknowledge the message. Some deleted files may not require this step.
Depending on the type of file deleted, you may need to contact professional services after deleting the file.
Stop Words
Stop word files contain a list of words that the search interface ignores unless used as part of a quoted phrase. These include words such as if, the, it, to, and so forth.
One example of a default stop word you might want to edit is the word will. It is included as a stop word because it is most commonly used as an auxiliary verb. For example, "I will go tomorrow." However, if a user searches for this word as a noun, such as "He put his nephew in his will," it is still ignored. While keeping will and similar words in the stop words file increases efficiency, removing these words improves search accuracy. Review the list of words in the file, and add or remove words as necessary.
Depending on your configuration, stop word files might be available for multiple languages.
To edit stop word files, follow the steps below:
In the Navigation menu, click Configuration, then select <language_code>-stopwords.txt from the menu.
Review the words in all available files and add or remove words as necessary by typing or deleting in the list of words provided.
Click .
The ps-search-ui service must be restarted for changes to take effect. Contact professional services to restart it.
Search Stores
A search store contains a set of searchable data and helps organize data. It is possible to limit data searches to a single search store. Organizing your data into search stores also allows you to delete a single search store rather than deleting individual records or all data. This is especially useful if there is a set of data that you want available for only a limited time.
Search stores must be set up before data is indexed. When setting up search stores, choose from one of the four existing files that house search stores and store groups:
SearchServer-audit.conf: audit logs
SearchServer-aux.conf: auxiliary data--such as attestations, subscriptions, limbo records, medcodes
SearchServer-clinical.conf: clinical record data
SearchServer-mpi.conf: MPI data
Create New Search Stores
In the Navigation menu, click Configuration, then select the desired SearchServer conf file from the menu.
Locate the lines that list the spaces. They'll look similar to this:
Text
space-1 = records
space-2 = labs
space-3 = adts
At the end of the list, type the new store number and store name, e.g., space-32 = searchstorename. The store number must begin with
space-. Do not duplicate the store number or name across the different files. Only lowercase alphanumeric characters, periods, or hyphens are recognized. When using the store in a query or report, use the store name, not the store number.Locate the line similar to
job-cgi = commitindex=2&periodsec=90(the commit index number may be different), and add an incremented line for the new search store using the new space number assigned; for example, job-cgi = commitindex=32&periodsec=90. This tells the server to automatically commit all new records every 90 seconds.Click .
The ps-searchserver service must be restarted for changes to take effect. Contact professional services to restart it.
Create Groups of Stores
There are times when the same stores are repeatedly combined in queries. If this is the case, it may be more beneficial to create a group that contains multiple stores. After store groups are created, instead of typing multiple stores each time, the user can enter only the store group name. To create the group, follow the steps below:
In the Navigation menu, click Configuration, then choose the desired SearchServer conf file from the menu.
Locate
store-groups {...}. In most cases, this exists with IMAT codes and AuditLogs as default groups. Ifstore-groupsdoes not exist, add it.Set the store group name equal to the predefined space names (not the space numbers) within the {}. Do not duplicate store group names across the different search server files.
Text
store-groups {
   ...
  AuditLogs = auditLog2016, auditLog2017, auditLog2018, auditLog2019, auditLog2020, auditLog2021, auditLog2022, auditLog2023, auditLog2024, auditLog2025
}
Click .
The ps-searchserver service must be restarted for changes to take effect. Contact professional services to restart it.
Exclude Stores from Searches
Currently, in IMAT applications where selecting All stores is an option for queries, you are selecting all stores except those specified in the SearchServer conf file. Generally, stores are excluded if they do not include medical information, such as the audit log stores, or are specific to an IMAT application, such as MPI.
Locate the desired SearchServer conf file.
Locate
exclude-stores.Create a comma-separated list of all stores you want excluded from searches. You must use the store number and do not exclude stores across the different conf files.
Text
# Specify default search stores to be included and excluded (used when no search store is specified in the query)

# if include-stores is absent, the default is all minus the exclude-stores list
# exclude-stores = 2,3

exclude-stores = 1000,1002,1100,1101,1102,1103,1110,1120,1130
Click .
The ps-searchserver service must be restarted for changes to take effect. Contact professional services in order to restart it.
Help Links
Help can be accessed through the user menu or by clicking found below the user name. By default, clicking on the links opens documentation delivered with the IMAT appliance. However, if the need changes, you can link that help to another location. Every time "customerHelpLink": "/ui/documentation/", is found, a custom link can be inserted. Ensure you've located the correct page for customization, as there is a line for each page as well as the User Menu. Follow the steps below to change the link. Remember, proper JSON syntax must be used.
Locate and open imat.json.
Locate the line
"customerHelpLink": "/ui/documentation/",.Replace the link with the desired location. Remember to include the quotation marks and the comma at the end of the line.
Relative links point to other locations on the IMAT appliance and do not need the full URL: /ui/documentation/#/reports/overview.
Absolute links point to any location outside of the appliance and require the full URL: http://www.thisisthebestwebsiteever.gov/a/myfavoritepage.
Repeat for each link that needs updating.
Click .
You may need to restart the imat-api service for changes to take effect.
Session Handler Timeout
If a user is inactive for too long after logging in, the system times out, and the user is required to log in to his or her account again. Adjusting the timeout in the session handler changes the amount of time a user has before he or she is logged out.
Locate api.json.
Change the value for
"sessionTimeoutInMinutes".Click .
Maintenance Mode
You can prevent all users except administrators and script writers from logging into the system. When maintenance mode is enabled, users receive a message saying that the system is under maintenance and to try again later.
Set the system to maintenance mode by using the following steps:
Locate api.json.
Change
"maintenanceMode"value to"true".Click .
Once your scheduled maintenance has been completed, return the value to "false".
MPI Gender Field Options
It is possible to change the gender labels as they are displayed on the MPI Lookup form or the MPI Limbo lookup form. Keep in mind as you are formatting these fields that the "value" is directly related to the specified field as it is alphanormalized when the data is consumed into the search server and must match that information; therefore, it should not be changed. However, if you find that you have more gender options in your data than found in the drop-down list, you can add the corresponding "label" to the form. Correct JSON syntax must be used.
Locate the persona-search.json or limbo-search.json file.
Find
"options"in the"gender"code block.Enter the labels as you'd like them to appear on the MPI lookup form.
JSON
"gender": {
  "display_name": "Gender",
  "name": "s.patient_sex",
  "type": "select",
  "options": [
    {
      "value": "male",
      "label": "Male"
    },
    {
      "value": "female",
      "label": "Female"
    }
  ],
  "placeholder": "e.g. male"
},
Click .
Contact professional services to apply your changes to the server.
Note, unless you have received training, don't change anything else in the file.
PHI Access
Some of IMAT's tools require permission to view PHI. By default, the software allows only administrators to view those tools; however, the permissions are configurable to meet needs. The below code, named phi_access.json, is the default delivered with the IMAT software:
WARNING:
Comments, indicated by //, are not valid in the actual JSON file and are here for instructional purposes only.
JSON
{
  "accessTimeout": "1440", // This is the number of minutes access is allowed before access expires.
  "sessionOnly": true, // This is a Boolean which controls whether or not to clear attestations on new logins; a missing property is treated as false.
  "workflow": { // Each configuration block is nested under a root property of the object called "workflow". The child properties of "workflow" are the step names. Each step name may be any valid string except for reserved names. Currently the only reserved name is "Start".
    "Start": { // This is required.
      "actions": { // This is required.
        "confirm": true, // True successfully exits the workflow and allows the user to see PHI. The other option is to send the user to the next step of the process. See #/advanced/admin/configuration#phi-options for more examples.
        "reject": false // False unsuccessfully exits the workflow and blocks the user from viewing PHI.
      },
      "groups": ["searchappliance_system"], // This is an array of groups that are allowed to see PHI.
      "type": "GroupCheck" // This checks the groups property (an array of groups) against the user's groups. If a user belongs to any of the groups in the array, action.confirm is automatically executed. If no groups match, action.reject is automatically executed.
    }
  }
}
Those with the proper access and knowledge can also access the file at /opt/search/default/conf/phi_access.json.
As mentioned above, the file can require users to read attestation agreements, choose to accept or decline the disclaimer, give the user options from a list, etc. Below is an example of a file with various blocks of attestation. Follow the code below to see how one block flows into another until all of the desired checks are complete.
JSON
{
  "accessTimeout": "1440",
  "initialAttestationMetadata": { // Sets up which properties will be accepted and what their default values are.*
    "attested_patient": null,
    "broke_glass": null,
    "modified_consent": null,
    "view_bh": null
  },
  "workflow": {
    "Start": {
      "actions": {
        "confirm": "PatientConsentYes",
        "reject": "AccessReason"
      },
      "groups": ["requires_consent_group"],
      "type": "GroupCheck"
    },
    "AccessReason": {
      "actions": {
        "confirm": true,
        "reject": false
      },
      "content": {
        "title": "Access Reason",
        "body": {
          "type": "text",
          "value": "Why are you accessing this data?"
        },
        "input": {
          "type": "text",
          "options": []
        },
        "btn_confirm": {
          "label": "Submit"
        },
        "btn_reject": {
          "label": "",
          "visible": false
        }
      },
      "type": "Prompt"
    },
    "PatientConsentYes": {
      "actions": {
        "confirm": "Redisclosure1",
        "reject": "BreakTheGlassGroupCheck"
      },
      "compare": {
        "operator": "==",
        "query": "()mpid:{mpid}",
        "value": "Y",
        "field": "consent",
        "store": "Consent"
      },
      "type": "QueryCheck" // This allows a custom query to run.**
    },
    "Redisclosure1": {
      "actions": {
        "confirm": "Redisclosure2",
        "reject": false
      },
      "content": {
        "title": "Redisclosure 1",
        "body": {
          "type": "text",
          "value": "First redisclosure message."
        },
        "input": {
          "type": "none",
          "options": []
        },
        "btn_confirm": {
          "label": "Ok"
        },
        "btn_reject": {
          "label": "",
          "visible": false
        }
      },
      "type": "Prompt" // This allows custom questions to be asked to the user.***
    },
    "Redisclosure2": {
      "actions": {
          "confirm": true,
          "reject": false
      },
      "attestationMetadata": {
        "confirm": {
          "attested_patient": true,
          "modified_consent": true
        }
      },
      "content": {
        "title": "Redisclosure 2",
        "body": {
          "type": "text",
          "value": "Second redisclosure message."
        },
        "input": {
          "type": "none",
          "options": []
        },
        "btn_confirm": {
          "label": "Ok"
        },
        "btn_reject": {
          "label": "",
          "visible": false
        }
      },
      "type": "Prompt"
    },
    "BreakTheGlassGroupCheck": {
      "actions": {
        "confirm": "PatientConsentEmergency",
        "reject": "IsPatientMinor"
      },
      "groups": ["BreakTheGlass"],
      "type": "GroupCheck"
    },
    "PatientConsentEmergency": {
      "actions": {
        "confirm": "BreakTheGlassPrompt",
        "reject": "IsPatientMinor"
      },
      "attestationMetadata": {
        "confirm": {
          "broke_glass": true,
          "view_bh": true
        },
        "reject": {
          "broke_glass": false,
          "view_bh": false
        }
      },
      "compare": {
        "operator": "OR",
        "query": "()mpid:{mpid}",
        "value": ["U", "E"],
        "field": "consent",
        "store": "Consent"
      },
      "type": "QueryCheck"
    },
    "BreakTheGlassPrompt": {
      "actions": {
        "confirm": "Redisclosure1",
        "reject": "IsPatientMinor"
      },
      "content": {
        "title": "Break the Glass",
        "body": {
          "type": "text",
          "value": "Do you want to break the glass?"
        },
        "input": {
          "type": "none",
          "options": []
        },
        "btn_confirm": {
          "label": "Yes"
        },
        "btn_reject": {
          "label": "No",
          "visible": true
        }
      },
      "type": "Prompt"
    },
    "IsPatientMinor": {
      "actions": {
        "confirm": "ParentalConsentGroup",
        "reject": false
      },
      "compare": {
        "operator": "==",
        "query": "()mpid:{mpid} ()d.patient_date_of_birth:[TODAY-18Y TO TODAY]",
        "value": "1",
        "field": "{count}",
        "store": "1101"
      },
      "type": "QueryCheck"
    },
    "ParentalConsentGroup": {
      "actions": {
        "confirm": "ParentalConsentPrompt",
        "reject": false
      },
      "groups": ["ParentalConsentOverride"],
      "type": "GroupCheck"
    },
    "ParentalConsentPrompt": {
      "actions": {
        "confirm": "Redisclosure1",
        "reject": false
      },
      "content": {
        "title": "Parental Consent Override",
        "body": {
          "type": "text",
          "value": "Do you want to access the records via Parental Consent Override?"
        },
        "input": {
          "type": "none",
          "options": []
        },
        "btn_confirm": {
          "label": "Yes"
        },
        "btn_reject": {
          "label": "No",
          "visible": true
        }
      },
      "type": "Prompt"
    }
  }
}
*The properties being used can be whatever you wish to assign them. However, you must assign a property to use. If you try to use a property that is not set up in the initialAttestationMetadata block, it will return an error. The attestation Metadata values get stored in the attestation record so they can be used in reports.
**The QueryCheck block allows a custom query to be executed. The results of the query are then compared to "value" using the "operator". The Query property accepts special runtime resolution variables {mpid} and {user}, along with {facility}, which resolves to {facility} portion of the user's facility_{facility} group. The order of comparison is as follows: {queryResult} {operator} {configValue}. If true, action.confirm is automatically executed. If false, action.reject is automatically executed.
***This prompt allows custom questions to ask the user. Configuration allows the placement of a text area, radio, or checkbox options for the user to enter their answer. None may be used as the input to present the user with a message that they can accept or confirm. Regardless of the user's answer, if they click btn_confirm, the action.confirm executes, and the answer is sent to the server to be logged.
GUIDs and SUIDs
These are unique identifiers. They collect a list of all the unique values encountered within a specified field. SUID (Store Unique Identifier) fields track the unique values for this field within a store. GUID (Global Unique Identifier) fields track the unique values for this field across all stores. GUID fields are most commonly used with a corresponding quicktable to enable field value-centric reports or sets (e.g., patient-centric reports).
Add SUID/GUID fields:
In the Navigation menu, click Configuration.
Go to parsetable.d/IMAT.xml or vim /opt/search/appliance5/conf/parsetable.d/IMAT.xml.
Add
Markup
<field name='patient_id' map='guid'> # or use map='suid'
    <tag name='patient_id'>
</field>
Make a corresponding entry to the QuickTables, qx.default.def or vim /opt/search/appliance5/conf/qx.default.def.
If using SUIDs, add the value to the associated quicktable for each store where this field could occur: for example, qx.0.def. The table should contain the following changes:
[fieldname str StrTable=guid]A specific example is found below. This example is adding the change to the patient_id field:
patient_id str StrTable=guidClick .
Restart the search server by contacting professional services. All changes take effect from this point forward, but changes are not retroactive.
VHR Configuration
VHR comes with five configurable files. Some elements within the files are not configurable and should not be changed. If there is any question about whether information can be changed, contact professional services. See VHR Configuration for more information.